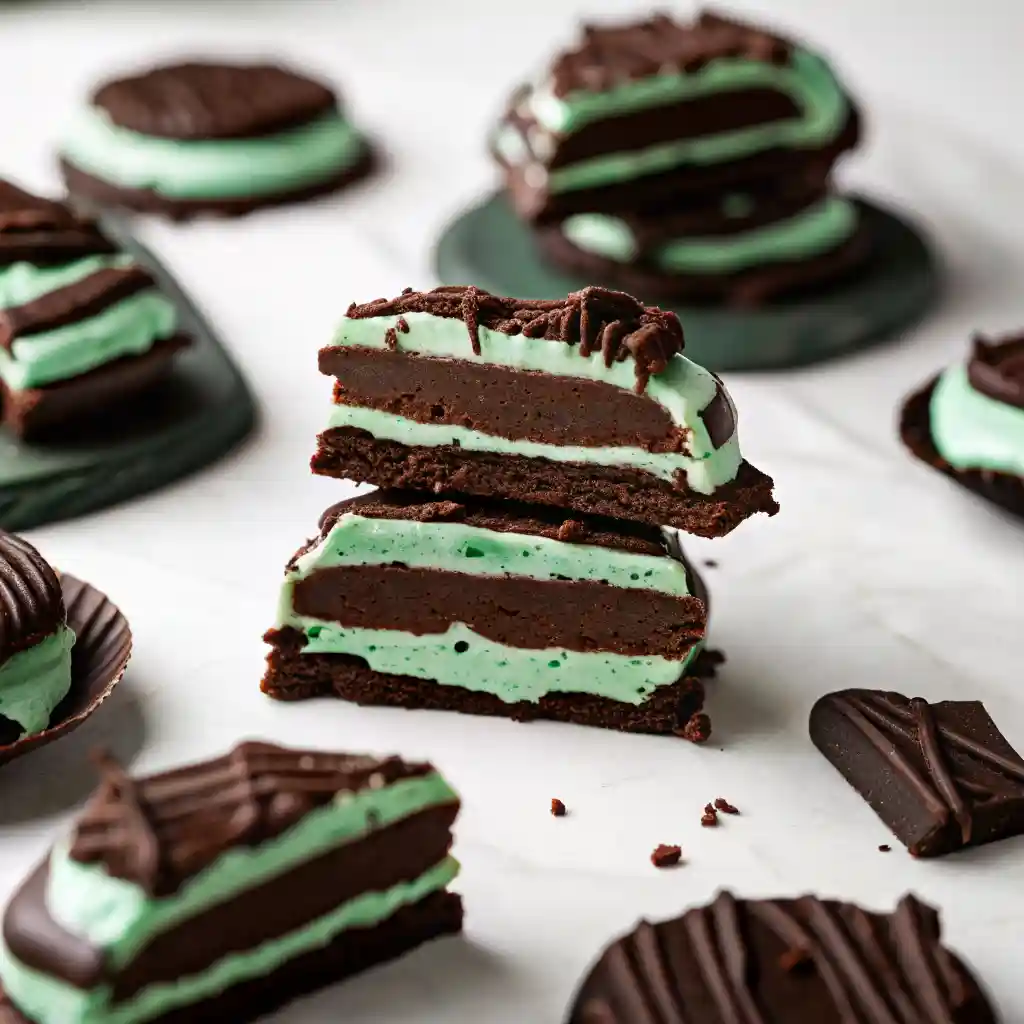
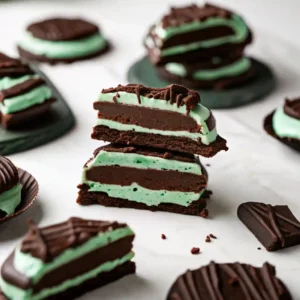
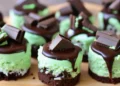
In the world of holiday confections, the pairing of deep cocoa and refreshing peppermint is a timeless tradition that signals the arrival of winter festivities. These Chocolate Mint Cookies are a masterclass in this iconic duo, featuring three distinct, indulgent layers: a chewy, fudge-like chocolate cookie base, a thick cloud of emerald-green mint frosting, and a rich, glossy chocolate ganache to seal the deal. It is a dessert designed for those who appreciate the complexity of textures, moving from a crunchy-chewy edge to a silky, melt-in-your-mouth finish.
The beauty of this recipe lies in its structural integrity and visual high-contrast. While many mint cookies rely on chips or extracts alone, this triple-layer approach mimics the experience of a high-end chocolate truffle or an “Andes Mint” in cookie form. Whether you are prepping for a Christmas cookie exchange, hosting a St. Patrick’s Day brunch, or looking for a “Luxury Dessert” to elevate your weekend, these cookies provide a professional, bakery-standard aesthetic with zero advanced equipment. Let’s explore the science of the “freezer-set” frosting and the secrets to achieving a perfectly smooth, professional-grade ganache.
Why You’ll Love This Recipe
- Exceptional Texture Contrast: You get the chewiness of a double-chocolate cookie, the creaminess of a whipped peppermint frosting, and the snappy silkiness of a dark chocolate ganache.
- Vibrant Presentation: The bright green mint layer sandwiched between two shades of deep chocolate makes these a standout on any dessert tray.
- Better-Than-Store-Bought: Unlike mass-produced peppermint treats, this recipe uses real butter and high-quality cocoa for a clean, sophisticated flavor profile.
- Make-Ahead Potential: These cookies actually benefit from chilling, meaning you can prep them a day in advance for a stress-free event.
- Highly Giftable: Once the ganache sets, these cookies are sturdy enough to be stacked and packaged in decorative holiday tins or clear cellophane bags.
Ingredient Notes & Pro Selections
The success of a layered cookie depends entirely on the stability of your ingredients. Here is what you need to know to shop like a professional.
The Cookie Base
- Unsweetened Cocoa Powder: Use a high-quality Dutch-processed cocoa if possible. It provides a darker, near-black color and a smoother chocolate flavor that doesn’t compete with the sharp peppermint.
- Unsalted European Butter: Because the base is a “fudge” style cookie, high-fat butter (like Kerrygold) ensures the crumb remains succulent and tender even after being chilled.
- Room Temperature Egg: A room-temperature egg emulsifies much more effectively with the creamed butter, preventing “greasy” streaks in the dough.
The Peppermint Frosting
- Mint Extract vs. Peppermint: Ensure you are using Peppermint Extract for that classic “cool” sensation. Avoid standard “mint extract,” which can often lean toward a spearmint flavor reminiscent of toothpaste.
- Powdered Sugar (Sifted): Always sift your powdered sugar for the frosting. Any tiny lumps will be magnified once the frosting is spread flat on the cookie.
- Green Gel Food Coloring: To achieve a vibrant “shamrock” or “holiday” green, gel coloring is essential. It provides deep pigment without the excess moisture found in liquid drops.
The Ganache Topping
- Semi-Sweet Chocolate Chips: These provide the best balance of sweetness and stability. You can also use a chopped baking bar (60% cacao) for an even glossier finish.
- Neutral Oil: A tablespoon of canola or vegetable oil added to the melted chocolate is the secret to a ganache that remains slightly soft and easy to bite through once set.
Step-by-Step Instructions
Step 1: Cream the Butter and Sugar
Preheat your oven to 350°F (175°C) and line two large baking sheets with parchment paper. In the bowl of a stand mixer fitted with the paddle attachment (or a large bowl with a hand mixer), beat the softened butter and granulated sugar together. Continue for about 3–4 minutes on medium-high speed until the mixture is pale, airy, and looks like whipped cream.
Step 2: Add Vanilla and Egg
Add the large egg and vanilla extract to the creamed base. Beat for another minute until the mixture is fully combined and smooth. Scrape down the sides of the bowl with a rubber spatula to ensure no unmixed butter remains at the bottom.
Step 3: Mix the Dry Ingredients
Sift the all-purpose flour, unsweetened cocoa powder, baking soda, and salt directly into the wet ingredients. Mix on the lowest speed only until the white flour streaks disappear.
- Pro Tip: Over-mixing at this stage will develop gluten, which will make your cookies tough and bread-like rather than chewy and fudgy.
Step 4: Bake and Cool
Roll the dough into 1.5-inch balls (about 16 uniform balls). Place them on the prepared sheets, spacing them 2 inches apart. Bake for 8–10 minutes.
- The Doneness Test: The edges should be set, but the centers should still look slightly glossy and “under-baked.” Let the cookies cool for 10 minutes on the pan, then move them to a wire rack to cool completely.
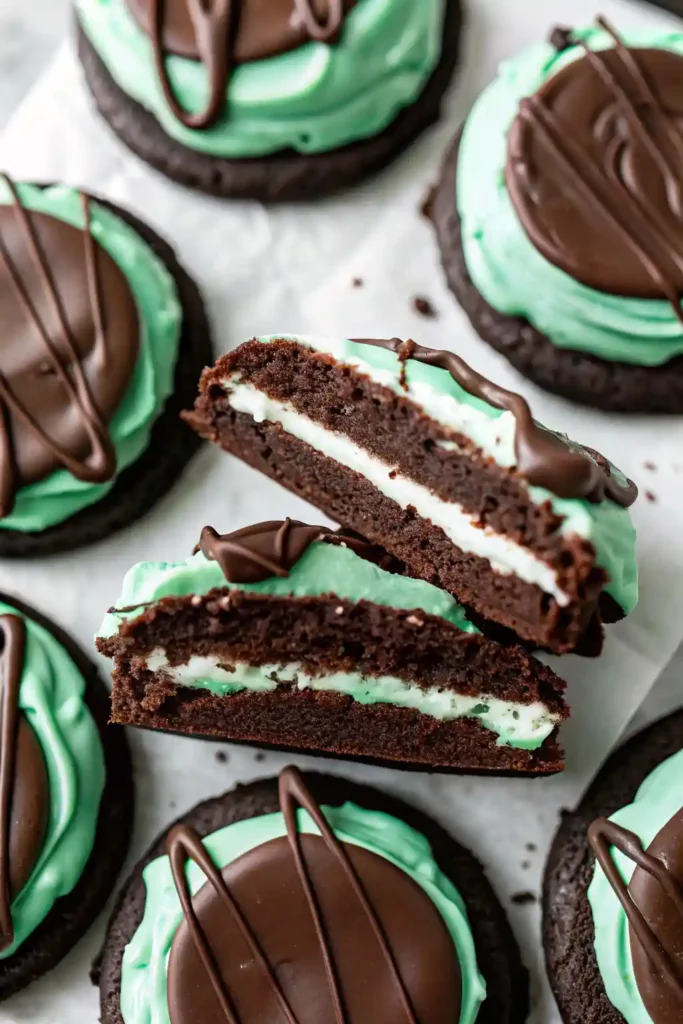
Step 5: Add the Green Frosting
In a medium bowl, beat together the powdered sugar, butter, milk, peppermint extract, and green gel coloring until smooth and fluffy. Spread a thick, even layer of the mint frosting over each cooled cookie. The Secret Move: Place the frosted cookies in the freezer for at least 15–20 minutes. Chilling the frosting until it is firm is essential for the next step.
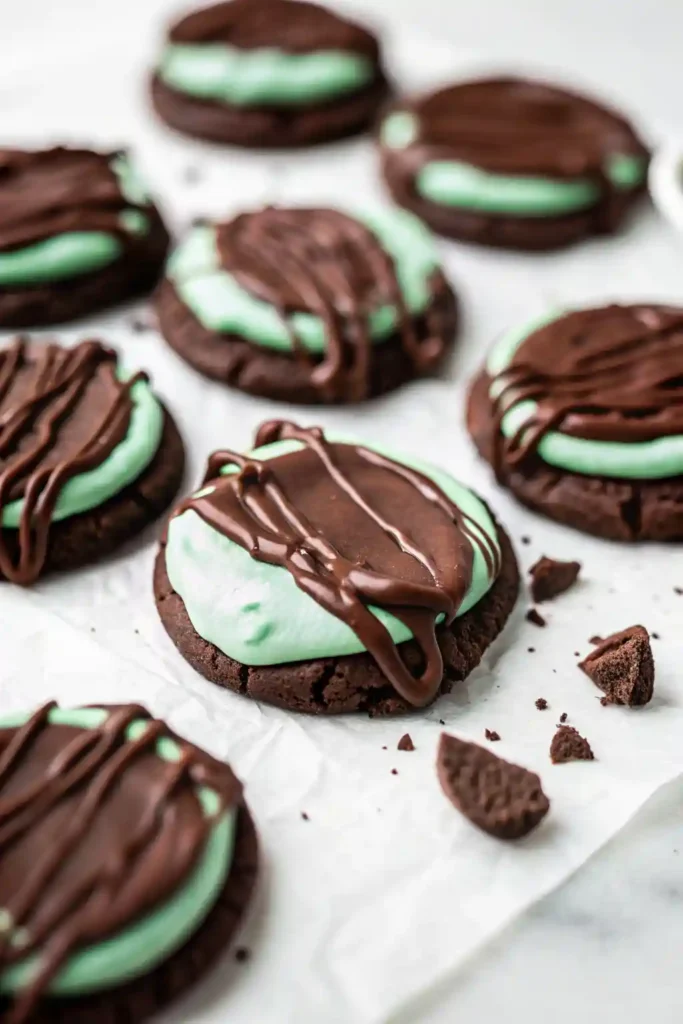
Step 6: The Ganache Finish
In a microwave-safe bowl, combine the chocolate chips and the oil. Heat in 30-second increments, stirring well after each burst, until completely melted and glossy. Spoon a tablespoon of the warm ganache over the top of each frozen cookie. The cold frosting will “stop” the warm chocolate from running off the sides, creating a perfect, professional cap. Serve immediately or let the chocolate firm up at room temperature.
Secrets to a Stable Layered Cookie
- The “Freeze Before Ganache” Rule: This is the most important technical tip. If you try to spread warm ganache over room-temperature buttercream, the frosting will melt and the two will swirl together. Freezing the frosting creates a solid “base” for the chocolate to land on.
- Room Temperature Everything: Ensure your butter for both the cookie and the frosting is truly softened. If the butter is cold, you will have to over-beat the mixture to get it smooth, which incorporates too much air and can cause the cookies to puff and collapse.
- Oil in the Ganache: Do not skip the tablespoon of oil. Without it, the chocolate will set very hard, making it difficult to bite into the cookie without the ganache shattering and falling off.
- Uniform Dough Balls: Use a medium cookie scoop! Uniform sizes ensure that every cookie in the batch is done at the exact same time, preventing some from being burnt while others are raw.
Variations and Substitutions
- White Chocolate Mint: Swap the semi-sweet ganache for a white chocolate cap. Use a 3:1 ratio of white chocolate to oil, as white chocolate is softer.
- The “Crunch” Version: Sprinkle crushed candy canes or Andes Mint pieces over the ganache before it sets for added texture.
- Dairy-Free Option: Use a high-quality vegan butter stick and dairy-free chocolate chips. This recipe adapts very well to plant-based substitutions.
- Boozy Mint: For an adult party, replace the milk in the frosting with a tablespoon of Crème de Menthe or peppermint schnapps.
Storage and Shelf Life
- Refrigerator: Because of the butter-heavy frosting, these cookies must be stored in the fridge. Keep them in an airtight container for up to 1 week.
- Freezer: These are excellent freezer cookies! Flash-freeze them on a tray for 1 hour, then stack them in a freezer-safe bag with parchment paper between layers. They will stay fresh for up to 2 months.
- Serving Note: For the best flavor, remove the cookies from the fridge 20 minutes before serving. This allows the ganache and the cookie base to soften just enough to melt on the tongue.
FAQ
Does the green food coloring affect the taste? No, gel coloring is flavorless. If you prefer to avoid artificial dyes, you can leave it white or use a natural plant-based green dye (though the color may be more muted).
Can I make the dough ahead of time? Yes! You can refrigerate the cookie dough for up to 48 hours. If the dough is cold when it hits the oven, you may need to add an extra 1–2 minutes to the bake time.
Why are my cookies flat? This usually happens if the butter was too warm (melted) or if the baking soda was expired. Ensure your butter is “cool room temperature”—it should indent when pressed but not be greasy.
Can I use mint chocolate chips instead of extract? You can, but the flavor won’t be as concentrated. We recommend sticking with the extract in the frosting for that professional “burst” of mint.
Gourmet Chocolate Mint Cookies (Triple-Layer Peppermint Recipe)
Ingredients
Equipment
Method
- Preheat oven to 350°F (175°C) and line baking sheets with parchment. Beat butter and sugar together for 3–4 minutes until pale and fluffy.
- Beat in the egg and vanilla extract until fully combined. Scrape down the bowl as needed.
- Sift flour, cocoa powder, baking soda, and salt into the bowl. Mix on low speed just until combined.
- Roll dough into 1.5-inch balls and place 2 inches apart. Bake for 8–10 minutes until edges are set and centers remain soft. Cool completely.
- Beat butter, powdered sugar, milk, peppermint extract, and green gel coloring until smooth and fluffy. Spread frosting evenly over cooled cookies.
- Place frosted cookies in the freezer for 15–20 minutes until frosting is firm.
- Melt chocolate chips with oil in 30-second intervals until smooth. Spoon ganache over frozen frosting and allow to set.

