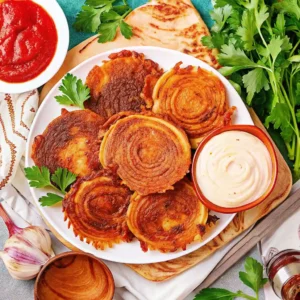
If you love the flavor of classic onion rings but crave the thin, poppable crunch of a potato chip, these Onion Ring Chips are about to become your new favorite obsession. Unlike traditional thick-cut onion rings that can sometimes be doughy or greasy, these chips are sliced paper-thin and coated in a seasoned flour-and-cornstarch crust that shatters with every bite. They are the perfect hybrid between a vegetable side dish and a salty snack, making them an ideal centerpiece for game day platters or a unique topping for burgers and salads.
The secret to achieving a restaurant-quality crunch at home lies in the preparation of the onions and the temperature of the oil. By using a mandoline to ensure uniform slices and a specific “soak and coat” method, you can create a mountain of golden-brown chips that stay crispy long after they leave the fryer. Whether you serve them with a zesty bloomin’ onion sauce or a cool ranch dip, these onion ring chips are a crowd-pleasing treat that proves you don’t need a deep fryer to get professional results. Let’s master the technique for the thinnest, crispiest onion snacks imaginable.

Why You’ll Love This Recipe
- Superior Crunch: By slicing the onions into thin “chips” rather than thick rings, you maximize the surface area for the breading, resulting in a much crispier final product.
- Pantry-Staple Ingredients: You likely already have everything you need: onions, flour, cornstarch, and basic spices. It is an incredibly budget-friendly appetizer.
- Versatile Serving Options: These work as a standalone snack, a side for sandwiches, or a gourmet garnish for steaks and creamy soups.
- Crowd-Pleasing Flavor: It captures the nostalgic, savory taste of a “bloomin’ onion” in a much more manageable, bite-sized format.
- Quick to Cook: Because the slices are so thin, they fry up in under two minutes per batch, making it easy to feed a hungry crowd fast.
Ingredient Notes & Pro Selections
The success of an onion chip depends heavily on the type of onion you choose and the ratio of your breading materials.
The Onions
- Sweet Onions (Recommended): Varieties like Vidalia, Walla Walla, or Maui are the gold standard. They have a higher sugar content and lower sulfur, which means they lose their sharp “bite” when fried and turn beautifully sweet and caramelized.
- Yellow Onions: A great secondary choice. They are more pungent than sweet onions but offer a classic, robust onion flavor that stands up well to heavy seasoning.
- Red Onions: While they can be used, they have a higher water content and can sometimes turn a grayish-purple color when fried, which is less visually appealing.
The Breading & Liquids
- All-Purpose Flour: Provides the bulk of the coating and the structural base.
- Cornstarch: This is the “crunch factor.” Replacing a portion of the flour with cornstarch prevents gluten development and ensures the coating is light, airy, and shatteringly crisp.
- Buttermilk: The acidity in buttermilk tenderizes the onion and provides a “sticky” base for the dry ingredients to adhere to.
- Substitution: If you don’t have buttermilk, mix 1 cup of whole milk with 1 tablespoon of lemon juice or white vinegar and let it sit for 5 minutes.
- Seasoning Blend: A mix of smoked paprika, garlic powder, onion powder, fine sea salt, and cayenne pepper. The cayenne doesn’t make them “hot” but provides a necessary depth of flavor.
Step-by-Step Instructions
Step 1: The Precision Slice
Peel your onions and remove the stem ends. Using a mandoline slicer set to 1/8-inch thickness, slice the onions into thin rounds. If you don’t have a mandoline, use an ultra-sharp chef’s knife and take your time to get them as thin and uniform as possible. Separate the slices into individual rings. Place them in a large bowl.
Step 2: The Buttermilk Soak
Pour the buttermilk over the onion rings. Ensure every ring is submerged. Let them soak for at least 30 minutes (or up to 2 hours in the fridge).
- Why soak? This step removes the harsh sulfur compounds from the onion, making them sweet and mild, while the proteins in the buttermilk help the flour stick later.
Step 3: Mix the Dry Coating
In a large, shallow dish or a gallon-sized Ziploc bag, whisk together the all-purpose flour, cornstarch, and all the spices. Shake or whisk until the color is uniform.
Step 4: The Coating Technique
Working in small batches, remove a handful of onion rings from the buttermilk, letting the excess liquid drip off. Toss them into the flour mixture. Shake vigorously to ensure every single ring is separated and coated.
- Pro Tip: Place the coated rings on a wire rack for 5 minutes before frying. This allows the flour to hydrate and form a “paste” that won’t fall off in the oil.
Step 5: The Fry
Heat 2 inches of neutral oil (canola, vegetable, or peanut) in a heavy-bottomed pot or Dutch oven to 375°F (190°C). Drop the onion chips into the oil in small batches. Do not overcrowd! Use a slotted spoon or “spider” to move them around so they don’t stick together. Fry for 1–2 minutes until they are a deep golden brown.
Step 6: Drain and Season
Remove the chips and place them immediately on a paper-towel-lined plate or a wire cooling rack. Sprinkle with an extra pinch of fine sea salt while they are still hot and oily so the salt sticks. Repeat with the remaining batches.
Secrets to a Non-Soggy Onion Chip
- Temperature Maintenance: If the oil temperature drops below 350°F, the onions will absorb the oil and become greasy and soggy. Always wait for the oil to return to 375°F between batches.
- Thin is King: If your slices are too thick, the onion will release too much steam during frying, which will soften the crust from the inside out. Stick to the 1/8-inch rule.
- Small Batches: It is tempting to dump them all in at once, but overcrowding causes the oil temperature to plummet and the chips to clump into an oily mass.
- The Cornstarch Ratio: Never use 100% flour. The 3:1 ratio of flour to cornstarch is the scientific sweet spot for long-lasting crunch.
Dipping Sauce Pairings
An onion chip is a vehicle for sauce. Here are three professional-grade pairings:
- Zesty “Petal” Sauce: Mix 1/2 cup mayo, 2 tbsp horseradish, 2 tsp ketchup, 1/2 tsp paprika, and a pinch of oregano. This mimics the famous steakhouse dipping sauce.
- Spicy Maple Dip: Whisk 1/2 cup Greek yogurt with 1 tbsp maple syrup and 1 tsp sriracha for a sweet-heat contrast.
- Classic Garlic Aioli: Combine mayo, lemon juice, and three cloves of fresh pressed garlic for a sophisticated, savory finish.
Variations and Substitutions
- Air Fryer Method: Lightly spritz the coated onions with oil spray. Air fry at 375°F for 8–10 minutes, shaking the basket every 3 minutes. They will be less “deep-fried” in flavor but still very crunchy.
- Beer Battered Chips: Replace the buttermilk soak with a thin beer batter (flour, cornstarch, and a light lager). This yields a “puffy” chip rather than a “crusty” chip.
- Everything Bagel Spice: Omit the paprika and cayenne and toss the finished hot chips in everything bagel seasoning for a trendy twist.
- Gluten-Free: Use a 1:1 gluten-free flour blend. Since the onions are thin and the cornstarch provides the crunch, GF flour works exceptionally well in this recipe.
Storage and Reheating
- Room Temperature: These are best eaten within 2 hours of frying. If you must store them, keep them in a cardboard box or a paper bag (not plastic!) to allow air circulation.
- Reheating: Do not microwave. To restore the crunch, place the chips on a baking sheet and heat in a 400°F (200°C) oven for 3–4 minutes. Alternatively, pop them back into the air fryer for 2 minutes.
- Freezing: We do not recommend freezing fried onion chips, as the onion will become mushy upon thawing.
FAQ
Why is the breading falling off my onions? This usually happens if the onions were too wet when they hit the flour, or if you didn’t let the coated onions “rest” for 5 minutes before frying. The rest period allows the flour to bond to the buttermilk.
What is the best oil for frying onion chips? Peanut oil is the best because of its high smoke point and neutral flavor. If you have an allergy, canola or vegetable oil are perfect substitutes.
Can I make these ahead of time? You can slice and soak the onions in buttermilk up to 24 hours in advance. However, the breading and frying should be done right before serving for the best texture.
My onions are bitter. What happened? This usually happens with older yellow onions. The buttermilk soak is designed to fix this! Ensure you soak for at least 30 minutes to draw out those bitter compounds.
Crispy Onion Ring Chips
Ingredients
Equipment
Method
- Peel onions and slice into 1/8-inch rounds using a mandoline or very sharp knife. Separate into individual rings.
- Place onion rings in a bowl and cover completely with buttermilk. Soak for at least 30 minutes or up to 2 hours.
- In a shallow dish or large bag, whisk together flour, cornstarch, paprika, garlic powder, onion powder, salt, and cayenne.
- Remove onions from buttermilk, letting excess drip off. Toss in flour mixture until fully coated. Let rest on a wire rack for 5 minutes.
- Heat 2 inches of oil in a heavy pot to 375°F (190°C).
- Fry onion rings in small batches for 1–2 minutes, stirring gently, until deep golden brown.
- Transfer to a paper towel or wire rack and immediately sprinkle with extra salt. Repeat with remaining onions.


