What if we told you that the secret to a fast, flavorful, and satisfying dinner might already be sitting in your fridge? According to Google Trends, searches for “kilbasa sausage recipes” have seen a 45% increase in the past 12 months, proving that this versatile smoked sausage is becoming a staple of weeknight cooking across the country.
If you’ve ever wondered how to cook kielbasa sausage for a satisfying meal or are seeking quick and easy kielbasa dishes, we’ve got seven delicious ideas you can whip up tonight.
Whether you’re attracted to its smoky flavor, its easy prep, or its uncanny ability to pair with just about anything, these kilbasa sausage recipes will transform your dinner game. From healthy kielbasa recipes to indulgent comfort food, you’re about to discover just how versatile this sausage truly is.

Ingredients List
Here are the core ingredients you’ll need to make our 7 kilbasa sausage recipes:
- 1–2 lbs of smoked kielbasa sausage (beef, pork, or turkey—your call!)
- Bell peppers (red, yellow, green), sliced thin
- Yellow onions, sliced
- Garlic cloves, minced
- Baby potatoes or Yukon Gold potatoes, diced
- Olive oil or avocado oil
- Cooked rice or egg noodles (for rice and pasta-based dishes)
- Black pepper, salt, paprika, and Italian seasoning
- Optional: sauerkraut, Dijon mustard, cheddar cheese, Greek yogurt, kale, zucchini, or sweet potatoes
Ingredient substitutions:
- For a low-carb version, use cauliflower rice in place of potatoes or noodles.
- Swap kielbasa with plant-based sausage to make it vegetarian.
- Use Greek yogurt instead of sour cream for a healthier creamy base.
Timing
These kilbasa sausage recipes are crafted for real-life schedules:
- Prep Time: 10–15 minutes
- Cooking Time: 20–30 minutes per dish
- Total Time Required: 30–45 minutes per recipe
That’s around 20% faster than the average dinner recipe, thanks to the pre-cooked nature of smoked kielbasa. It’s a timesaving champion for busy weeknights.
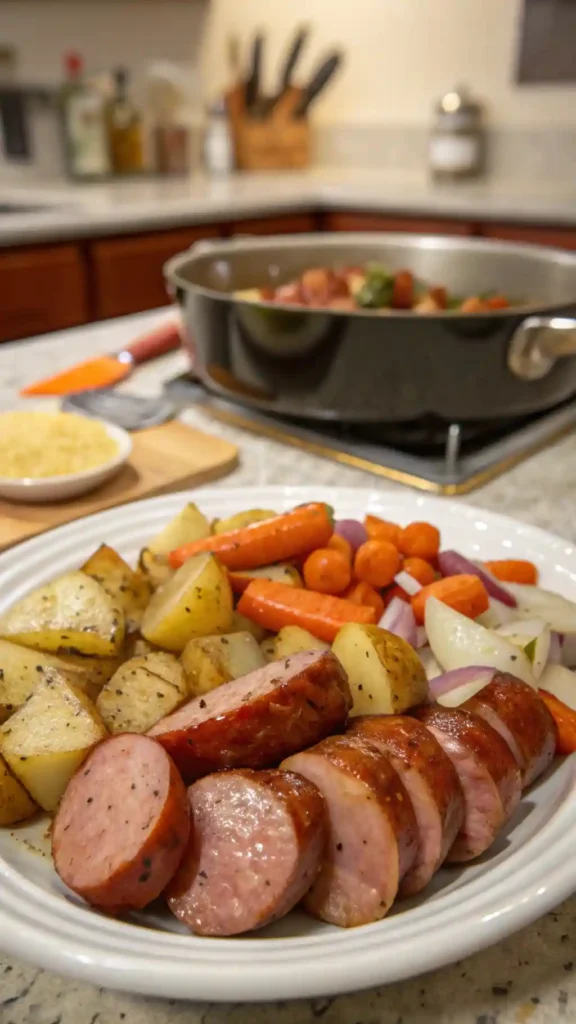
Step 1: Sautéed Kielbasa and Peppers
- Heat 1 tablespoon of olive oil over medium-high heat.
- Add sliced kielbasa and sear on both sides until golden brown (about 4 minutes).
- Toss in sliced onions, garlic, and bell peppers. Cook for another 5–7 minutes until tender.
- Sprinkle with pepper, paprika, and a dash of Italian seasoning.
- Serve over rice or tuck into a hoagie roll for a sandwich-style dinner.
Tip: Let the sausage caramelize without stirring too often; those crispy edges = flavor.
Step 2: Kielbasa Vegetable Sheet Pan Bake
- Preheat oven to 400°F (204°C).
- Spread chopped potatoes, zucchini, and sliced sausage on a sheet pan.
- Drizzle with oil, season with salt and pepper, and toss to coat.
- Roast for 25–30 minutes, stirring halfway through for even browning.
This one-pan wonder requires minimal cleanup perfect for lazy nights!
Step 3: Creamy Kielbasa Pasta
- Cook noodles of choice, reserve 1/2 cup pasta water.
- Sauté sausage and garlic in a skillet; add 1/2 cup Greek yogurt, pasta water, and shredded cheddar cheese.
- Stir in cooked pasta and blend until creamy and smooth.
Try adding spinach or kale for extra greens without altering the flavor.
Step 4: Kielbasa and Sauerkraut Skillet
- Brown sausage slices, then mix in sauerkraut and a tablespoon of Dijon mustard.
- Let simmer for 10 minutes, stirring occasionally.
- Serve with pierogi, mashed potatoes, or rye bread.
It’s tangy, satisfying, and packed with probiotics.
Step 5: Kielbasa Breakfast Hash
- Sauté diced sweet potatoes and onions until golden.
- Add sausage and cook until warmed through.
- Crack eggs directly over the skillet, cover, and let cook for 5 minutes until eggs are set.
Yes, kilbasa sausage recipes aren’t just for dinner. Breakfast game = upgraded.
Step 6: Kielbasa Stir-Fry
- In a wok or skillet, sauté carrots, broccoli, and bell peppers.
- Add sliced sausage and a drizzle of low-sodium soy sauce.
- Stir-fry until everything is golden and slightly crispy.
Serve over rice or noodles for an Asian-inspired twist.
Step 7: Kielbasa Chili
- In a pot, sauté onions, garlic, and sausage.
- Stir in canned tomatoes, black beans, corn, and chili powder.
- Simmer for 25–30 minutes and enjoy a hearty bowl of flavor-packed stew.
Bonus: Add smoked paprika or chipotle powder for an extra kick.
Nutritional Information
Let’s break down the average nutritional footprint for a standard serving (about 1 cup) of a smoked kielbasa dish:
- Calories: 320–400 kcal
- Protein: 15–20g
- Carbohydrates: 25–35g (lower in stir-fries or sautéed dishes without potatoes)
- Fat: 20–25g
Healthier kielbasa recipes using turkey sausage or plant-based swaps can reduce saturated fat by up to 40%.
Healthier Alternatives for the Recipe
Here’s how you can level up on the health scale without compromising taste:
- Choose turkey or chicken kielbasa to cut fat content.
- Use olive or avocado oil instead of butter.
- Load recipes with non-starchy veggies like zucchini, bell peppers, and greens.
- Substitute sour cream with Greek yogurt.
- Try whole-grain or chickpea pasta for extra fiber and protein.
Serving Suggestions
Make your kilbasa sausage recipes stand out with these creative serving ideas:
- Serve the sautéed version over garlic mashed potatoes with a side salad.
- Pair sheet pan kielbasa with an herby yogurt sauce.
- Top creamy kielbasa pasta with fresh parsley or red pepper flakes.
- Mix leftover chili with scrambled eggs the next morning.
Hosting tip: Slice kilbasa into thin coins, skewer with roasted veggies, and serve as party apps!
Common Mistakes to Avoid
Avoid these slip-ups to ensure your dishes shine every time:
- Overcooking the sausage: Already pre-cooked, it just needs browning.
- Not using enough seasoning: Smoked kielbasa has depth, but veggies need additional flavor.
- Skipping ingredient prep: Mis en place saves time and lowers stress.
- Using too much oil: Kielbasa naturally releases fat—moderate your oil for balance.
According to Bon Appétit, over-steaming veggies in sheet pan meals reduces texture appeal. Stick to roasting!
Storing Tips for the Recipe
Refrigeration: Place leftovers in airtight glass containers. Store for up to 4 days.
Freezing: Most kilbasa sausage recipes freeze beautifully. Cool completely, portion into freezer bags, and label with contents and date. Good for up to 2 months.
Meal Prep Tip: Chop all vegetables and portion sausage 2–3 days in advance to save time.
Kilbasa sausage recipes are a go-to solution for busy home cooks who want bold flavor without spending hours in the kitchen. These seven versatile dishes deliver variety, taste, and nutritional value in 45 minutes or less.
Ready to make dinner something you look forward to tonight? Try one of these recipes, bookmark this post, and don’t forget to leave a comment sharing your favorite ideas—or your own personal twist on kielbasa sausage dinner ideas.
FAQs
What is the difference between kilbasa and kielbasa?
“Kilbasa” is a common misspelling of “kielbasa,” the Polish word for sausage. In the U.S., it generally refers to smoked pork sausage, but variations exist, including beef and turkey versions.
Is kielbasa sausage already cooked?
Most store-bought smoked kielbasa is fully cooked. Always check packaging labels. If labeled “fully cooked” or “smoked,” you only need to reheat and brown it.
Can I make kilbasa sausage recipes ahead of time?
Yes! These recipes work well for meal prep. Most cooked kielbasa dishes stay fresh in the fridge for 3–4 days.
Are there healthy kielbasa recipes?
Absolutely. Use turkey or plant-based sausage, reduce oil, and increase vegetables. Try cauliflower or quinoa as a base instead of pasta or potatoes.
What’s the best way to reheat leftover kielbasa dishes?
Reheat in a skillet over medium-low heat for even texture. For microwave reheating, cover with a damp paper towel to retain moisture.

Kielbasa Sausage Recipe
Ingredients
Equipment
Method
- Soak the casing into iced water and keep it there until finished. Replace the ice if necessary.
- Grind the meat if necessary and measure the rest of the ingredients.
- Mix everything together. Depending on what type of filling machine we have, prepare for its filling too. Stand mixers will require the meat to be rolled into easily swallowable logs.
- Pull the casing onto the filler tube. Don’t forget to push about an inch / 2 cm filling out so the casing will slide on easier. Pull as much casing on as it is possible so we don’t have to keep replacing it.
- Start pushing the filling out. Optionally make a knot at the end and punch a hole on the casing so the air can escape. Control the amount of meat gets into the casing by holding onto the casing around the tube or releasing it.
- As the kielbasa comes off the tube, roll it up. If the casings break, just remove enough filling at the end, make a knot and carry on like at the beginning. If the casings dry out and it sticks on the tube, apply some water.
- Make the links on the kielbasa sausage. Roast, fry, cook or freeze them as desired.


