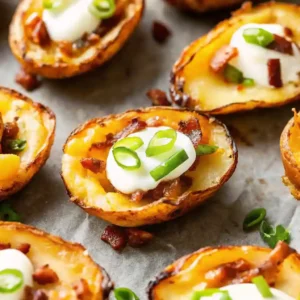
In the landscape of classic American appetizers, the Loaded Potato Skin occupies a position of high honor. It is a dish that celebrates the humble potato by transforming its exterior into a shatteringly crisp, salty vessel for the most indulgent of toppings: sharp melted cheese, smoky bacon, and cool, tangy sour cream. While often relegated to the “frozen food” section of the grocery store, a truly great potato skin—one with a glass-like crunch and a fluffy interior rim—is a masterpiece of textural engineering that can only be achieved at home.
The secret to a professional-grade potato skin lies in the “double-bake” technique and the precise management of moisture. By baking the potato whole to set its structure, and then re-baking the oiled skins at a high temperature, we trigger the Maillard reaction, resulting in a deep golden-brown crust that stands up to heavy toppings without becoming soggy. Whether you are hosting a Super Bowl party, a festive holiday gathering, or looking for a comforting “pub-style” side dish, these potato skins deliver a high-impact experience that proves simplicity is often the ultimate sophistication. Let’s explore the science of the Russet potato and the professional secrets to achieving the perfect salty crunch.

Why You’ll Love This Recipe
- Superior Texture Contrast: Unlike frozen versions, these skins offer a genuine “crunch” on the outside while maintaining a thin, buttery layer of soft potato on the inside.
- Effortless Crowd-Feeding: You can bake a massive batch of potatoes in advance, leaving only the quick “crisping and filling” steps for when your guests arrive.
- Smart Ingredient Control: By making these from scratch, you avoid the hydrogenated oils and excessive sodium found in commercial appetizers, allowing the natural flavors of high-quality cheddar and bacon to shine.
- The Ultimate “Dipping” Vessel: These skins are structurally sturdy, making them the perfect companion for thick ranch dips, spicy salsas, or extra dollops of sour cream.
- Highly Customizable: While the bacon-cheddar duo is classic, the crispy potato shell is a blank canvas for everything from taco meat to Mediterranean feta and olives.
Ingredient Notes & Pro Selections
Because this recipe relies on a few key pillars, selecting the right variety of potato and the correct fat for crisping is the difference between a limp snack and a gourmet appetizer.
The Potatoes
- Russet Potatoes (6-8 Medium): This is the only potato choice for this recipe. Russets have a high starch content and a thick, sturdy skin that becomes incredibly crisp when oiled. Waxy potatoes (like Yukon Gold or Red Bliss) have skins that are too thin and will become leathery rather than crunchy.
- Size Consistency: Choose potatoes that are uniform in size (about 6–8 ounces each) to ensure they all cook at the same rate.
The Crisping Agents
- Neutral Oil (Canola or Avocado): You want an oil with a high smoke point. Brushing the skins with oil before the second bake “fries” the surface in the oven.
- Kosher Salt: The large grains provide a necessary savory “pop” on the exterior skin, mimicking the seasoned fries found in high-end steakhouses.
The Toppings
- Sharp Cheddar or Colby Jack: We recommend grating your own cheese from a block. Pre-shredded cheese is coated in potato starch to prevent clumping, which prevents it from melting into a perfectly smooth, gooey pool.
- Thick-Cut Bacon: Use a high-quality hardwood-smoked bacon. Frying it until it is extra crispy ensures it provides a textural contrast to the melted cheese.
- Full-Fat Sour Cream: Provides the necessary cooling acid to balance the salty, fatty components.
- Fresh Green Onions: Use both the white and green parts for a sharp, fresh aromatic finish.
Step-by-Step Instructions
Step 1: The Initial Bake
Preheat your oven to 400°F (204°C). Scrub the Russet potatoes thoroughly and pat them completely dry. Using a fork, prick each potato several times to allow steam to escape. Place the potatoes directly on the oven rack (or on a baking sheet) and bake for 50–60 minutes until the skins are slightly wrinkled and the centers are tender when pierced with a knife.
Step 2: Cool and Prep
Remove the potatoes from the oven and let them cool until they are safe to handle (about 10–15 minutes). Using a sharp knife, slice each potato in half lengthwise.
Step 3: The Precision Scoop
Using a small spoon, scoop out the warm potato flesh, leaving a 1/4-inch thick shell of potato attached to the skin.
- Pro Tip: Do not scoop too close to the skin! You need that thin layer of potato to act as a “cushion” for the butter and oil, ensuring the center stays soft while the edges get crisp. Save the scooped-out potato for mashed potatoes or a “Tater Tot Breakfast Casserole.”
Step 4: The Crisping Phase
Increase the oven temperature to 450°F (232°C). Brush both the inside and the outside of the potato shells generously with oil (or melted butter). Sprinkle the insides with kosher salt and black pepper. Place the shells cut-side down on a rimmed baking sheet. Bake for 10 minutes. Flip them over and bake for another 5–8 minutes.
- The Visual Cue: The edges should be dark golden brown and the interior should look slightly “bubbled” and crisp.
Step 5: Fill and Melt
Remove the pan from the oven. Flip the skins so they are “cup-side” up. Fill each shell with a generous amount of shredded cheese and crispy bacon bits. Return to the oven for 3–5 minutes, or until the cheese is bubbling and completely melted.
Step 6: Final Garnish
Remove from the oven and let them sit for 2 minutes to allow the cheese to set. Top each skin with a dollop of sour cream and a sprinkle of fresh green onions. Serve immediately while hot.
Secrets to the Crispiest Potato Skins
- Dry is King: If your potatoes are even slightly damp when they go into the oven, they will steam rather than roast. This leads to a “chewy” skin. Always use a kitchen towel to get them bone-dry after washing.
- High Heat is Non-Negotiable: You must increase the heat to 450°F for the second bake. This intense heat evaporates any remaining moisture in the skin, creating that signature “shatter” texture.
- The Cut-Side Down Trick: During the first part of the crisping phase (Step 4), placing the potatoes cut-side down traps a small amount of heat against the pan, effectively “frying” the edges of the skin.
- Butter vs. Oil: For the best flavor, use melted salted butter for the interior. For the best crunch on the exterior, use a high-heat oil. A 50/50 mix is the “Gourmet” choice.
Variations and Substitutions
- The “Mexican” Skin: Fill the skins with taco-seasoned ground beef, Pepper Jack cheese, and top with jalapeños and Mexican Queso Dip.
- Buffalo Chicken Skins: Use shredded rotisserie chicken tossed in buffalo sauce, topped with blue cheese crumbles and celery.
- Vegetarian Delight: Replace the bacon with black beans and roasted corn. Top with diced avocado and cilantro.
- Breakfast Skins: Fill with a small amount of scrambled eggs, sausage crumbles, and cheddar. Perfect for a holiday brunch.
- Truffle Parmesan: Brush the skins with truffle oil instead of regular oil and top with aged Parmesan and fresh chives.
Storage and Reheating
- Refrigerator: Store leftovers in an airtight container for up to 3 days.
- Freezing: These are excellent for “DIY Frozen Snacks.” Follow the recipe through Step 4 (crisping the shells). Let them cool, then freeze the empty shells in a bag. When ready to eat, fill with cheese and bacon and bake at 425°F for 10–12 minutes.
- Reheating: Do not use the microwave. To restore the crunch, reheat the potato skins in an air fryer at 375°F for 4–5 minutes or in a 400°F oven for 8 minutes.
FAQ
Why are my potato skins tough? This usually happens if you used a potato other than a Russet, or if the potatoes were under-baked in the first step. The skin needs to be fully “set” before the crisping process begins.
Can I make these in an air fryer? Absolutely! After scooping, air fry the oiled shells at 400°F for 5–7 minutes per side. Add the cheese and bacon and air fry for another 2 minutes. It is actually faster than the oven!
How do I prevent the potatoes from rolling over? If your potatoes are very round, slice a tiny sliver off the bottom of the skin so it has a flat “base” to sit on the baking sheet.
What is the best cheese for a “cheese pull”? A mixture of Monterey Jack and Sharp Cheddar provides the best balance of flavor and elasticity.
Crispy Loaded Potato Skins (The Ultimate Gourmet Game Day Recipe)
Ingredients
Equipment
Method
- Preheat your oven to 400°F (204°C). Scrub the Russet potatoes thoroughly and pat them dry. Prick each potato several times with a fork. Place the potatoes directly on the oven rack or on a baking sheet and bake for 50–60 minutes until the skins are slightly wrinkled and the centers are tender.
- Remove the potatoes from the oven and let them cool for 10–15 minutes. Slice each potato in half lengthwise.
- Using a small spoon, scoop out the potato flesh, leaving about 1/4 inch of potato attached to the skin. Save the scooped-out potato for other dishes like mashed potatoes or breakfast casseroles.
- Preheat the oven to 450°F (232°C). Brush the inside and outside of the potato skins with melted butter and oil. Sprinkle the insides with kosher salt and black pepper. Place the potato skins cut-side down on a baking sheet and bake for 10 minutes. Flip the skins over and bake for another 5–8 minutes until golden brown and crispy.
- Remove the skins from the oven and flip them over to be cup-side up. Fill each skin with shredded cheddar cheese and crumbled bacon. Return to the oven for 3–5 minutes or until the cheese is melted and bubbly.
- Remove the potato skins from the oven and let them cool for 2 minutes. Top each skin with a dollop of sour cream and a sprinkle of chopped green onions. Serve immediately while hot.


