This recipe for Easy Chicken Katsu Bowls brings one of Japan’s most beloved comfort foods right into your kitchen. It features a perfectly crispy, panko-breaded chicken cutlet, fried to a beautiful golden brown, sliced, and served over a bed of fluffy steamed rice with crisp shredded cabbage. A generous drizzle of a sweet and tangy homemade tonkatsu sauce is the final, perfect touch to this incredibly satisfying meal.
Forget takeout—making chicken katsu at home is surprisingly simple and the results are so much better. The secret to that shatteringly crisp crust is the Japanese panko breadcrumbs. This is a hearty, delicious, and family-friendly meal that’s perfect for any night of the week.

Why You’ll Love This Recipe
- Incredibly Crispy Chicken: The panko breading creates a light, airy, and super crunchy crust that’s completely addictive.
- Better Than Takeout: Tastes just like the restaurant version, but fresher and made right at home.
- Simple, Flavorful Sauce: The homemade tonkatsu sauce is easy to whisk together and packed with tangy, savory flavor.
- Complete, Hearty Meal: A satisfying bowl with a perfect balance of protein, carbs, and fresh vegetables.
Ingredients
For the Chicken Katsu:
- 2 large Boneless, Skinless Chicken Breasts (about 1.5 lbs total)
- 1/2 cup All-Purpose Flour
- 2 large Eggs, lightly beaten
- 2 cups Panko Breadcrumbs
- 1 teaspoon Salt
- 1/2 teaspoon Black Pepper
- Neutral oil (like canola or vegetable), for frying
For the Tonkatsu Sauce:
- 1/2 cup Ketchup
- 1/4 cup Worcestershire Sauce
- 2 tablespoons Soy Sauce
- 1 tablespoon Mirin
- 1 tablespoon Sugar
For Serving:
- 4 cups Cooked Japanese Short-Grain Rice
- 2 cups Cabbage, very thinly shredded
- Optional: Sliced green onions, toasted sesame seeds
Step-by-Step Instructions
- Prepare the Chicken: Slice each chicken breast in half horizontally to create four thin cutlets. Place the cutlets between two pieces of plastic wrap and use a meat mallet or rolling pin to pound them to an even 1/2-inch thickness. Season both sides of each cutlet with salt and pepper.
- Set Up Breading Station: Prepare three shallow dishes. In the first, place the flour. In the second, the beaten eggs. In the third, the panko breadcrumbs.
- Bread the Chicken: Working with one cutlet at a time, dredge it in the flour, shaking off the excess. Next, dip it into the egg, letting the excess drip off. Finally, press it firmly into the panko, ensuring the entire surface is well-coated.
- Make the Tonkatsu Sauce: In a small bowl, whisk together the ketchup, Worcestershire sauce, soy sauce, mirin, and sugar until the sugar has dissolved.
- Fry the Chicken: In a large, heavy-bottomed skillet, heat about 1 inch of oil to 350°F (175°C). Carefully place two of the breaded cutlets in the hot oil. Fry for 3-5 minutes per side, until deep golden brown and cooked through.
- Drain and Slice: Transfer the cooked katsu to a wire rack to drain. Let it rest for a few minutes, then slice it into 1-inch strips.
- Assemble the Bowls: Divide the cooked rice among four bowls. Top with a generous handful of shredded cabbage. Arrange the sliced chicken katsu on top. Drizzle generously with the tonkatsu sauce and garnish with green onions and sesame seeds.
Tips & Variations
- Pro Tip: Pounding the chicken to an even thickness is the key to ensuring it cooks quickly and evenly, resulting in a juicy cutlet.
- Air Fryer Method: For a lighter version, preheat your air fryer to 400°F (200°C). Spray the breaded cutlets with cooking spray and air fry for 10-14 minutes, flipping halfway, until golden and crispy.
- Tonkatsu (Pork Version): The classic version of this dish uses boneless pork chops instead of chicken. Follow the same method for a delicious Tonkatsu.
- Add Japanese Mayo: For an extra layer of flavor, drizzle a little Kewpie (Japanese) mayonnaise over the katsu along with the tonkatsu sauce.
Frequently Asked Questions (FAQ)
- What is panko and can I use regular breadcrumbs?
- Panko are Japanese-style breadcrumbs made from crustless bread. They are lighter and flakier than regular breadcrumbs, which is what gives katsu its signature airy, crispy crust. It is highly recommended to use panko for the best results.
- How do I store leftovers?
- Store the components separately in airtight containers in the refrigerator. The chicken will lose its crispiness but can be reheated in an air fryer or oven to help restore some of the crunch.
- Can I make the sauce in advance?
- Yes, the tonkatsu sauce can be made up to a week in advance and stored in an airtight container in the refrigerator.
Serving Suggestions
- A classic Chicken Katsu Bowl is a complete meal, but it’s often served with a side of hot miso soup and some Japanese pickles (tsukemono) for a full, authentic experience.
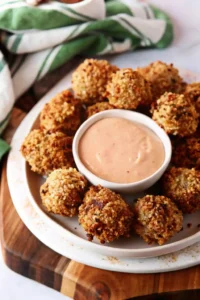
Boudin Balls
Ingredients
Equipment
Method
- Line a large rimmed sheet pan with parchment paper and set aside.
- Remove boudin from sausage casings and place into a large mixing bowl. Beat two eggs and pour over the boudin, mixing until evenly combined.
- Using a 1-tablespoon cookie scoop, form about 40 balls and arrange them on the prepared baking sheet in a single layer.
- Freeze the boudin balls for at least 30 minutes to firm up.
- Set up a breading station with three bowls: flour in one, panko in another, and whisked eggs with milk in the third.
- Preheat oven to 425°F and line another rimmed sheet pan with parchment paper. Roll each boudin ball in flour, then egg mixture, then panko until evenly coated.
- Place coated balls on the prepared pan with space between them. Lightly spray with avocado or olive oil.
- Bake for 30–35 minutes until golden brown and crispy. Rotate the pan halfway through baking for even color.
- Meanwhile, make the dipping sauce: in a small bowl, combine mayonnaise, ketchup, lemon juice, Worcestershire, hot sauce, and Cajun seasoning. Mix well and adjust seasoning to taste.
- Serve warm boudin balls with the dipping sauce. Garnish with sliced scallions or parsley if desired.


