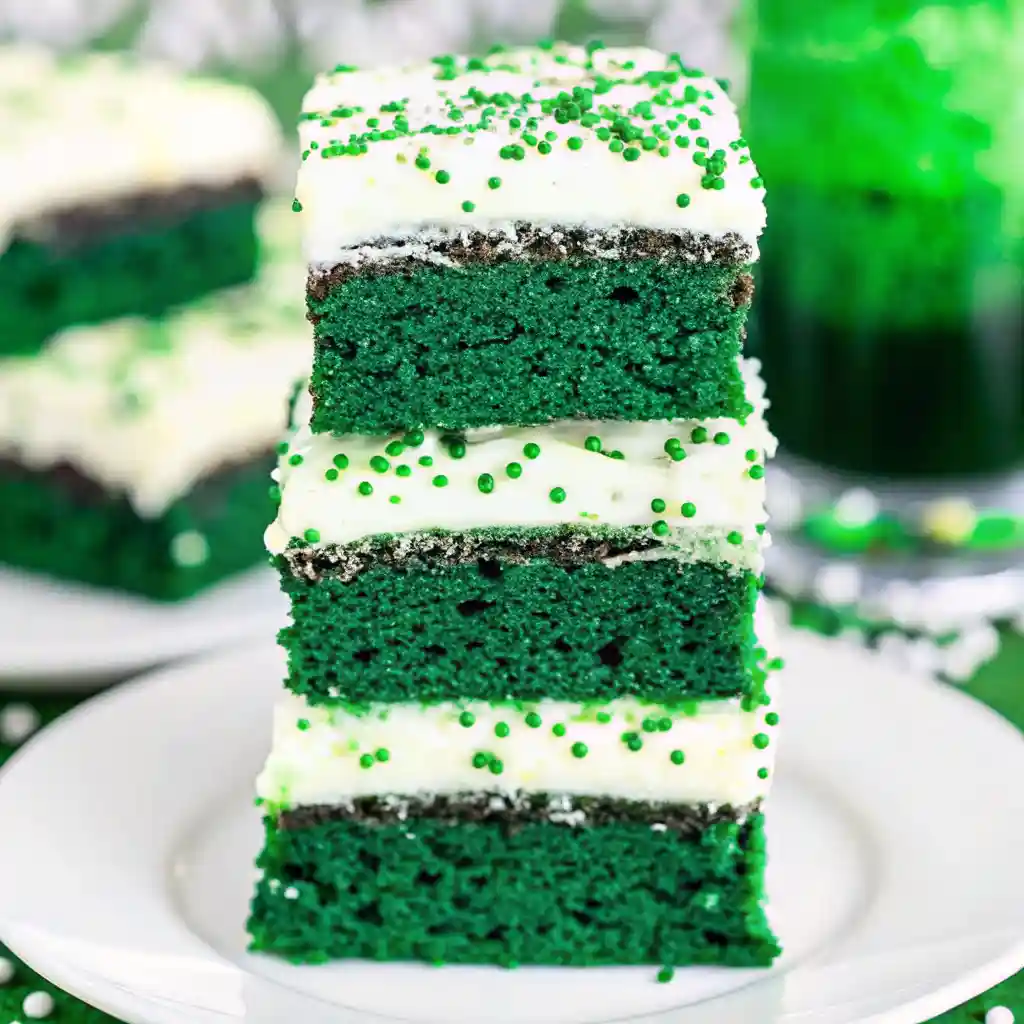
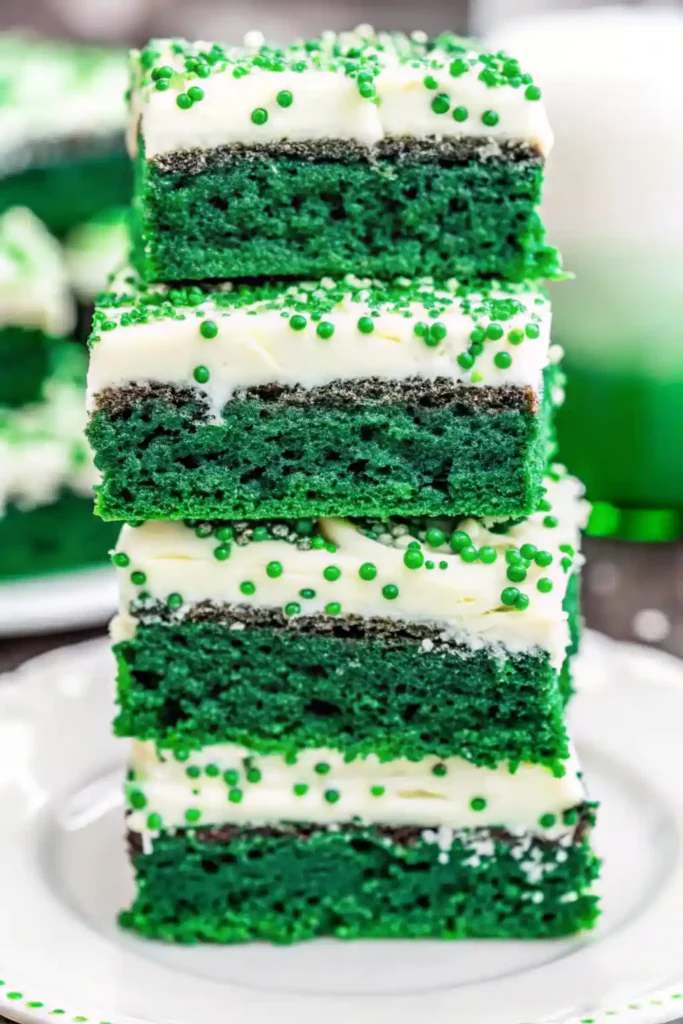
In the world of professional baking, the “velvet” profile is defined by more than just color; it is a specific chemical harmony between cocoa, acidity, and moisture that results in a crumb so fine it mimics the feel of luxury fabric. These Green Velvet Brownies are a stunning seasonal evolution of that tradition. While their vibrant emerald hue makes them an instant centerpiece for St. Patrick’s Day or Christmas celebrations, their flavor is a sophisticated balance of mild cocoa and tangy, velvet-smooth cream cheese frosting.
Unlike a standard dense fudge brownie, the “velvet” method produces a texture that sits elegantly between a cake and a blondie—succulent, tight-crumbed, and incredibly moist. By using a hint of high-quality cocoa powder, we achieve the classic “velvet” depth without overpowering the visual brilliance of the green dye. Whether you are hosting a festive brunch or looking for a high-impact addition to a holiday gift box, these brownies offer a gourmet experience that is as pleasing to the palate as it is to the eye. Let’s explore the science of the velvet crumb and the secrets to achieving a perfectly stabilized cream cheese finish.
Why You’ll Love This Recipe
- Stunning Visual Contrast: The deep, forest-green base against the snowy-white cream cheese frosting creates a high-fashion aesthetic that requires zero advanced decorating skills.
- The “Velvet” Texture: Utilizing a specific ratio of fats and leavening ensures a melt-in-your-mouth experience that is far more refined than a standard box-mix brownie.
- Balanced Sweetness: The tang of the cream cheese and the slight bitterness of the cocoa powder cut through the sugar, appealing to those who prefer a more sophisticated dessert.
- Perfect for Gifting: These brownies are sturdy enough to be sliced into clean, sharp squares, making them ideal for holiday platters or mail-away treat boxes.
- Effortless Gourmet: By following our professional tips on temperature control and mixing, you can achieve bakery-quality results with standard pantry staples.
Ingredient Notes & Pro Selections
The success of a velvet dessert depends entirely on the quality of your aromatics and the intensity of your coloring agents.
The Brownie Base
- Unsalted European Butter: Because the flavor of the butter is prominent in the “velvet” base, use a high-fat brand (like Kerrygold) for a richer mouthfeel and better moisture retention.
- Granulated Sugar: Provides the necessary sweetness and helps create the characteristic slightly-cracked top.
- Unsweetened Cocoa Powder: Use a standard natural cocoa powder rather than Dutch-processed for this recipe. Natural cocoa is slightly more acidic, which reacts with the leavening to create that signature “velvet” lift.
- Green Gel Food Coloring: This is the most critical component. To achieve a deep, vibrant emerald, you must use gel coloring (like AmeriColor Leaf Green). Liquid coloring is too diluted and will require you to use so much that it may alter the batter’s chemistry.
The Creamy Foundation
- Full-Fat Block Cream Cheese: Always use the brick form, not the spreadable tub variety. The blocks contain stabilizers that ensure your frosting holds its shape at room temperature.
- Pure Vanilla Bean Paste: For a “Gourmet” touch, swap standard extract for vanilla bean paste. The tiny black seeds look beautiful against the white frosting and provide a deeper, floral aroma.
The Texture Binders
- Large Eggs (Room Temperature): Room temperature eggs emulsify much more effectively with the butter and sugar, ensuring a smooth, lump-free batter.
- All-Purpose Flour: Use the “spoon and level” method to avoid packing too much flour into your measuring cup, which would result in a dry, bread-like brownie.
Step-by-Step Instructions
Step 1: Prep the Oven and Pan
Preheat your oven to 350°F (175°C). Grease an 8×8-inch or 9×9-inch square baking pan with butter or non-stick spray. Line the pan with parchment paper, leaving an inch of overhang on the sides (a “sling”). This is essential for lifting the brownies out of the pan cleanly once they are frosted.
Step 2: Mix the Wet Base
In a large mixing bowl, whisk together the 1 cup granulated sugar and 1/2 cup (1 stick) of melted butter. Whisk until the sugar is partially dissolved and the mixture looks shiny. Add the 2 large eggs and 1 teaspoon of vanilla extract, beating vigorously for about 1 minute until the mixture is pale and slightly frothy.
Step 3: Achieve the Emerald Tint
Stir in the green gel food coloring. Start with 1/4 teaspoon and whisk thoroughly. Continue adding gel one drop at a time until you reach a vibrant, deep green.
- Pro Tip: The color will darken slightly as it bakes, so aim for a shade that is one “step” brighter than your desired final result.
Step 4: Whisk and Combine Dry Ingredients
In a separate small bowl, whisk together the 1 cup all-purpose flour, 1 tablespoon cocoa powder, and 1/4 teaspoon salt. Slowly add the dry mixture to the green wet base. Use a rubber spatula to fold the ingredients together just until the last white streaks of flour disappear. Do not over-mix, or the brownies will become tough.
Step 5: The Bake
Pour the batter into the prepared pan and smooth the top with your spatula. Bake for 20–25 minutes.
- The Doneness Test: Insert a toothpick into the center; it should come out with a few moist crumbs attached, but not liquid batter. Do not over-bake, as velvet brownies can dry out quickly. Let the brownies cool completely in the pan.
Step 6: Master the Cream Cheese Frosting
While the brownies cool, beat 8 oz of softened cream cheese and 4 tablespoons of softened butter together until completely smooth and lump-free. Gradually add 2 cups of powdered sugar and 1 teaspoon of vanilla. Beat on high speed for 2–3 minutes until the frosting is light, fluffy, and looks like a white cloud.
Step 7: Frost and Garnish
Once the brownies are stone-cold, use the parchment sling to lift them out of the pan. Spread a thick, even layer of the cream cheese frosting over the top. Use a palette knife or the back of a spoon to create decorative “swoops.” Garnish with festive green sprinkles or extra brownie crumbs.

Secrets to a Flawless Velvet Crumb
- The Sifting Rule: Cocoa powder is notoriously lumpy. Always sift your cocoa and flour together before adding them to the wet ingredients. This ensures a perfectly smooth “velvet” texture without bitter pockets of dry powder.
- Cooling is Non-Negotiable: Never attempt to frost these brownies while they are even slightly warm. The high fat content in the cream cheese will melt instantly, resulting in a runny mess rather than a thick, stable topping.
- Control the Cocoa: It is tempting to add more chocolate, but velvet recipes rely on a low ratio of cocoa. If you add too much, the dark brown color will “muddy” the green dye, resulting in a swampy olive color rather than a bright emerald.
- Clean Slicing Hack: To get those perfect, sharp-edged squares you see in professional photography, place the frosted brownies in the refrigerator for 30 minutes to set the cheese. Use a long, sharp knife dipped in hot water and wiped clean between every single cut.
Variations and Substitutions
- Mint Velvet Version: Add 1/2 teaspoon of peppermint extract to the brownie batter and top the frosting with crushed Andes Mints for a “Shamrock Shake” flavor profile.
- White Chocolate Chunk: Fold in 1/2 cup of white chocolate chips to the batter for a sweet, creamy contrast within the green fudge.
- The “Grinch” Brownie: Use a lighter lime-green tint and place a single red candy heart in the center of each square.
- Gluten-Free Swap: This recipe performs exceptionally well with a 1:1 gluten-free baking flour blend, as the moisture from the butter and eggs provides plenty of structure.
Storage and Shelf Life
- Refrigerator: Because of the cream cheese frosting, these brownies must be stored in the fridge. Keep them in an airtight container for up to 5 days.
- Freezer: You can freeze the brownies (frosted or unfrosted) for up to 2 months. Wrap them tightly in plastic wrap and then a layer of foil. Thaw in the refrigerator overnight before serving.
- Serving Note: For the best texture, remove the brownies from the fridge 20 minutes before eating. This allows the brownie base to soften slightly while the frosting remains cool and firm.
FAQ
Can I make these without food coloring? Yes, but they will be a pale, reddish-tan color. The flavor will remain a delicious mild chocolate, but the “Emerald” visual appeal will be lost.
Why is my cream cheese frosting runny? This usually happens if the cream cheese or butter was too soft (melted) or if you used a low-fat variety. To fix it, add another 1/4 cup of powdered sugar and chill the frosting for 15 minutes before spreading.
Can I use a 9×13 pan? Yes, but you will need to double all the ingredients. The bake time will increase to approximately 30–35 minutes.
How do I get the “cracked” top? The cracked top comes from properly creaming the eggs and sugar. Ensure you beat them for a full minute during Step 2 to incorporate enough air.

Green Velvet Brownies (Gourmet Cream Cheese Frosting Recipe)
Ingredients
Equipment
Method
- Preheat oven to 350°F (175°C). Grease and line an 8×8-inch or 9×9-inch baking pan with parchment paper, leaving overhang for easy removal.
- In a large bowl, whisk together sugar and melted butter until glossy. Add eggs and vanilla and whisk for 1 minute until pale and slightly frothy.
- Stir in green gel food coloring, adding gradually until a vibrant green color is achieved.
- In a separate bowl, whisk together flour, cocoa powder, and salt. Gently fold dry ingredients into the wet mixture just until combined.
- Pour batter into prepared pan and smooth the top. Bake for 20–25 minutes, until a toothpick inserted in the center comes out with moist crumbs. Cool completely.
- Beat cream cheese and butter until smooth. Gradually add powdered sugar and vanilla, beating until light and fluffy.
- Spread frosting evenly over cooled brownies. Chill briefly for clean slicing, then cut into squares and serve.


