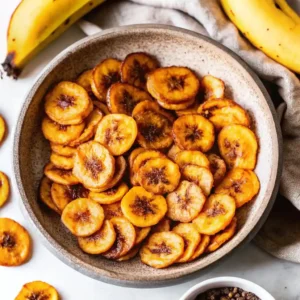
If you have ever found yourself craving a crunchy snack but wanting to avoid the excess oil and sugar of store-bought potato chips, these Homemade Baked Banana Chips are about to become your new obsession. With just two simple ingredients and a little bit of patience, you can transform ordinary fruit into a golden, crispy treat that satisfies both your sweet tooth and your need for crunch.
Unlike the fried banana chips you find in the snack aisle, this oven-baked version is guilt-free, naturally sweet, and incredibly easy to make. The secret lies in the “low and slow” baking method, which dehydrates the fruit without burning it, concentrating the natural sugars into a caramel-like flavor. Whether you pack them in your kids’ lunchboxes, crumble them over your morning yogurt, or just eat them by the handful while watching a movie, these healthy chips are the ultimate pantry staple you can make right at home. Let’s get slicing!

Why You’ll Love This Recipe
- Only 2 Ingredients: You likely have everything you need in your kitchen right now: bananas and lemons.
- Naturally Gluten-Free & Vegan: A safe and healthy snack for almost every dietary requirement.
- No Added Sugar: The sweetness comes entirely from the fruit itself, making it a guilt-free indulgence.
- Cost-Effective: Store-bought dried fruit can be expensive. This recipe allows you to make a huge batch for a fraction of the price.
- Perfect for Meal Prep: These chips store beautifully, meaning you can make a big batch on Sunday and enjoy healthy snacks all week long.
Ingredients Notes & Selection
Since this recipe relies on only two ingredients, the quality and state of those ingredients make a huge difference in the final result.
The Bananas
The ripeness of your bananas is the most critical factor.
- Best Choice: Look for bananas that are ripe but firm. They should be completely yellow with no green on the stem, but not yet spotted with brown. This ensures they are sweet enough to taste good but firm enough to slice thinly and hold their shape.
- Too Green: If the bananas are under-ripe, the chips will lack flavor and taste starchy or chalky.
- Too Ripe: If the bananas have brown spots or are soft, they will be difficult to slice thinly and may turn mushy in the oven rather than crisping up.
The Lemon Juice
- Freshly Squeezed: You will need the juice of 1-2 lemons.
- Purpose: The acidity in the lemon juice serves two purposes. First, it prevents the bananas from oxidizing (turning brown) as soon as they are sliced. Second, it adds a subtle brightness that cuts through the intense sweetness of the dehydrated fruit.
Step-by-Step Instructions
Achieving that store-bought crunch at home is all about moisture removal. Follow these steps carefully for the best results.
Step 1: Prep and Preheat
Preheat your oven to 200°F (95°C). This low temperature is vital; we are essentially dehydrating the bananas rather than “cooking” them.
Line two large baking sheets with parchment paper or silicone baking mats. Lightly grease the parchment with a quick spray of cooking oil to ensure the slices don’t stick.
Step 2: Slice the Bananas
Peel your bananas. Using a sharp knife or a mandoline slicer (highly recommended for consistency), slice the bananas into 1/8-inch to 1/4-inch rounds.
- Tip: Consistency is key. If some slices are thick and others are thin, they will bake unevenly, leaving you with some burnt chips and some chewy ones.
Step 3: The Lemon Bath
Pour the lemon juice into a shallow bowl. Dip each banana slice into the juice, ensuring it is coated on both sides. Shake off the excess liquid—you want them coated, not dripping wet.
- Alternative Method: If dipping individual slices feels tedious, you can brush the lemon juice over the slices once they are on the baking sheet using a pastry brush.
Step 4: Arrange and Bake
Place the banana slices on the prepared baking sheets in a single layer. Do not overlap them, or they will steam instead of crisp.
Place the pans in the oven and bake for 1 hour.
Step 5: Flip and Continue Baking
After the first hour, remove the pans. The bananas should feel tacky but not wet. carefully flip each slice over. This ensures they dry out evenly on both sides.
Return the pans to the oven and bake for another 1 to 1.5 hours.
- Check for Doneness: Around the 2-hour mark, test a chip. It should feel leathery and dry to the touch, and look golden brown. Keep in mind that they will not be rock-hard while hot.
Step 6: The Cooling Process
Remove the pans from the oven and transfer the banana chips to a wire cooling rack immediately.
- Crucial Step: The chips crisp up significantly as they cool down. Let them sit for at least 20-30 minutes before eating. If they are still chewy after cooling, pop them back in the oven for another 15-20 minutes.
Tips for the Crispiest Chips
- Use a Mandoline: It is very difficult to get paper-thin, even slices with a knife. A mandoline ensures every chip is the exact same thickness, leading to uniform crunch.
- Don’t Rush the Oven: It might be tempting to crank up the heat to 300°F or 400°F to speed things up, but this will burn the sugars in the fruit before the moisture has evaporated. Low and slow is the only way.
- Air Flow Matters: If you have a convection setting on your oven, use it! It circulates air and helps dehydrate the fruit faster. You may need to reduce the cooking time slightly.
- Avoid Overcrowding: If you try to jam too many slices onto one pan, the moisture released will create a humid environment, resulting in soft, chewy fruit leather instead of chips.
Flavor Variations
While plain banana chips are delicious, you can easily dress them up with spices.
- Cinnamon Sugar: Before baking, sprinkle the lemon-coated slices with a mixture of cinnamon and a tiny pinch of sugar.
- Salty & Savory: Skip the sugar and sprinkle with coarse sea salt. The sweet-and-salty combo is addictive.
- Spicy Kick: Add a dusting of cayenne pepper or chili powder for a tropical heat.
- Chocolate Dipped: After the chips have completely cooled and crisped, dip half of each chip into melted dark chocolate and let it set in the fridge.
Storage and Shelf Life
Proper storage is essential to keep your hard work from going to waste. Humidity is the enemy of dehydrated food.
- Cool Completely: Never package warm chips. Condensation will form inside the container and make them soggy instantly.
- Airtight Container: Store the cooled chips in a glass jar or airtight plastic container.
- Room Temperature: Keep them in a cool, dry place. They will stay fresh for up to 2-3 weeks.
- Freezing: You can freeze them for longer storage, but they may lose some crispiness upon thawing.
FAQ
Why are my banana chips chewy instead of crispy? This usually means they still have too much moisture inside. They might have been sliced too thick or not baked long enough. You can try putting them back in the oven for 15-minute intervals. Also, remember they must cool down to harden.
Can I use frozen bananas? No. Frozen bananas release too much water when they thaw and their structure breaks down, making them mushy. They are great for banana bread, but not for chips.
Do I have to use lemon juice? The lemon juice prevents browning and adds flavor, but you can use orange juice or pineapple juice for a sweeter alternative. You can skip the acid entirely, but your chips will be a darker brown color.
Can I make these in an Air Fryer? Yes! Arrange slices in a single layer in the air fryer basket (you will need to do multiple batches). Air fry at 270°F (130°C) for 15-20 minutes, flipping halfway through. Watch them closely as air fryers cook much faster than ovens.
Is parchment paper or foil better? Parchment paper is generally better as it is naturally non-stick. If using foil, be sure to grease it well, otherwise, the caramelized sugars in the banana will stick to the metal.
Making Homemade Baked Banana Chips is a rewarding process that transforms a humble fruit into a premium snack. While it takes a bit of time in the oven, the active effort is minimal, and the result is a preservative-free, wholesome treat that you can feel good about eating. So grab that bunch of yellow bananas sitting on your counter and turn them into something spectacular!
Homemade Baked Banana Chips
Ingredients
Equipment
Method
- Preheat oven to 200°F (95°C). Line two large baking sheets with parchment paper or silicone baking mats. Lightly grease if desired.
- Peel bananas and slice into even 1/8- to 1/4-inch thick rounds using a sharp knife or mandoline slicer.
- Dip banana slices briefly into lemon juice to coat both sides. Shake off excess liquid.
- Arrange banana slices in a single layer on baking sheets without overlapping.
- Bake for 1 hour, then flip each slice carefully.
- Return to oven and bake for an additional 1 to 1.5 hours until dry, golden, and leathery.
- Transfer chips to a wire rack and allow to cool completely for 20–30 minutes to fully crisp.


