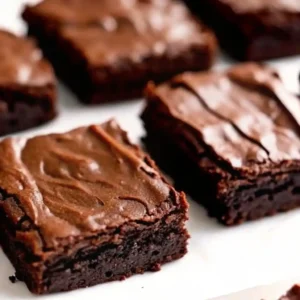
In the world of sourdough baking, the “discard” is often viewed as a byproduct to be managed. However, seasoned bakers know that this fermented mixture is a culinary goldmine, especially when it comes to the “Luxury Desserts” category. These Sourdough Discard Brownies are a masterclass in flavor complexity—a dense, fudgy, and intensely chocolatey treat that utilizes the natural acidity of sourdough to create a texture and depth of flavor that standard brownies simply cannot replicate.
The beauty of this recipe lies in the chemical interaction between the fermented discard and the heavy fats of the chocolate. The lactic acid in the sourdough tenderizes the crumb, resulting in a “melt-in-your-mouth” succulent texture, while the subtle tang provides a sophisticated foil to the richness of the cocoa. Whether you are a dedicated bread maker looking to reduce waste or a chocolate enthusiast seeking a professional-grade dessert, this guide will show you how to master the “glossy-top” whisking technique and the science of the perfect chocolate-to-discard ratio.

Why You’ll Love This Recipe
- Exceptional Moisture Retention: The hydration provided by the sourdough starter ensures these brownies stay soft and fudgy for up to a week, far longer than traditional recipes.
- Sophisticated Flavor Profile: The fermentation adds a “malt-like” depth and a light tang that makes the chocolate taste more intense and less cloying.
- The Perfect Crackly Top: We utilize a specific temperature-controlled whisking method to ensure that iconic, paper-thin shimmering crust every single time.
- Zero-Waste Baking: It is the most delicious way to use up your sourdough discard without having to fire up the oven for a 24-hour bread project.
- Bakery-Standard Density: These brownies sit perfectly between a truffle and a cake, offering a heavy-weight chew that feels truly indulgent.
Ingredient Notes & Pro Selections
Because this recipe relies on a few key flavor pillars, selecting high-quality fats and chocolates is the secret to a “Gourmet” result.
The Sourdough Discard
- Discard vs. Active: For this recipe, you want to use Sourdough Discard (unfed starter). It should be at room temperature to ensure it emulsifies properly with the melted chocolate.
- The Age Factor: Discard that has been in the fridge for 2–4 days offers the best balance of acidity. If your discard is very old (over a week), the tang may be too aggressive for a dessert.
The Chocolate Duo
- Bittersweet Baking Bars (60-70% Cacao): Do not use chocolate chips for the base melt! Chips contain stabilizers that prevent them from emulsifying into a smooth batter. Use high-quality baking bars (like Ghirardelli or Guittard).
- Dutch-Processed Cocoa Powder: This provides the deep, dark color and a smooth, mellow chocolate flavor. It reacts beautifully with the acidity of the sourdough.
The Fats & Sugars
- Unsalted European Butter: Higher fat content means less water, which leads to a fudgier brownie.
- Granulated & Light Brown Sugar: The granulated sugar is essential for the crackly top, while the brown sugar provides the molasses-rich “chew.”
The Texture Binders
- Large Eggs: These must be at room temperature. Cold eggs will cause the melted chocolate to seize.
- Pure Vanilla Bean Paste: For a “Luxury” look, use paste instead of extract to see those beautiful black vanilla specks within the dark fudge.
The Science of the Sourdough Fudginess
To achieve professional-grade results, one must understand the role of the discard. Sourdough discard is essentially equal parts flour and water that has been partially broken down by wild yeast and bacteria.
- Gluten Inhibition: The acidity in the discard (lactic and acetic acids) weakens the gluten bonds in the added flour. This is why these brownies are so tender—they lack the “bready” or “cakey” structure found in many home recipes.
- Flavor Enhancement: Much like adding coffee to chocolate, the fermented notes of the sourdough amplify the earthy tones of the cocoa beans.
- The Emulsion: The starter acts as a secondary emulsifier, helping the butter and chocolate bind into a cohesive, shiny batter that doesn’t leak oil during the bake.
Step-by-Step Instructions
Step 1: Prep and Melt
Preheat your oven to 350°F (175°C). Grease an 8×8-inch square baking pan and line it with parchment paper, leaving a 1-inch overhang (a “sling”) for easy removal. In a microwave-safe bowl or a double boiler, melt the 1 cup of butter and 4 oz of chopped chocolate. Stir until completely smooth and glossy. Let it cool for 5 minutes.
Step 2: The “Glossy Top” Whisk (The Secret Step)
In a large mixing bowl, combine the 1 cup granulated sugar, 1/2 cup brown sugar, and 2 large eggs. Crucial Technique: Use a whisk or a hand mixer on medium-high speed to beat the eggs and sugar for at least 3 to 4 minutes.
- The Goal: You are looking for the “Ribbon Stage”—the mixture should be pale, thick, and fall off the whisk in slow, visible ribbons. This process dissolves the sugar, which is the scientific requirement for a crackly top.
Step 3: Combine the Wet Elements
Whisk the cooled chocolate-butter mixture into the egg-sugar base. Gently stir in the 1/2 cup of sourdough discard and 1 tablespoon of vanilla paste. Mix until the color is uniform and the batter looks like dark liquid silk.
Step 4: Fold in the Dry Foundation
Sift in the 1/2 cup all-purpose flour, 1/2 cup cocoa powder, and 1/2 teaspoon salt. Using a rubber spatula, fold the ingredients together. Stop the second the last streak of flour disappears. Over-mixing at this stage will introduce too much air, leading to a cakey brownie rather than a fudgy one.
Step 5: The Bake
Pour the batter into the prepared pan and smooth the top. Bake for 28–32 minutes.
- The Doneness Test: Insert a toothpick into the center. For a “Gourmet” fudgy finish, the toothpick should come out with moist crumbs attached, not clean. If the batter is liquid, it needs more time; if the toothpick is dry, they are over-baked.
Step 6: The Mandatory Cool
Let the brownies cool completely in the pan for at least 2 hours.
- Pro Tip: Fudgy brownies need time for the fats to solidify. If you cut them while warm, they will fall apart. For the absolute best results, refrigerate the pan for 1 hour before slicing.
Secrets to a Professional Brownie Finish
- Don’t Skimp on the Whisking: As mentioned in Step 2, the crackly top is 100% dependent on how well you beat the eggs and sugar. If you skip this, your brownies will have a matte, dull surface.
- Sift the Cocoa: Cocoa powder is notoriously lumpy. Sifting ensures you don’t find a bitter pocket of dry powder in your moist brownie.
- Temperature of the Discard: If your discard is ice-cold from the fridge, it will cause the melted chocolate to clump. Take it out 30 minutes before you start.
- Clean Slicing: To get those sharp, “Insta-worthy” squares, use a large chef’s knife. Dip the blade in hot water and wipe it dry between every single cut.
Variations and Substitutions
- Salted Sourdough Brownies: Sprinkle a teaspoon of Maldon flaky sea salt over the batter immediately after removing it from the oven.
- Walnut Crunch: Fold in 1/2 cup of toasted chopped walnuts for a classic textural contrast.
- Espresso Infusion: Add 1 teaspoon of instant espresso powder to the dry ingredients to deepen the chocolate notes even further.
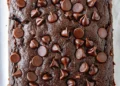
- White Chocolate Swirl: Drop small spoonfuls of melted white chocolate onto the raw batter and use a toothpick to create a marble effect.
Storage and Shelf Life
- Room Temperature: Store in an airtight container for up to 4 days.
- The Refrigerator Secret: These brownies actually improve in flavor and texture after 24 hours in the fridge. They become even denser and more truffle-like. They will stay fresh for up to 1 week.
- Freezing: Sourdough brownies freeze beautifully. Wrap individual squares in plastic wrap and place them in a freezer bag for up to 3 months. Thaw on the counter for 20 minutes before eating.
FAQ
Does the discard make the brownies sour? Not at all. The sugars and chocolate are the dominant flavors. The sourdough discard simply provides a subtle, complex background note that cuts through the sweetness and enhances the cocoa.
Can I use gluten-free flour? Yes! This recipe is very forgiving. A 1:1 gluten-free baking blend works well, as the discard provides plenty of moisture and structure.
Why is my sourdough discard brownies cakey? This usually happens from over-beating the batter after the flour is added, or from adding an extra egg. Stick to the “folding” method for the dry ingredients.
Can I make these without a sourdough starter? You can substitute the discard with 1/4 cup Greek yogurt and 1/4 cup all-purpose flour, but you will lose the specific fermented depth of the original.
Fudgy Sourdough Discard Brownies (The Ultimate Rich & Tangy Recipe)
Ingredients
Method
- Preheat your oven to 350°F (175°C). Grease an 8×8-inch square baking pan and line it with parchment paper, leaving a 1-inch overhang for easy removal. In a microwave-safe bowl or double boiler, melt the butter and chopped chocolate together until smooth and glossy. Let it cool for 5 minutes.
- In a large mixing bowl, combine the granulated sugar, brown sugar, and eggs. Using a hand whisk or a mixer, whisk on medium-high speed for 3-4 minutes until the mixture becomes pale, thick, and falls in ribbons when the whisk is lifted.
- Whisk the cooled chocolate-butter mixture into the egg-sugar base. Stir in the sourdough discard and vanilla paste until fully incorporated.
- Sift in the flour, cocoa powder, and salt into the mixture. Gently fold the ingredients with a rubber spatula, mixing until just combined. Be careful not to overmix.
- Pour the batter into the prepared pan and smooth the top. Bake for 28–32 minutes. The brownies should have a moist crumb attached to a toothpick, indicating they are fudgy. If the toothpick comes out clean, the brownies are overbaked.
- Allow the brownies to cool completely in the pan for at least 2 hours. For the best texture, refrigerate them for 1 hour before slicing.


