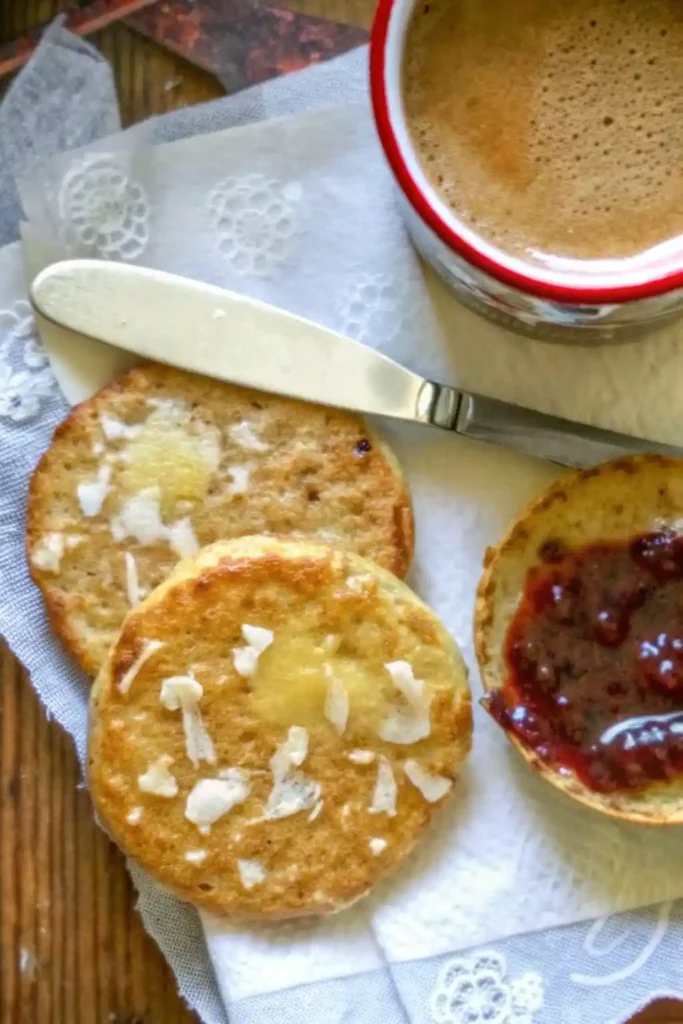
In the landscape of breakfast staples, the English muffin occupies a position of distinct architectural importance. Unlike the uniform crumb of a slice of toast or the dense interior of a bagel, a true English muffin is defined by its “nooks and crannies”—a complex network of irregular air pockets designed specifically to trap pools of melted butter and jam. While mass-produced grocery store versions are often dry and sponge-like, these Homemade English Muffins are a masterclass in texture, featuring a shatteringly crisp, cornmeal-dusted exterior and a soft, airy interior.
The secret to achieving professional-grade results at home lies in the management of dough hydration and the “cold-fermentation” process. By utilizing a high-moisture dough and allowing it to rise slowly, we encourage the development of large carbon dioxide bubbles that expand during the griddling process. This isn’t just a bread recipe; it is an exercise in stovetop baking—a method that uses dry heat to sear the top and bottom of the muffin simultaneously while the interior steams to perfection. Whether you are building an elaborate Eggs Benedict or simply seeking the perfect vehicle for salted butter, this guide will show you the professional secrets to the “fork-split” and the science of the high-hydration crumb.
Why You’ll Love This Recipe
- Superior Texture Control: Homemade muffins allow for a much higher hydration level than industrial versions, resulting in a significantly softer and more porous interior.
- The “Griddle” Experience: Unlike most breads that require a hot oven, English muffins are “baked” on a skillet, giving them a unique, toasted flavor and a perfectly flat profile.
- Complex Flavor Development: A slow, overnight rise develops a subtle, sourdough-adjacent tang that complements both savory and sweet toppings.
- Freezer-Friendly Staple: These muffins freeze exceptionally well, making them the ultimate “meal prep” item for busy weekday mornings.
- Artisan Appeal: The characteristic dusting of cornmeal and the irregular, handmade shapes provide an upscale, rustic aesthetic that elevates any brunch spread.
Ingredient Notes & Pro Selections
Because the English muffin is a minimalist bake, the quality of your grains and the temperature of your liquids will dictate the success of the rise.
The Flour & Grains
- Bread Flour (Highly Recommended): For the best “chew” and structural integrity, use a high-protein bread flour (approx. 12-13% protein). This allows the dough to hold onto the large air bubbles created during fermentation.
- Fine Yellow Cornmeal: This is essential for the exterior. It prevents the sticky dough from adhering to the pan and provide that signature “grit” and crunch on the crust.
The Liquids
- Whole Milk: Provides the fat and natural sugars needed for a tender crumb and even browning.
- Unsalted European Butter: Melted butter added to the dough ensures the interior stays succulent and prevents the muffin from becoming tough.
- Honey or Sugar: A small amount of sweetener acts as food for the yeast and facilitates the Maillard reaction on the griddle.
The Leavening
- Active Dry Yeast: Ensure your yeast is fresh! If it doesn’t foam in the warm milk, your muffins will be dense and leaden.
- Room Temperature Start: All ingredients should be at room temperature (around 70°F) to ensure a consistent rise.
The Science of the Nooks and Crannies
To achieve those iconic holes, one must understand the relationship between moisture and steam.
- High Hydration: A “slack” or sticky dough is mandatory. The excess water in the dough turns to steam instantly when it hits the hot griddle. This steam pushes the gluten strands apart, creating the “crannies.”
- The No-Knead Strategy: While some kneading is required to build strength, over-kneading can lead to a tight, uniform crumb. We aim for a dough that is just developed enough to hold its shape but loose enough to expand rapidly.
- The Fork Split: This is the most important rule. Never cut an English muffin with a knife! A knife blade flattens the air pockets. Using the tines of a fork to pry the muffin open preserves the jagged landscape of the interior.
Step-by-Step Instructions
Step 1: Activate the Yeast
In a small bowl, combine 1 cup of warm milk (110°F), 1 tablespoon of honey, and 2 ¼ teaspoons of active dry yeast. Stir gently and let it sit for 5–10 minutes until it becomes foamy and smells like fresh bread.
Step 2: Mix the Dough
In the bowl of a stand mixer, combine 3 cups of bread flour and 1 teaspoon of salt. Add the yeast mixture and 2 tablespoons of melted butter. Using the dough hook, mix on low speed until a shaggy dough forms. Increase to medium speed and “knead” for 5–8 minutes. The dough will be very sticky—this is correct. It should pull away from the sides of the bowl but still cling to the bottom.
Step 3: The First Rise
Transfer the sticky dough to a lightly oiled bowl. Cover with plastic wrap and let it rise in a warm, draft-free spot for 1.5 to 2 hours, or until it has doubled in size.
- Gourmet Option: For the best flavor, place the bowl in the refrigerator for 12–24 hours for a slow “cold ferment.”
Step 4: Shape the Rounds
Line a baking sheet with a generous layer of cornmeal. Turn the dough out onto a floured surface. Do not punch it down aggressively! Gently pat it into a 1-inch thick rectangle. Using a 3-inch round cutter, stamp out the muffins. Place them on the cornmeal-lined sheet and sprinkle the tops with more cornmeal. Let them rest (uncovered) for 45 minutes to 1 hour for a final rise.
Step 5: The Griddle Bake
Heat a large non-stick skillet or cast-iron griddle over medium-low heat. Do not add oil; the cornmeal provides the non-stick barrier. Carefully transfer the muffins to the skillet. Cook for 7–10 minutes per side.
- The Secret: Use a very low heat. If the griddle is too hot, the outside will burn before the inside is cooked. The muffins should puff up significantly during the first 5 minutes.
Step 6: The Oven Finish (Optional)
If you are worried the centers aren’t fully cooked, place the muffins in a 350°F (175°C) oven for 5 minutes immediately after griddling. Let them cool completely on a wire rack. Cutting into a warm muffin will result in a gummy texture.
Secrets to a Professional Breakfast Muffin
- Don’t Over-Flour: When shaping the muffins, use just enough flour to keep them from sticking to your hands. Adding too much flour into the dough during shaping will dry out the nooks and crannies.
- The Temperature Check: Use an instant-read thermometer. The internal temperature of a perfectly cooked English muffin should be between 200°F and 205°F.
- The “Ring” Method: For perfectly uniform, circular muffins, you can place “English Muffin Rings” (or clean tuna cans with the tops and bottoms removed) directly on the griddle and scoop the dough into them.
- Wait to Split: Resist the urge to fork-split the muffins while they are hot. The internal steam needs to dissipate to set the structure of the holes.
Variations and Substitutions
- Whole Wheat Muffins: Replace 1.5 cups of the bread flour with whole wheat flour. You may need to add an extra 2 tablespoons of milk to compensate for the higher absorption of whole grain.
- Cinnamon Raisin: Fold in 1/2 cup of raisins and 1 teaspoon of cinnamon during the final minute of mixing in the stand mixer.
- Sourdough Discard: Replace 1/2 cup of the flour and 1/2 cup of the milk with 1 cup of sourdough discard for a more complex, tangy profile.
- Everything Bagel Style: Sprinkle the tops with “Everything Bagel” seasoning instead of just cornmeal before the final rise.
Storage and Reheating Guide
- Room Temperature: Store in an airtight container for up to 4 days.
- Freezing: These are the ultimate freezer bread! Fork-split them before freezing. Place a small square of parchment paper between the halves and store in a freezer bag for up to 3 months.
- Reheating: Reheat directly from frozen in a toaster or toaster oven. The high heat of the toaster is essential for crisping those jagged nooks.
FAQ
Why are my English muffins flat? This usually happens if the dough was too dry or if the muffins were over-proofed during the second rise. Ensure the dough is sticky and keep an eye on them during the final 45-minute rest.
Can I make these without a stand mixer? Yes! You can mix the dough in a bowl with a sturdy spoon and “knead” it by using a series of stretches and folds every 30 minutes for 2 hours.
Do I have to use cornmeal? Semolina flour is a great substitute. If you have neither, you can use flour, but you will miss the characteristic “grit” of a traditional English muffin.
Why is the center of my muffin gummy? You likely cut into it while it was still warm, or the griddle heat was too high. The interior finishes “setting” during the cooling process.

Homemade English Muffins (The Ultimate Nooks and Crannies Recipe)
Ingredients
Method
- In a small bowl, combine warm milk (110°F), honey, and active dry yeast. Stir and let it sit for 5-10 minutes until it becomes foamy.
- In a stand mixer bowl, combine bread flour and salt. Add the yeast mixture and melted butter. Mix with a dough hook on low until the dough is shaggy.
- Knead the dough on medium speed for 5–8 minutes until it becomes smooth but still sticky. The dough should pull away from the sides but cling to the bottom of the bowl.
- Transfer the dough to a lightly oiled bowl, cover with plastic wrap, and let rise for 1.5 to 2 hours, or until doubled. (Alternatively, place in the fridge overnight for a slow rise.)
- Once the dough has risen, punch it down gently. Turn it out onto a floured surface and roll it into a 1-inch thick rectangle. Using a 3-inch round cutter, stamp out muffins. Place them on a baking sheet dusted with cornmeal, and sprinkle the tops with more cornmeal. Let rest for 45 minutes to 1 hour for the second rise.
- Heat a large skillet or cast-iron griddle over medium-low heat. Without adding oil, carefully transfer the muffins to the skillet. Cook for 7-10 minutes per side until golden brown. If unsure, check the internal temperature with a thermometer (200°F to 205°F).
- If the centers are not fully cooked, place the muffins in a 350°F oven for 5 minutes to finish baking. Let cool completely before slicing.


