You know those days when you’re desperately trying to find a snack for the kids that’s actually healthy but they’ll still get excited about? Yeah, that was literally my life every single afternoon until I stumbled onto these frozen yogurt granola cups. I was scrolling through social media one night after the kids went to bed (because apparently that’s what I do for fun now), and I saw someone making these cute little frozen cups with yogurt and granola. I thought, “there’s no way my kids will go for that” — but I was so desperate for an alternative to the endless goldfish crackers that I decided to try it anyway.
Friends, I’m not exaggerating when I say these have been life-changing. The first batch I made disappeared in literally two days. Emma asked if we could make them “every single week, please,” and Lucas has started calling them his “special treats.” They’re crunchy, creamy, slightly sweet, and feel like such a treat even though they’re basically just yogurt and granola in a clever format.
The best part? They take maybe 15 minutes to put together, and then you just freeze them. That’s it. No baking, no complicated steps, no fancy ingredients. Just a simple, wholesome snack that you can feel good about giving your family (or eating yourself at 10 p.m. while watching TV, not that I would know anything about that).
Why You’ll Love These Frozen Yogurt Granola Cups
I’ve been making these for about six months now, and here’s why they’ve become such a staple in our house:
- So easy it’s almost ridiculous: If you can stir things in a bowl and use a spoon, you can make these. There’s no baking, no cooking, no complicated techniques. Just mix, press, freeze. That’s literally it.
- Actually healthy: These are made with Greek yogurt (hello, protein!), whole grain granola, and fresh fruit. There’s nothing sketchy in here, no artificial anything, just real ingredients that you can pronounce.
- Kids genuinely love them: This is huge. Emma, who is going through a phase where she “doesn’t like anything,” asks for these by name. The frozen texture makes them feel like a special treat, even though they’re way healthier than actual ice cream.
- Perfect for meal prep: I make a batch on Sunday afternoon and we have grab-and-go snacks all week. They’re great for after school, after sports practice, or when someone’s just hungry and cranky.
- Completely customizable: You can use any yogurt flavor, any granola, any fruit or toppings you want. I’ve made them probably twenty different ways and they’re always good.
- Way cheaper than store-bought yogurt cups: Have you seen how much those fancy frozen yogurt bars cost? This is so much more economical, especially when you have kids who go through snacks like it’s their job.
Ingredients for Frozen Yogurt Granola Cups
The ingredient list is super simple, and you probably have most of this stuff already:
For the granola base:
- 2 cups granola (store-bought or homemade)
- 3 tablespoons almond butter (or peanut butter, cashew butter — any nut butter works)
- 2-3 tablespoons honey
- ½ teaspoon vanilla extract
- ¼ teaspoon cinnamon (optional, but I love it)
For the yogurt filling:
- 2 cups Greek yogurt (I use vanilla, but plain works too)
- Optional: 1-2 tablespoons honey (if you want it sweeter)
For toppings:
- Fresh berries (blueberries, strawberries, raspberries)
- Sliced bananas
- Mini chocolate chips (for special occasions)
- Extra granola crumbles
- Chopped nuts
- A drizzle of honey
Notes on ingredients:
The Greek yogurt is key here. I’ve tried making these with regular yogurt and they came out kind of icy and weird. Greek yogurt has less water content, so it freezes into this creamy, almost ice-cream-like texture. I usually use 2% or whole milk Greek yogurt — the low-fat stuff doesn’t freeze as nicely.
For the granola, I’ve used everything from homemade to various store-bought brands, and they all work great. My favorite is the honey almond kind, but honestly, use whatever you like or have on hand. Just make sure it’s not the super hard, crunchy type that might hurt your teeth when frozen.
The nut butter is what holds the granola base together. I usually use almond butter because that’s what I buy for smoothies, but peanut butter is more budget-friendly and works just as well. If you have a nut allergy, sunflower seed butter is a great alternative (and one I keep for Emma’s classroom snacks).
Here’s a tip I learned the hard way: if your granola mixture seems too dry and crumbly, add a bit more nut butter and honey until it sticks together when you squeeze it. The first time I made these, I was stingy with the nut butter and the bases just fell apart. Not cute.
How to Make Frozen Yogurt Granola Cups
Okay, this is truly one of the easiest recipes I’ll ever share with you. Here’s how it goes:
Step 1: Make the Granola Base
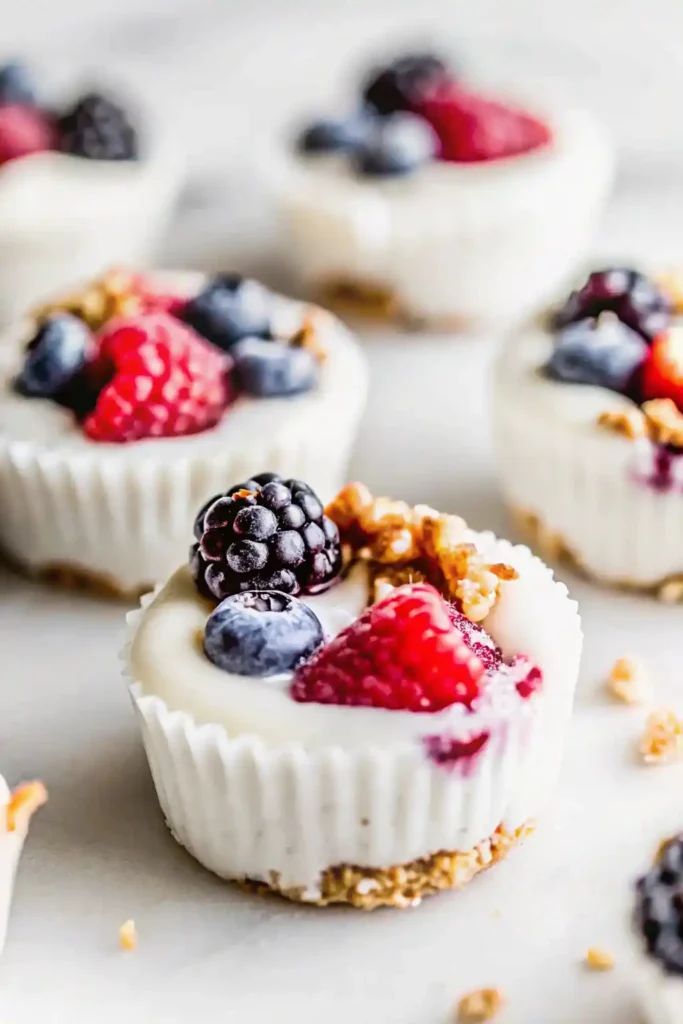
Step 1: Line a 12-cup muffin tin with paper or silicone muffin liners. Silicone liners are honestly better for this because the cups pop out so much easier, but paper liners work too.
Step 2: In a medium bowl, mix together the granola, almond butter, honey, vanilla extract, and cinnamon. Use your hands if you need to — I usually do! You want everything to be well combined and sticky enough to hold together when pressed.
Step 3: Scoop about 2 tablespoons of the granola mixture into each muffin cup. Press it down firmly with the back of a spoon or your fingers. You want a solid base that won’t crumble when you eat it later.
Pro tip: Really press it down. Like, more than you think you need to. The first batch I made, I was too gentle and the bases were crumbly. Now I press hard enough that I can feel it’s packed solid, and they come out perfect every time.
Step 2: Add the Yogurt
Step 1: If you’re sweetening your yogurt, stir in the honey now. I taste as I go — sometimes I add honey, sometimes the yogurt is sweet enough on its own.
Step 2: Spoon about 2-3 tablespoons of yogurt on top of each granola base, filling almost to the top of the liner. Leave just a tiny bit of room for toppings.
Step 3: Use the back of your spoon to smooth the yogurt surface. This isn’t just for looks — it makes it easier to add toppings evenly.
Note: I used to fill these all the way to the brim, and then the toppings would overflow and make a mess. Now I leave about ¼ inch of space and it’s much better.
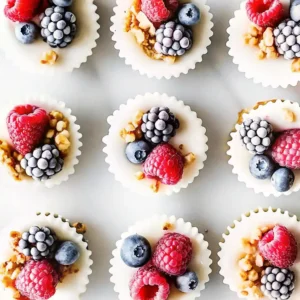
Step 3: Add Your Toppings
Step 1: This is the fun part! Add whatever toppings you want. I usually do a mix of fresh berries — a few blueberries, some sliced strawberries, maybe a raspberry or two.
Step 2: Gently press the toppings into the yogurt so they’ll freeze into it and not fall off later. Lucas learned this the hard way when his blueberries all rolled off his first cup.
Step 3: If you want, sprinkle a few extra granola crumbles on top or drizzle with a tiny bit of honey.
Ideas for toppings:
- Classic berry mix (my go-to)
- Sliced banana with a few mini chocolate chips (Emma’s favorite)
- Tropical: diced mango and shredded coconut
- Peanut butter lover: extra PB drizzle and chopped peanuts
- Chocolate lover: mini chocolate chips and cacao nibs
- Apple pie style: diced apple with extra cinnamon
Step 4: Freeze
Step 1: Place the muffin tin carefully in the freezer. Try to keep it level so the yogurt doesn’t slosh to one side.
Step 2: Freeze for at least 4 hours, but preferably overnight. I always make these in the afternoon so they’re ready for snack time the next day.
Step 3: Once they’re completely frozen, you can pop them out of the muffin tin and store them in a freezer bag or airtight container. This frees up your muffin tin for other uses (or for making more!).
Tips for the Best Frozen Yogurt Cups
After making batch after batch of these, here’s what I’ve learned:
Let them thaw for 5-10 minutes before eating: This is crucial! Straight from the freezer, they’re too hard to bite into comfortably. I learned this when I chipped my tooth trying to eat one too soon (okay, not really chipped, but it hurt). Let them sit on the counter for a few minutes and they soften to the perfect texture.
Use full-fat or 2% Greek yogurt: The fat content makes such a difference in the creamy texture. I tried making these with non-fat yogurt once and they were icy and not nearly as good.
Press that granola base HARD: I’m saying it again because it’s so important. A firmly packed base won’t crumble when you eat it.
Silicone liners are worth it: I resisted buying silicone muffin liners for so long, but they make such a difference for this recipe. The cups pop right out, no sticking, no tearing. I got a set of 12 on Amazon for like $8 and I use them constantly.
Make extra: These go fast. I thought a dozen would last us a week. It lasted three days. Now I double the recipe every time.
Try flavored yogurt: Vanilla is great, but I’ve also made these with strawberry yogurt, peach yogurt, honey yogurt — they’re all delicious. Just taste your yogurt first and adjust the added honey accordingly.
Add protein powder if you want: I’ve stirred a scoop of vanilla protein powder into the yogurt before and it worked great. Just add a tablespoon or two of milk to thin it out slightly since protein powder thickens everything.
Storage and Make-Ahead Tips
Storing: Once frozen solid, pop them out of the muffin tin and store in a freezer bag or airtight container. They’ll keep in the freezer for up to 2 months, though ours never last that long.
Grab-and-go option: I sometimes individually wrap each cup in plastic wrap once frozen, then put them all in a freezer bag. This makes them perfect for packing in lunchboxes or taking to sports practice.
Batch prep: I usually make a double batch on Sunday afternoons. It doesn’t take much more time, and then I know we’re set for snacks all week.
Thawing: Take one out and let it sit on the counter for 5-10 minutes before eating. If you’re packing them for lunch, they’ll thaw to the perfect consistency by lunchtime.
Not quite frozen enough? Sometimes I’m impatient and try to eat them after only 3 hours. They’re edible but kind of soft and slushy. For the best texture, really let them freeze overnight.
Variations to Try
The beauty of this recipe is how flexible it is. Here are some variations I’ve tried and loved:
Peanut butter and jelly: Use peanut butter in the base, swirl a little strawberry jam into the yogurt, and top with fresh strawberries. Lucas calls these his “PB&J cups” and loses his mind over them.
Chocolate lover’s: Use chocolate granola, add a tablespoon of cocoa powder to the yogurt, and top with mini chocolate chips. This is my secret dessert when I’m trying to eat healthier but want something sweet.
Tropical paradise: Use coconut granola, add diced mango and pineapple on top, sprinkle with shredded coconut. These taste like vacation.
Apple cinnamon: Mix diced apple into the yogurt with extra cinnamon, use cinnamon granola for the base. Perfect for fall!
Protein-packed: Add a scoop of protein powder to the yogurt and top with nut butter drizzle and hemp hearts.
Dairy-free: Use coconut yogurt or almond milk yogurt and make sure your granola is dairy-free. I’ve made these for Emma’s friend who’s lactose intolerant and they were a hit.
What to Serve Them With
These are pretty perfect on their own, but sometimes we have them alongside:
Breakfast: I’ll give the kids one of these with a piece of whole wheat toast with peanut butter, and that’s a solid breakfast.
After school snack: Just the cup by itself is usually enough, but sometimes I’ll add a handful of pretzels or some veggies and hummus on the side.
Post-workout: These are my favorite thing to eat after my morning workout. The protein from the yogurt and the carbs from the granola are exactly what I need.
Dessert: Honestly, these feel treat-like enough to count as dessert. Way healthier than ice cream but still satisfying that sweet craving.
Frequently Asked Questions
Can I use regular yogurt instead of Greek yogurt? I really don’t recommend it. Regular yogurt has too much water content and freezes into an icy, not-creamy texture. Greek yogurt is key here for that smooth, almost ice-cream-like consistency.
What if I don’t have muffin liners? You can grease the muffin tin really well with cooking spray or butter. The cups will be a bit harder to remove, but it works. I’ve also used small paper cups or even silicone ice cube trays for mini versions.
Can I make these without the granola base? Sure! You’ll basically have frozen yogurt cups. They’re still good, just not as interesting texture-wise. The granola base adds that satisfying crunch.
How long do they need to freeze? Minimum 4 hours, but overnight is better. I’ve tried eating them after 3 hours and they’re still a bit soft in the middle.
Can kids help make these? Absolutely! This is one of the best recipes for kids to help with. Lucas loves pressing the granola bases and adding the toppings. Just supervise when they’re mixing the sticky nut butter and honey mixture.
What if they won’t come out of the muffin tin? Let them sit at room temperature for 5 minutes, then run a butter knife around the edge of each cup. They should pop right out. This is way easier with silicone liners!
Can I make these keto or low-carb? You could use a low-carb granola and unsweetened yogurt, maybe add some sugar-free sweetener. I haven’t tried it myself, but I don’t see why it wouldn’t work.
Do they taste like frozen yogurt? Sort of! They have a creamy frozen texture similar to frozen yogurt, but with the added crunch of the granola base. They’re not quite as sweet as store-bought frozen yogurt, which I actually prefer.
Frozen Yogurt Granola Cups
Ingredients
Method
- Line a 12-cup muffin tin with paper or silicone muffin liners. If using paper liners, consider greasing them lightly.
- In a medium bowl, combine granola, almond butter, honey, vanilla extract, and cinnamon. Mix until everything is sticky and well combined.
- Scoop about 2 tablespoons of the granola mixture into each muffin cup. Press down firmly with the back of a spoon or your fingers to form a solid base.
- In a separate bowl, stir Greek yogurt with honey (optional) to sweeten. Spoon about 2-3 tablespoons of yogurt on top of each granola base. Smooth the surface with the back of a spoon, leaving a small gap at the top for toppings.
- Top the yogurt with your choice of fresh berries, sliced bananas, mini chocolate chips, or any other toppings you prefer. Gently press the toppings into the yogurt.
- Place the muffin tin in the freezer and freeze for at least 4 hours or overnight until completely frozen.
- Once frozen, carefully pop the cups out of the muffin tin and store them in an airtight container or freezer bag. They can be stored in the freezer for up to 2 months.


