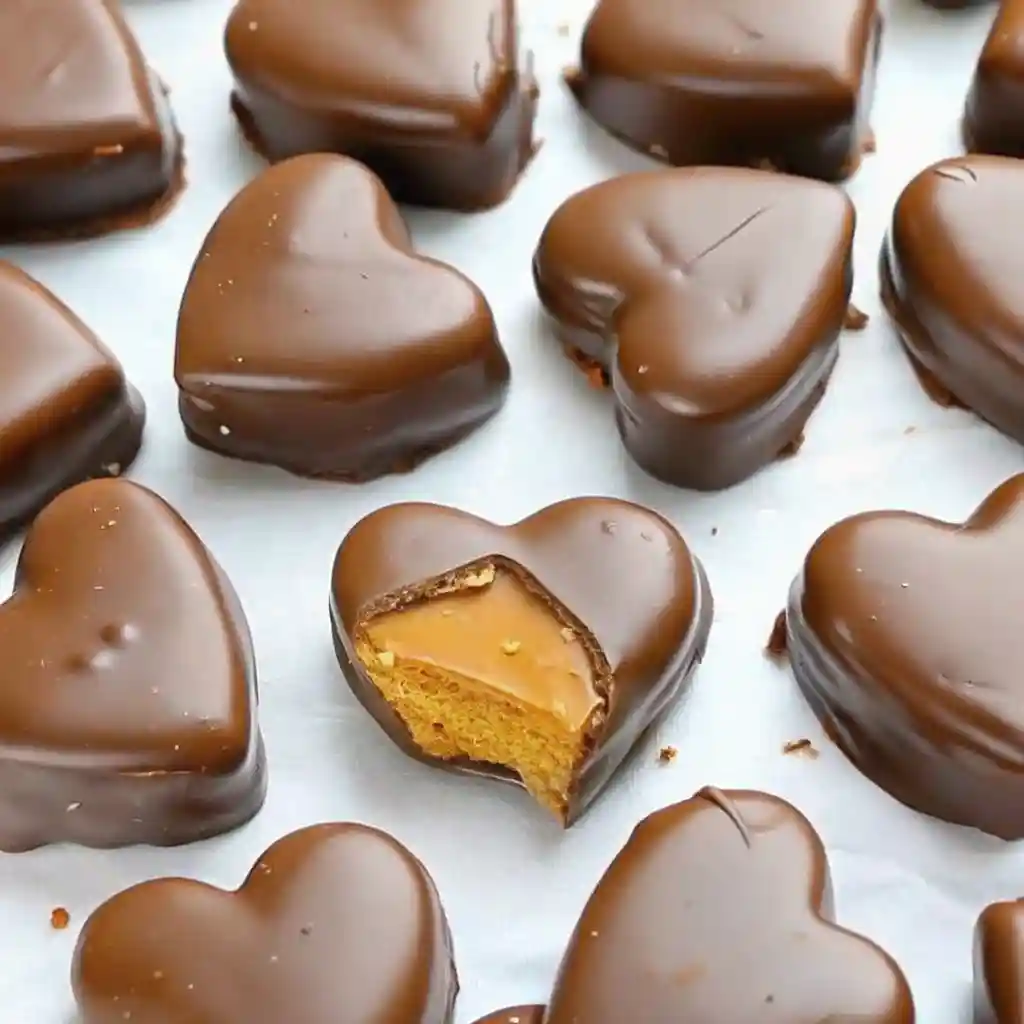
There is a cultural phenomenon that happens every February: the hunt for the elusive Reese’s Peanut Butter Heart. Fans of the brand have long argued that the holiday shapes—the pumpkins, trees, and hearts—possess a superior peanut-butter-to-chocolate ratio compared to the standard cup. The center is saltier, the texture is creamier, and the chocolate is just thin enough to give way to that iconic filling.
But what if you didn’t have to wait for the seasonal aisle to stock up? This Homemade Reese’s Peanut Butter Hearts recipe allows you to recreate that exact “melt-in-your-mouth” experience in your own kitchen. By using real butter, high-quality chocolate, and a secret texture-binding ingredient, you can make a version that is arguably better than the store-bought original. These no-bake treats are perfect for Valentine’s Day gifting, school parties, or simply satisfying a serious craving. Let’s dive into the science of the perfect peanut butter filling and how to get that professional chocolate-dipped finish at home.

Why You’ll Love This Recipe
If you are a fan of the chocolate-peanut butter combination, this recipe is a game-changer. Here is why this version outshines the store-bought packages:
- Superior Ingredients: You are in control of the quality. By using high-quality European-style butter and premium chocolate melting wafers, you eliminate the preservatives and high-fructose corn syrup found in commercial candies.
- The Perfect Texture: Most homemade peanut butter cups are too gritty or too soft. This recipe uses finely crushed graham cracker crumbs to mimic the unique, slightly dry, yet creamy texture of a real Reese’s center.
- Cost-Effective: Making a large batch of these hearts at home is significantly cheaper than buying individual seasonal packs, especially if you are gifting them to multiple people.
- No Special Molds Required: While you can use a heart-shaped silicone mold, this recipe teaches you how to hand-cut or use a cookie cutter for that iconic heart shape, making it accessible for everyone.
- Ideal for Gifting: These hearts are sturdy enough to be packaged in clear cellophane bags with a ribbon, making them a thoughtful, delicious “edible Valentine.”
Ingredient Notes & The Science of the Filling
Achieving the “Reese’s” flavor isn’t just about mixing peanut butter and sugar; it’s about the balance of fats and solids.
The Peanut Butter Base
- Creamy Peanut Butter (1 ½ Cups): For the most authentic texture, use a standard “no-stir” creamy peanut butter like Jif or Skippy. Avoid “natural” peanut butters that separate, as the excess oil will prevent the hearts from firming up properly.
- Unsalted Butter (½ Cup): Softened to room temperature. Butter provides the richness and helps the centers hold their shape once chilled.
- Confectioners’ Sugar (2 Cups): Also known as powdered sugar. This provides sweetness and structure without the grittiness of granulated sugar.
The Secret Texture Binder
- Graham Cracker Crumbs (1 Cup): This is the “secret” ingredient. If you use only sugar and peanut butter, the filling will be too sticky. The fine crumbs of graham crackers absorb excess oil and provide that signature slightly-gritty-but-smooth mouthfeel that makes Reese’s unique.
The Chocolate Coating
- Chocolate Melting Wafers or Chips (12 oz): Use high-quality milk chocolate for the classic taste, or dark chocolate for a sophisticated twist.
- Coconut Oil or Shortening (1 Tbsp): Mixing a small amount of fat into your melted chocolate helps it stay smooth, prevents it from “blooming” (turning white), and gives the finished candy a beautiful glossy sheen.
Step-by-Step Instructions
Step 1: Prepare the Peanut Butter Dough
In a large mixing bowl, beat together the softened butter and creamy peanut butter until completely smooth. You can do this by hand, but a hand mixer ensures a perfectly aerated base. Gradually add the powdered sugar and graham cracker crumbs. Mix until a thick, pliable dough forms. It should feel like playdough—not too sticky, but not so dry that it cracks when pressed.
Step 2: Roll and Chill
Line a large baking sheet with parchment paper. Place the peanut butter mixture on the sheet and press it down into an even layer, approximately ½-inch to ¾-inch thick. Use a rolling pin or the back of a flat measuring cup to smooth the top. Place the tray in the freezer for 20–30 minutes. Chilling the dough before cutting is essential to ensure clean edges on your hearts.
Step 3: Cut the Heart Shapes
Remove the tray from the freezer. Use a small (2-inch) heart-shaped cookie cutter to cut out your hearts.
- Pro Tip: If you don’t have a cookie cutter, you can cut the dough into small rectangles and use a knife to trim the top into a heart shape. Place the cut-out hearts back on the parchment paper and return them to the freezer for another 30 minutes. They must be very cold and firm before dipping in hot chocolate.
Step 4: Melt the Chocolate
In a microwave-safe bowl, combine the chocolate chips and coconut oil. Heat in 30-second increments, stirring well after each burst. Once the chocolate is about 80% melted, stop the microwave and stir continuously until the residual heat melts the remaining pieces. This “shortcut tempering” ensures the chocolate sets firmly at room temperature.
Step 5: The Dipping Process
Remove a few hearts from the freezer at a time (keeping the rest cold). Use a fork to submerge a heart into the melted chocolate. Lift it out and gently tap the fork against the side of the bowl to let the excess chocolate drip off. Slide the heart back onto the parchment paper. If you want to add festive sprinkles, do it now while the chocolate is still wet!
Step 6: Set and Serve
Allow the chocolate to set completely at room temperature (about 1 hour) or in the refrigerator (15 minutes). Once the chocolate is hard, they are ready to eat or package!

Tips for a Professional Finish
- Keep it Cold: The biggest mistake people make is trying to dip “warm” peanut butter. If the centers aren’t frozen, they will melt into your chocolate, creating a “peanut butter swirl” mess rather than a clean coating.
- Thin Your Chocolate: If your chocolate feels too thick to dip, add another teaspoon of coconut oil. You want it to be the consistency of heavy cream so it creates a thin, elegant shell.
- Use a Fork, Not a Spoon: A fork allows the excess chocolate to drain through the tines, preventing a “puddle” of chocolate from forming at the base of your hearts.
- Scrap the Excess: When moving the heart from the chocolate to the paper, drag the bottom of the fork against the rim of the bowl to “wipe” the bottom.
Variations to Try
- Dark Chocolate Sea Salt: Use 70% dark chocolate for the coating and sprinkle with a few grains of flaky sea salt (like Maldon) while wet.
- White Chocolate Hearts: Use white chocolate melting wafers for a “White Reese’s” copycat.
- Double Chocolate: Add 2 tablespoons of cocoa powder to the peanut butter dough for a chocolate-on-chocolate experience.
- Nut-Free Version: Use sunflower seed butter (SunButter) and ensure your graham crackers are nut-free. The texture is nearly identical!
Storage and Shelf Life
- Room Temperature: These candies are shelf-stable for up to 1 week if kept in a cool, dry place.
- Refrigerator: To keep that “snap” in the chocolate, store them in an airtight container in the fridge for up to 3 weeks.
- Freezer: These are amazing as a frozen treat! Store in a freezer bag for up to 3 months. You can eat them directly from the freezer—they won’t get rock hard.
FAQ
Can I make these without graham cracker crumbs? You can, but the texture will be different. You would need to increase the powdered sugar significantly to get them to hold their shape, which can make them overly sweet. Fine digestive biscuit crumbs or vanilla wafer crumbs are the best substitutes.
Why did my chocolate turn white? This is called “blooming.” It usually happens if the chocolate was heated too quickly or stored in a place with fluctuating temperatures. It is still safe to eat, just not as pretty!
Can I use a heart mold instead? Yes! If using a mold, paint a layer of chocolate into the mold first, let it set, press the peanut butter filling inside, and then cover with a final layer of chocolate.
Why is the peanut butter sticking to the cookie cutter? Your dough might be too warm. Pop it back in the freezer for 10 minutes. You can also dip your cookie cutter in a little bit of powdered sugar before each cut to prevent sticking.

Homemade Reese’s Peanut Butter Hearts
Ingredients
Equipment
Method
- In a large bowl, beat the peanut butter and softened butter until smooth. Gradually mix in the powdered sugar and graham cracker crumbs until a thick, moldable dough forms.
- Press the peanut butter mixture onto a parchment-lined baking sheet into an even 1/2–3/4 inch layer. Freeze for 20–30 minutes until firm.
- Use a heart-shaped cookie cutter or knife to cut hearts. Place cut hearts back onto the tray and freeze for another 30 minutes.
- Melt chocolate and coconut oil together in the microwave in 30-second intervals, stirring until smooth.
- Dip frozen peanut butter hearts into melted chocolate using a fork. Tap off excess and place back on parchment paper.
- Let chocolate set at room temperature or refrigerate for 15 minutes until firm. Serve or package for gifting.


