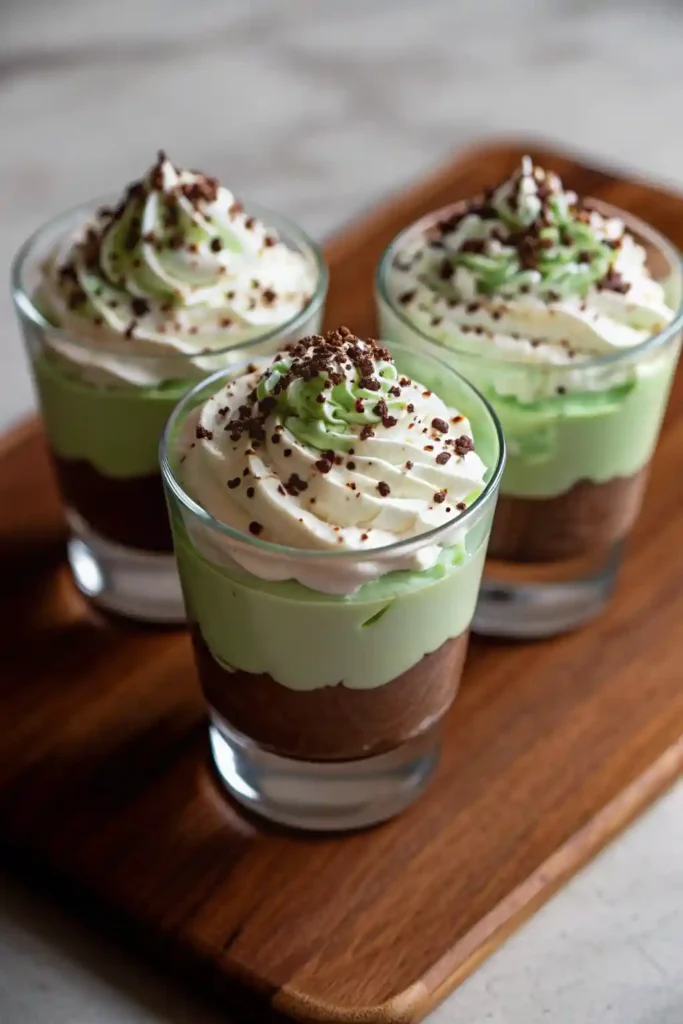
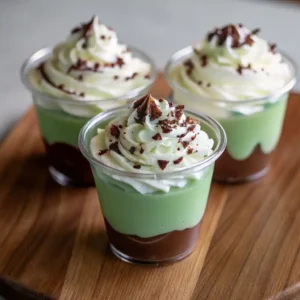
When the calendar turns to March and the world begins to celebrate all things Irish, there is one flavor profile that reigns supreme: the cool, refreshing combination of mint and chocolate. While the famous fast-food milkshake is a seasonal staple, these Shamrock Shake Pudding Cups take that iconic taste and transform it into an elegant, multi-layered dessert that requires zero oven time. Imagine silky, emerald-green mint pudding stacked against rich, dark chocolate layers, all topped with a cloud of whipped cream and festive chocolate shavings.
The beauty of this recipe lies in its visual “wow” factor and its “Kids Snacks” accessibility. It is a dessert that looks like it belongs on a high-end catering platter but is simple enough for children to assemble in the kitchen. By utilizing instant pudding shortcuts and a clever layering technique, you create a sophisticated parfait that balances the earthy depth of cocoa with the bright, cooling sensation of peppermint. Whether you are hosting a St. Patrick’s Day party, prepping a classroom treat, or looking for a “Holiday Baking” alternative that doesn’t involve heat, these pudding cups are a guaranteed crowd-pleaser. Let’s explore the science of the perfect “neat” layer and the secrets to achieving that vibrant shamrock green.
Why You’ll Love This Recipe
- Zero-Heat Preparation: This is the ultimate “no-bake” solution for busy holidays, freeing up your stovetop and oven for other savory Irish dishes.
- The Perfect Texture Balance: By layering different viscosities of pudding, you ensure every spoonful offers a mix of creaminess and structure.
- Highly Customizable: While we love the chocolate-mint duo, you can easily adapt the layers to suit different dietary needs or color themes.
- The “Portion Control” Advantage: Serving desserts in individual clear cups prevents the mess of slicing and makes them the perfect “grab-and-go” option for parties.
- Nostalgic Appeal: It captures the exact flavor profile of a childhood favorite milkshake in a much more indulgent, spoonable format.
Ingredient Notes & Pro Selections
Because this recipe relies on a few core staples, the quality of your pudding and the intensity of your dye will dictate the final professional appearance.
The Pudding Foundation
- Instant Pudding Mix (3.4 oz each): It is critical to use Instant pudding for this recipe. “Cook and Serve” pudding is much thinner when warm and will cause your layers to bleed into each other rather than remaining distinct. You’ll need one box of Chocolate and one box of Mint (or Vanilla with mint extract).
- Whole Milk: For the creamiest, most stable pudding, use cold whole milk. Lower-fat milks (skim or 1%) will result in a “looser” pudding that might not hold the weight of the layers as well.
The Minty Magic
- Mint vs. Peppermint: Ensure you are using Peppermint Extract or a dedicated “Mint” pudding mix. Avoid standard “spearmint” which can sometimes taste more like gum than a dessert.
- Green Gel Food Coloring: For the most vibrant shamrock hue, use gel coloring (like AmeriColor Leaf Green). Liquid food coloring is too diluted and can thin out the pudding, making it watery.
The Finishing Touches
- Whipped Topping or Fresh Whipped Cream: A thick, stabilized whipped topping (like Cool Whip) provides the best “peak” for garnishing, but fresh whipped cream offers a more gourmet flavor.
- Garnishes: High-quality Semi-Sweet Chocolate Shavings, a single maraschino cherry, or crushed Andes Mints provide the textural contrast needed to break up the creaminess.
Step-by-Step Instructions
Step 1: Prep Your Glassware
Select clear 8-ounce dessert glasses or plastic cups.
- Pro Tip: Wipe the inside of the cups with a clean, lint-free cloth before starting. Any dust or fingerprints will be magnified once the dark chocolate pudding is added.
Step 2: Whisk the Chocolate Base
In a medium mixing bowl, combine the instant chocolate pudding mix with 2 cups of cold milk. Whisk vigorously for 2 minutes until no lumps remain. Let it sit on the counter for 5 minutes to fully thicken.
Step 3: Create the Shamrock Layer
In a separate bowl, whisk the instant mint pudding mix (or vanilla mix with 1/2 tsp peppermint extract) with 2 cups of cold milk. Add 2–3 drops of green gel food coloring and whisk until the color is a uniform, bright emerald. Let it thicken for 5 minutes.
Step 4: The Art of Layering (The Secret Step)
To get perfectly clean lines between the green and brown, do not use a spoon. Instead, transfer each pudding flavor into its own piping bag (or a Ziploc bag with the corner snipped off). Pipe a 1-inch layer of chocolate pudding into the bottom of each glass. Gently tap the glass on the counter to level it. Pipe a 1-inch layer of the green mint pudding directly on top. Repeat once more for a beautiful four-layer effect.
Step 5: The First Chill
Place the cups in the refrigerator for at least 30 minutes. Chilling is essential to allow the pudding to “set” so that the whipped cream doesn’t sink into the top layer.
Step 6: Garnish and Serve
Right before serving, add a generous dollop of whipped cream. Use a grater to shower the top with chocolate shavings or sprinkle with crushed mint candies. For the classic “Shamrock Shake” look, place a single green maraschino cherry or a sprig of fresh mint on top.
Secrets to the Perfect Layered Parfait
- Temperature Control: Always use ice-cold milk. This causes the starches in the instant pudding to hydrate faster, leading to a sturdier structure that supports layering.
- The “Clean Wall” Technique: If you are using a spoon to layer, use a small spoon and drop the pudding directly into the center of the cup, letting it spread outward. If you touch the sides of the glass with the spoon, you will leave “pudding streaks” that ruin the layered look.
- No-Air Pockets: When piping the pudding, start from the outer edge and move toward the center to ensure there are no air bubbles visible through the glass.
- Consistency is Key: Ensure both your chocolate and mint puddings are the same thickness. If one is runnier than the other, they will eventually merge into a marble effect.
Variations and Substitutions
- The “Cookie-Crust” Surprise: Add a layer of crushed Mint Oreos or brownie bites at the very bottom of the cup for a hidden crunch.
- Boozy St. Paddy’s Parfait: For an adult party, replace 1/2 cup of the milk in the chocolate layer with Irish Cream Liqueur (like Baileys).
- Dairy-Free Version: Use Instant Oat Milk Pudding (available in some specialty stores) or make a chia seed pudding version using coconut milk and cocoa powder. Note that standard instant pudding mix often does not set with almond or soy milk.
- “Grasshopper” Style: Add a layer of marshmallow fluff between the chocolate and mint for an extra-sweet, nostalgic twist.
Storage and Party Prep Tips
- Refrigerator: These pudding cups can be made up to 24 hours in advance. In fact, the flavors of the mint often intensify after a night in the fridge.
- The Garnish Rule: Never add the whipped cream or chocolate shavings more than an hour before serving. The cream will begin to deflate, and the chocolate shavings can “bleed” into the white cream if they sit too long.
- Transportation: If you are taking these to a party, keep them in a muffin tin. The individual holes in the tin act as the perfect stabilizer to prevent the cups from tipping over in your car.
- Do Not Freeze: Freezing instant pudding changes the molecular structure of the starch. When it thaws, the pudding will become watery and grainy.
FAQ
Why didn’t my pudding thicken? This usually happens if you used a “natural” milk alternative (like almond or soy) which lacks the protein structure needed for instant pudding to bond. If using dairy, ensure the milk was very cold.
Can I make these in one big bowl? Yes! You can follow the same layering technique in a large glass trifle bowl for a family-style “Shamrock Trifle.”
How do I get the “Shamrock” color if I only have liquid dye? If you must use liquid dye, add it one drop at a time and whisk thoroughly. Be careful not to add more than 10 drops, or the pudding will become too thin to layer properly.
What is the best way to get chocolate shavings? Use a vegetable peeler on the side of a cold chocolate bar. This creates long, beautiful “curls” that look much more professional than standard grated chocolate.
Festive Shamrock Shake Pudding Cups (No-Bake Mint Treat)
Ingredients
Equipment
Method
- Prepare clear 8-ounce dessert cups and wipe the inside clean for neat presentation.
- Whisk the chocolate pudding mix with 2 cups of cold milk for 2 minutes until smooth. Let sit for 5 minutes to thicken.
- Whisk the mint (or vanilla) pudding mix with 2 cups of cold milk. Add peppermint extract if needed and tint with green gel food coloring. Let thicken for 5 minutes.
- Transfer puddings to piping bags. Pipe a layer of chocolate pudding into each cup, followed by mint pudding. Repeat for multiple layers.
- Refrigerate pudding cups for at least 30 minutes to set.
- Top with whipped cream and garnish with chocolate shavings or mint candies just before serving.

