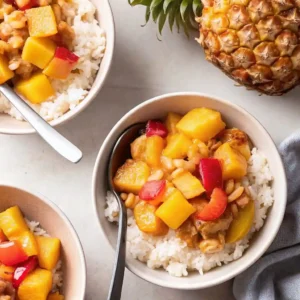
In the modern kitchen, the sheet pan meal has evolved from a simple convenience to a culinary art form. It is the ultimate solution for the busy weeknight: a method that promises minimal cleanup, maximum flavor development, and a perfectly balanced meal delivered on a single piece of cookware. This Sheet Pan Hawaiian Chicken is a premier example of this philosophy—a vibrant, high-protein dish that marries the savory depth of ginger-garlic soy glaze with the explosive, caramelized sweetness of roasted pineapple and bell peppers.
The secret to a successful Hawaiian sheet pan meal lies in the architecture of the pan and the temperature of the oven. By roasting at a high heat, we trigger the Maillard reaction on the chicken while simultaneously dehydrating the pineapple just enough to concentrate its natural sugars into a jam-like consistency. It is a “vacation on a plate” that appeals to both children and adults, offering a refreshing departure from the standard “chicken and veggies” routine. Whether you are looking for a healthy meal-prep champion or a crowd-pleasing dinner that requires zero stovetop hovering, this guide will show you how to master the “tropical sear” and the secrets to a perfectly reduced ginger-soy glaze.

Why You’ll Love This Recipe
- Effortless One-Pan Cleanup: Aside from a small bowl for the whisked sauce, the entire meal is prepared and cooked on a single sheet pan, leaving your kitchen pristine.
- Complex Flavor Synergy: The saltiness of the soy sauce acts as a flavor enhancer for the sweetness of the pineapple, creating a “Teriyaki-adjacent” profile that is deeply satisfying.
- Nutrient-Dense & Balanced: It provides a rainbow of vitamins from the bell peppers and onions, lean protein from the chicken, and healthy enzymes from the fresh fruit.
- High-Heat Caramelization: Unlike slow-cooked Hawaiian dishes, the oven method sears the edges of the fruit and vegetables, adding a smoky, roasted depth of flavor.
- Meal Prep Champion: This dish reheats exceptionally well, as the pineapple juices keep the chicken moist even after a day or two in the refrigerator.
Ingredient Notes & Pro Selections
The quality of your produce and the type of chicken you choose will define the texture and “juiciness” of the final tray.
The Protein
- Boneless Skinless Chicken Thighs (1.5 lbs): While breasts can be used, thighs are the “Gourmet” choice for sheet pan roasting. They contain more intramuscluar fat, which prevents them from drying out during the 20-minute roast.
- The “Bite-Sized” Rule: Cut your chicken into uniform 1-inch pieces. This ensures every piece cooks at the same rate as the vegetables, preventing the “raw center/burnt edge” dilemma.
The Tropical Elements
- Fresh Pineapple: For the best results, use fresh pineapple rather than canned. Fresh pineapple holds its structure better under high heat and contains more vibrant acidity.
- Bell Peppers & Red Onion: Use a mix of red, orange, and green bell peppers for visual impact. The red onion provides a sharp, savory contrast that mellows into sweetness as it roasts.
The Ginger-Soy Glaze
- Low-Sodium Soy Sauce (or Tamari): Provides the salty, umami backbone.
- Honey or Maple Syrup: This is the “glue” that helps the sauce stick to the ingredients and facilitates the browning process in the oven.
- Fresh Ginger and Garlic: Grating these fresh is non-negotiable for a professional-grade aroma.
- Toasted Sesame Oil: Adds a nutty, sophisticated finish that rounds out the acidic notes.
The Science of Roasting Pineapple
Why does pineapple taste so much better when roasted? It comes down to the concentration of sugars. Pineapple contains an enzyme called bromelain and a high water content.
- Moisture Evaporation: As the pineapple hits the 400°F heat, the water evaporates, leaving behind the concentrated fruit sugars.
- Caramelization: Once the water is gone, the sugars begin to brown (caramelize), creating those dark, sweet-and-charred edges that provide a gourmet “grilled” flavor profile without a barbecue.
Step-by-Step Instructions
Step 1: Prep and Preheat
Preheat your oven to 400°F (204°C). For the easiest cleanup, line a large rimmed baking sheet with parchment paper or a silicone mat.
- Pro Tip: Avoid aluminum foil if possible, as the acid in the pineapple and the salt in the soy sauce can sometimes react with the metal, affecting the flavor.
Step 2: Chop the Components
Cut the chicken thighs, bell peppers, red onion, and pineapple into uniform 1-inch chunks. Place everything directly onto the prepared sheet pan.
Step 3: Whisk the Glaze
In a small bowl, whisk together 1/4 cup soy sauce, 2 tablespoons honey, 1 tablespoon sesame oil, 1 tablespoon minced garlic, 1 teaspoon grated ginger, and a pinch of red pepper flakes.
Step 4: The Toss and Coat
Pour about two-thirds of the sauce over the ingredients on the sheet pan. Use your hands or a large spoon to toss everything until every piece of chicken and fruit is glistening with the glaze. Spread the mixture out into a single layer.
- Crucial Rule: If the pan is overcrowded, the ingredients will “steam” instead of roast, leading to soggy vegetables and pale chicken. If necessary, use two pans.
Step 5: The High-Heat Roast
Place the pan in the center of the oven and bake for 15–20 minutes. Halfway through the cooking time, give the ingredients a quick toss to ensure the underside of the chicken gets some color.
Step 6: The Final Glaze and Broil
Remove the pan from the oven. Drizzle the remaining sauce over the hot ingredients. Turn your oven to Broil and return the pan for the final 2–3 minutes.
- Visual Cue: The chicken is done when it reaches 165°F and the pineapple edges are starting to turn a dark, bubbly mahogany.
Step 7: Garnish and Serve
Sprinkle with fresh cilantro, sliced green onions, and a handful of toasted sesame seeds. Serve immediately over a bed of fluffy jasmine rice or cauliflower rice.
Secrets to the Perfect Sheet Pan Meal
- The “Single Layer” Mandate: We cannot overstate this. Airflow is the secret to crispiness. If you can’t see the bottom of the pan between the pieces of chicken, you have too much food on one tray.
- Dry the Chicken: Before chopping, pat the chicken thighs bone-dry with paper towels. Excess moisture on the surface of the meat prevents a good sear.
- The Starch Balance: If you find your sauce is too thin on the pan, you can whisk 1 teaspoon of cornstarch into your glaze before pouring it over the chicken to create a thicker, stickier coating.
- Acid Management: If the dish feels too sweet after roasting, give the entire tray a fresh squeeze of lime juice right before serving. The citrus will “brighten” the sugars and cut through the fat of the chicken thighs.
Variations and Substitutions
- Spicy Hawaiian: Add a tablespoon of Sriracha or Sambal Oelek to the glaze for a “Hot & Sweet” tropical experience.
- Low-Carb / Keto: Omit the honey and use a keto-approved liquid sweetener. Replace the jasmine rice with roasted cauliflower or serves over a bed of baby spinach.
- Shrimp Swap: Replace the chicken with jumbo peeled and deveined shrimp. Reduce the initial bake time to only 8–10 minutes, as shrimp cook much faster than poultry.
- Vegetarian Option: Use extra-firm tofu (pressed and cubed) or tempeh. Increase the sesame oil by 1 tablespoon to compensate for the lack of animal fat.
Storage and Reheating
- Refrigerator: Store leftovers in an airtight container for up to 4 days.
- Reheating: To maintain the texture of the vegetables, reheat in a skillet over medium heat for 5 minutes. If using a microwave, add a tiny splash of water to the container to keep the chicken from becoming rubbery.
- Freezing: You can freeze the cooked Hawaiian chicken for up to 2 months. Thaw in the refrigerator overnight before reheating.
FAQ
Can I use canned pineapple? Yes, but ensure it is “Pineapple Chunks in Juice” rather than heavy syrup. Drain the liquid extremely well and pat the chunks dry before adding them to the pan.
Is this recipe gluten-free? As written, it contains soy sauce. To make it 100% gluten-free, substitute the soy sauce with Coconut Aminos or certified Gluten-Free Tamari.
What is the best rice to serve this with? Jasmine rice is the traditional choice because its floral aroma complements the pineapple. For a more “Gourmet” look, try serving it with a Coconut Lime Rice.
Can I make this ahead of time? You can chop all the vegetables and the chicken up to 24 hours in advance. Store them in separate containers and toss them with the sauce right before baking for the best texture.
Sheet Pan Hawaiian Chicken (The Ultimate 30-Minute Tropical Dinner)
Ingredients
Equipment
Method
- Preheat your oven to 400°F (204°C). Line a large baking sheet with parchment paper or a silicone mat.
- Chop the chicken thighs, bell peppers, red onion, and pineapple into uniform 1-inch chunks. Place everything directly onto the prepared sheet pan.
- In a small bowl, whisk together the soy sauce, honey, sesame oil, garlic, ginger, and red pepper flakes.
- Pour about two-thirds of the glaze over the ingredients on the sheet pan. Toss everything to coat evenly.
- Spread the mixture out in a single layer. Bake for 15–20 minutes, tossing halfway through the cooking time.
- Remove from the oven and drizzle the remaining glaze over the ingredients. Switch the oven to broil and return the pan for 2-3 minutes until the chicken is cooked through and the pineapple is caramelized.
- Sprinkle with fresh cilantro, sliced green onions, and toasted sesame seeds. Serve immediately over a bed of jasmine rice or cauliflower rice.


