In the world of baking, there are recipes that require precision, patience, and a pantry full of expensive ingredients. And then, there are Cool Whip Cookies.
If you have never experienced the magic of this recipe, you are in for a delightful surprise. With just three humble ingredients—a box of cake mix, a tub of whipped topping, and a single egg—you can create cookies that rival the texture of a complicated brownie or a bakery-style crinkle cookie.
They are impossibly chewy, delightfully fudgy, and ridiculously fast to make. This is the “secret weapon” recipe you keep in your back pocket for last-minute potlucks, sudden chocolate cravings, or holiday cookie swaps where you need to bring three dozen treats but only have 20 minutes to spare.

Why This Recipe Works
It seems counterintuitive. How can whipped topping replace butter, oil, and sugar? The science lies in the ingredients of the Cool Whip itself.
- The Fat & Sugar Replacement: Cool Whip is essentially an emulsion of water, hydrogenated vegetable oil, and high-fructose corn syrup. When mixed with the dry cake mix, it provides the necessary fat to keep the cookie tender and the sugar to keep it moist.
- The Texture: Because Cool Whip is aerated, it creates a dough that is sticky and light. As it bakes, the air pockets collapse slightly, resulting in a dense, chewy center that remains soft for days.
- The Convenience: By using a boxed cake mix, you are bypassing the need to measure flour, leavening agents, cocoa powder, or salt. It is foolproof baking at its finest.
Ingredients: The Trinity of Simplicity
You likely have these items in your kitchen right now. If not, they are available at any grocery store for just a few dollars.
1. Boxed Cake Mix
The standard 15.25 oz box is what you need.
- Flavor: Chocolate is the classic choice for a fudgy, brownie-like result. However, this recipe is a chameleon. Lemon, Red Velvet, Strawberry, and Funfetti mixes all work beautifully.
- Brand: Betty Crocker, Duncan Hines, and Pillsbury all yield similar results. Just ignore the instructions on the back of the box!
2. Cool Whip (Whipped Topping)
You need one 8 oz tub.
- Thawed: It is crucial that the Cool Whip is completely thawed before you start. If it’s frozen, it won’t incorporate into the dry mix.
- Brand: The name brand “Cool Whip” tends to be more stable, but store-brand “Whipped Topping” generally works fine too.
- Note: Do not use aerosol whipped cream (like Reddi-wip) or homemade whipped cream. They do not have the stabilizers required to hold the cookie structure.
3. One Large Egg
The egg acts as the binder, holding the airy Cool Whip and the dry powder together into a cohesive dough.
Optional: Powdered Sugar
While not strictly necessary for the structure, rolling the dough balls in confectioners’ sugar before baking gives them that classic “crinkle cookie” appearance and adds a sweet, crisp exterior.
Step-by-Step Instructions
Step 1: The Mix
Preheat your oven to 350°F (175°C) and line two large baking sheets with parchment paper. In a large bowl, combine the loose cake mix powder, the thawed Cool Whip, and the egg.
- The Stir: Use a sturdy rubber spatula. At first, it will look dry and crumbly. Keep folding. Suddenly, it will transform into a thick, incredibly sticky dough.
Step 2: The “Sticky Dough” Strategy
This dough is notoriously sticky—it’s the one complaint beginners have. Here is how to handle it like a pro:
- Chill It (Recommended): If you have time, pop the bowl in the fridge for 20 minutes. Cold dough is much easier to handle.
- Grease Your Hands: If you don’t want to wait, spray your hands lightly with non-stick cooking spray.
- Use a Scoop: A spring-loaded cookie scoop is a lifesaver here, allowing you to drop the dough directly into the powdered sugar without touching it.
Step 3: The Roll
Pour about a cup of powdered sugar into a shallow bowl. Drop the dough balls into the sugar and roll them until heavily coated.
- Don’t Shake it Off: Be generous! The sugar will melt and crackle as the cookie expands, creating that beautiful black-and-white contrast.
Step 4: The Bake
Place the coated balls on the baking sheet, spaced about 2 inches apart. Bake for 10-12 minutes.
- The Doneness Test: The edges should be set, but the centers should still look slightly underbaked and soft. They will firm up as they cool. Do not overbake, or you will lose the signature chewiness.
Flavor Variations
The beauty of this recipe is that it is a blank canvas. By simply changing the cake mix, you can create a completely different dessert.
- Lemon Crinkles: Use a Lemon cake mix. Roll in powdered sugar. The result is a bright, zesty cookie that tastes like sunshine.
- Red Velvet: Use Red Velvet cake mix. These are stunning for Christmas or Valentine’s Day, especially against the white powdered sugar.
- Birthday Cake: Use Funfetti or Vanilla cake mix. You can even stir in extra sprinkles for more color.
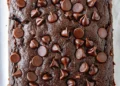
- Double Chocolate Chip: Use Chocolate Fudge cake mix and stir in ½ cup of semi-sweet chocolate chips for extra decadence.
Troubleshooting Common Issues
My dough is too sticky to handle. This is normal! The warmth of your hands melts the Cool Whip. Chill the dough for 15-30 minutes, or use two spoons to drop the batter into the powdered sugar.
The cookies went flat. This usually happens if the Cool Whip was warm or if the cookies were placed on a hot baking sheet. Ensure your baking sheet is cool before loading the next batch.
Can I use Lite or Fat-Free Cool Whip? Yes, you can! “Lite” works perfectly fine. “Fat-Free” can sometimes result in a slightly gummier texture, but it is still edible and delicious.
Storage and Freezing
- Room Temperature: Store in an airtight container for 3-4 days. They may become slightly softer over time (which many people prefer!).
- Freezing: These cookies freeze exceptionally well. Place baked cookies in a freezer-safe bag for up to 3 months. Thaw on the counter for 30 minutes before eating.
The Verdict
Cool Whip Cookies are the ultimate low-effort, high-reward dessert. They defy baking logic to produce a treat that is soft, rich, and deeply satisfying. Whether you are a novice baker or a pro looking for a shortcut, this recipe is guaranteed to become a staple in your kitchen.

3-Ingredient Cool Whip Cookies
Ingredients
Equipment
Method
- Preheat oven to 350°F (175°C). Line two baking sheets with parchment paper or silicone mats.
- In a large bowl, combine dry cake mix, thawed Cool Whip, and the egg. Mix until a thick, sticky dough forms.
- If dough is too sticky, chill for 20 minutes or grease your hands lightly.
- Place powdered sugar in a bowl. Scoop tablespoon-sized portions of dough and drop into sugar. Roll until fully coated.
- Arrange coated dough balls on the baking sheets, spaced 2 inches apart. Bake 10–12 minutes.
- Let cookies cool on the baking sheet for 5 minutes, then transfer to a wire rack to cool completely.


