
There is a pervasive myth in the culinary world that vegan baking is a game of compromise. The assumption is that without eggs, butter, and milk, a cake is destined to be dry, dense, or rubbery—a “healthy-tasting” imitation of the real thing.
This Vegan Chocolate Cake recipe is here to shatter that myth permanently.
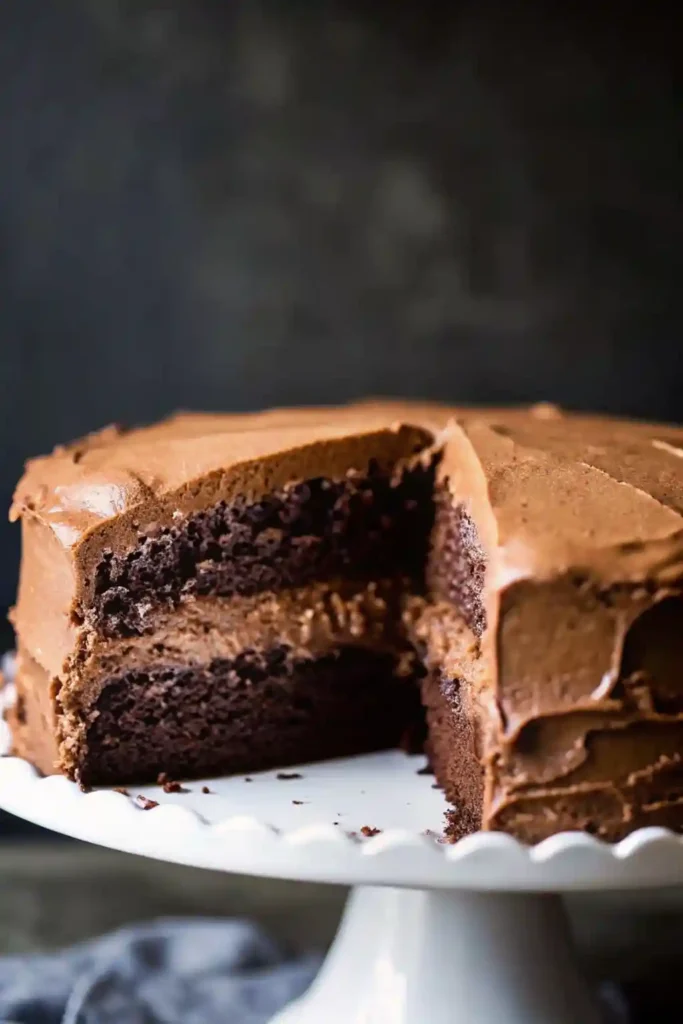
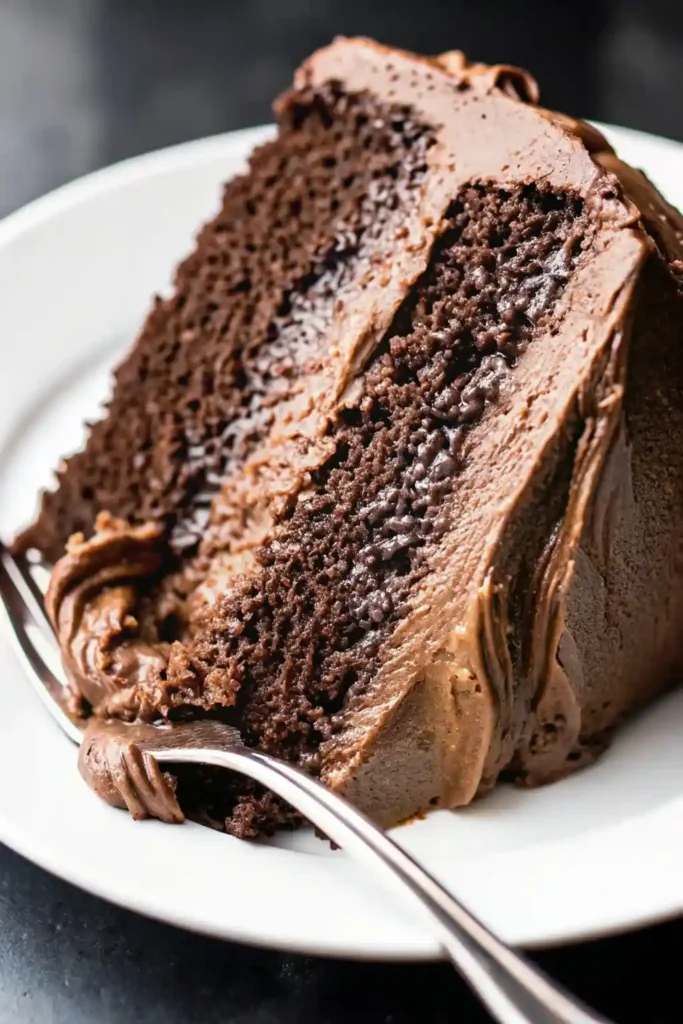
If you serve a slice of this cake to a die-hard dairy lover, I guarantee they will not guess it is plant-based. In fact, they might argue it is the best chocolate cake they have ever eaten, vegan or otherwise. It is exceptionally moist, deeply chocolaty, and possesses that perfect tender crumb that clings to your fork. It is the kind of cake that reminds you of the best bakery-style birthday cakes from your childhood: rich, decadent, and unapologetically sweet.
But what makes this recipe truly dangerous isn’t just the taste; it is the ease. You do not need flax eggs that leave a gummy texture. You do not need aquafaba (chickpea water) that requires endless whipping. You do not need expensive egg replacers or hard-to-find specialty ingredients. You likely have every single item needed for this cake in your pantry right now.
This is a one-bowl wonder that comes together in minutes, requires zero fancy equipment, and delivers consistent, show-stopping results every single time. Whether you are baking for a vegan friend, a child with an egg allergy, or simply because you ran out of eggs on a Tuesday night, this recipe will become your new gold standard.
Why This Recipe Works
To replicate the structure and richness of a traditional cake without animal products, we have to lean on a little bit of kitchen chemistry. Understanding why this works will help you become a better baker.
1. The “Buttermilk” Lift
In traditional baking, eggs provide structure and lift. To replace them, we create a chemical reaction. By combining plant-based milk (specifically high-protein soy or almond milk) with apple cider vinegar, we create a vegan “buttermilk.” When this acidic mixture hits the baking soda in the dry ingredients, it creates carbon dioxide bubbles. These bubbles get trapped in the batter, giving the cake a tremendous lift and a light, airy crumb that defies gravity.
2. The Boiling Water Bloom
This is the secret weapon of professional chocolatiers. Adding boiling water at the very end of the mixing process serves a dual purpose. First, the heat “blooms” the cocoa powder, dissolving the particles instantly and releasing the intense, deep chocolate flavor that often stays dormant in cold batters. Second, the hot water creates a very thin batter. While this might look scary when you pour it, this high liquid content ensures the flour hydrates fully, resulting in a cake that stays moist for days rather than drying out.
3. Oil vs. Butter
While we love the flavor of butter, oil is actually superior for texture in chocolate cakes. Butter is a solid fat that firms up at room temperature. Oil remains liquid. By using a neutral oil in the batter, we ensure that the cake feels moist on the palate and doesn’t harden as it cools. This is why oil-based cakes often have a longer shelf life than butter-based ones.
Ingredient Deep Dive: What You Need
The ingredients list is simple, but quality matters. Here is what you need to know about your pantry staples.
The Dry Mix
- All-Purpose Flour: This provides the perfect protein structure for a tender cake. If you are gluten-free, a high-quality 1:1 Gluten-Free Baking Flour (like King Arthur or Bob’s Red Mill) works beautifully here, though the texture may be slightly denser.
- Cocoa Powder: You can use standard unsweetened natural cocoa powder (like Hershey’s) or Dutch-processed cocoa. Natural cocoa tends to be lighter and more acidic (which helps the rise), while Dutch-processed is darker and fudgier. Both work well here because we have vinegar to assist with the acidity.
- Sugar: Standard granulated white sugar is best for structure. It creates a crisp top and a soft interior.
The Wet Mix
- Plant Milk: Soy milk is the gold standard for vegan baking because its high protein content allows it to curdle nicely into buttermilk. Almond milk is a close second. Oat milk can work, but it doesn’t curdle as effectively.
- Apple Cider Vinegar: This provides the acid for the lift. If you don’t have it, white distilled vinegar or fresh lemon juice are perfect 1:1 substitutes.
- Unsweetened Applesauce: This is our secondary egg replacer. It creates structure (pectin) and adds moisture without adding fat. Don’t worry about the taste; the chocolate completely masks the apple.
- Oil: Canola, vegetable, or grapeseed oil are ideal because they are flavorless. You can use melted coconut oil, but ensure all your other ingredients are room temperature, or the coconut oil will solidify into chunks when mixed.
The Frosting
- Vegan Butter: Do not use “tub” margarine or spreads for frosting; they have too much water and will melt into a puddle. You need vegan butter sticks (like Miyoko’s, Country Crock Plant Butter, or Earth Balance sticks).
- Cocoa Powder: Sift it! Cocoa powder loves to clump, and nobody wants a dusty bite of powder in their frosting.
Step-by-Step Instructions
Step 1: Create the Buttermilk
Preheat your oven to 350°F (175°C). Grease two 8-inch round cake pans. For extra insurance, line the bottoms with parchment paper circles and dust the sides with cocoa powder. In a small liquid measuring cup, combine the soy milk and apple cider vinegar. Give it a quick stir and set it aside for 5-10 minutes. You will see it separate and thicken—this is exactly what we want.
Step 2: The Dry Whisk
In a large mixing bowl, sift together the flour, sugar, cocoa powder, baking soda, baking powder, and salt. Do not skip the sifting step, especially for the cocoa powder and baking soda. Whisking the dry ingredients thoroughly ensures you won’t have any salty pockets or bitter soda lumps in the finished cake.
Step 3: Mix the Wet Ingredients
Add the oil, applesauce, vanilla extract, and the prepared curdled milk mixture to the dry ingredients. Using a hand mixer or a sturdy whisk, mix until well combined. The batter will be thick at this stage.
Step 4: The Boiling Water Pour
Carefully pour the boiling water into the batter. Turn your mixer to the lowest speed (or whisk gently by hand) to incorporate the water. The batter will transform from thick and pasty to very thin and liquid. Do not add more flour. Trust the process. The thin batter allows the steam to evaporate slowly during baking, creating that signature moist crumb.
Step 5: Bake to Perfection
Divide the batter evenly between the two prepared pans. Bake for 30-35 minutes.
- The Doneness Test: Insert a toothpick into the center of the cake. It should come out clean or with a few moist crumbs attached. If it comes out with wet batter, give it another 3-5 minutes. Avoid overbaking, or the cake will lose its fudgy quality.
Step 6: Cool and Frost
Let the cakes cool in the pans for about 15 minutes. This allows the structure to set so they don’t break when you flip them. Run a knife around the edge and invert them onto a wire rack to cool completely before frosting.
While cooling, whip the softened vegan butter until creamy. Gradually add powdered sugar and cocoa powder, alternating with small splashes of plant milk and vanilla, until you achieve a fluffy, spreadable consistency.
Troubleshooting Common Issues
Even with a foolproof recipe, baking can be temperamental. Here is how to avoid common pitfalls.
Problem: My cake sank in the middle.
- Cause 1: The oven door was opened too early. Opening the door releases heat and stops the rising process before the structure is set. Keep the door closed for at least the first 25 minutes.
- Cause 2: The leavening agents were old. Baking soda and powder lose potency over time. Test your soda by adding vinegar to it; if it doesn’t fizz aggressively, throw it out.
Problem: The cake is gummy.
- Cause: The cake was underbaked or cut into while still warm. Vegan cakes often have a slightly more delicate crumb structure that solidifies as it cools. Let it cool completely before slicing.
Problem: The frosting is melting/sliding off.
- Cause: The cake was not fully cooled. Even a hint of warmth will melt the vegan butter.
- Fix: If your kitchen is hot, pop the frosted cake in the fridge for 20 minutes to firm up the buttercream.
Variations to Try
- Mocha Cake: Replace half of the boiling water with boiling hot espresso or strong coffee. This deepens the chocolate flavor without making it taste like a latte.
- Black Forest: Fill the layers with cherry pie filling and top with vegan whipped cream instead of buttercream.
- Peanut Butter Chocolate: Use a peanut butter frosting instead of chocolate for a classic combo.
Vegan Chocolate Cake
Ingredients
Equipment
Method
- Preheat oven to 350°F (175°C). Grease two 8-inch round cake pans, line bottoms with parchment, and dust sides lightly with cocoa powder.
- Combine the plant milk and apple cider vinegar in a small measuring cup. Stir and set aside for 5–10 minutes to curdle into vegan ‘buttermilk’.
- In a large bowl, sift together the flour, sugar, cocoa powder, baking soda, baking powder, and salt. Whisk to combine evenly.
- Add the oil, applesauce, vanilla, and the curdled milk to the dry ingredients. Mix on medium speed until combined and no large streaks of flour remain.
- Carefully pour in the boiling water while mixing on low. The batter will become very thin—this is normal. Mix until fully incorporated.
- Divide batter evenly between the prepared pans and bake for 30–35 minutes, or until a toothpick inserted in the center comes out clean or with a few moist crumbs.
- Cool cakes in pans for 15 minutes, run a knife around the edges, then invert onto a wire rack to cool completely before frosting.
- Make the buttercream by whipping the softened vegan butter until fluffy. Gradually add powdered sugar and cocoa, alternating with splashes of plant milk and vanilla, until smooth and spreadable.
- Frost one layer, stack the second, then cover the top and sides with remaining frosting. Chill briefly if needed to set the buttercream before slicing.


