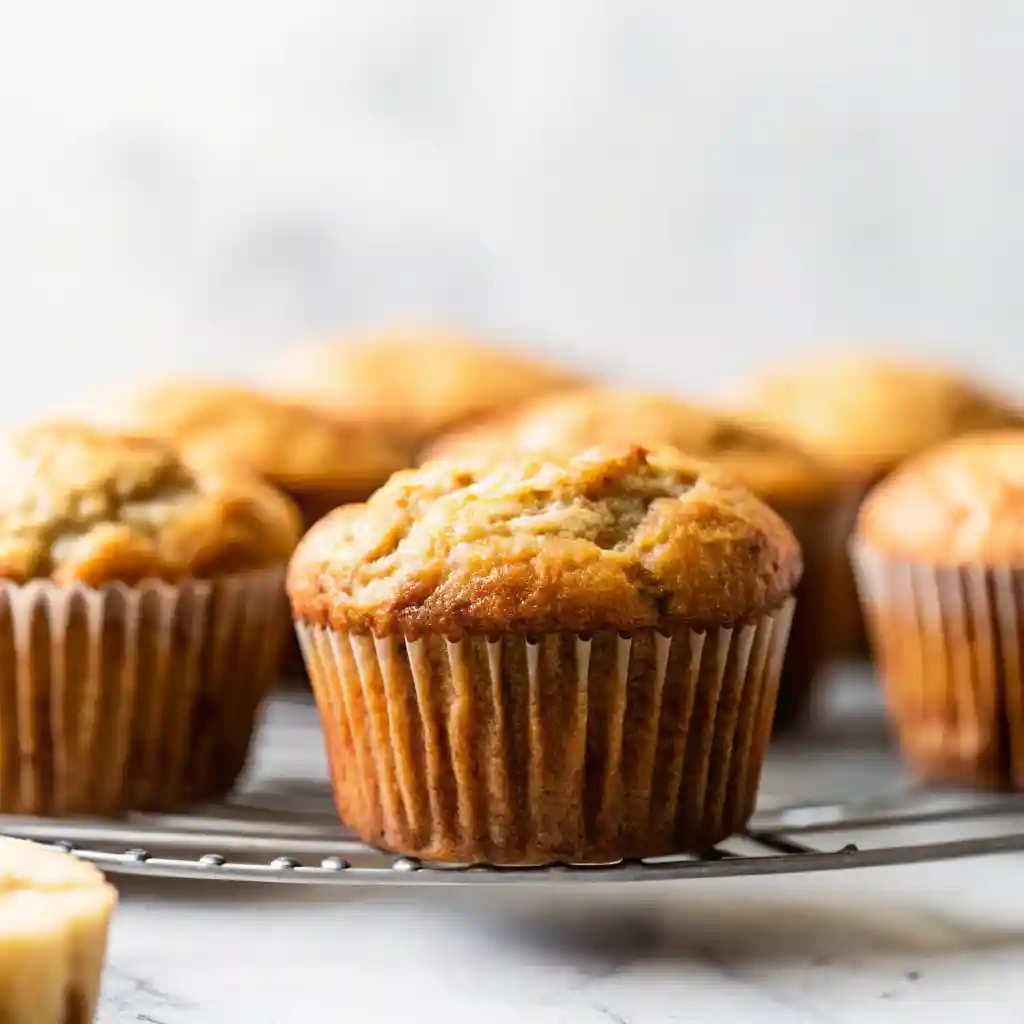
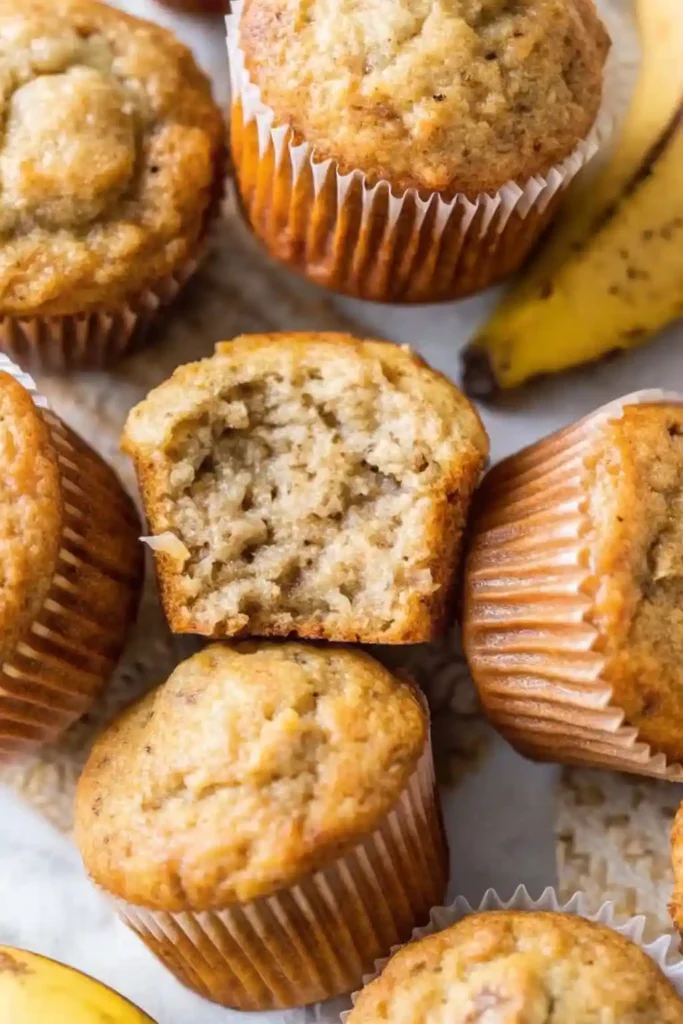
In the world of breakfast pastries, the banana muffin occupies a space of pure, dependable comfort. While a loaf of banana bread is perfect for a slow Sunday morning, the muffin is the king of the “grab-and-go” lifestyle—a perfectly portioned, handheld vessel of tropical sweetness and soft, cake-like crumb. However, there is a distinct difference between a flat, dense home-style muffin and a towering, golden-brown bakery masterpiece. This Easy Homemade Banana Muffin recipe is designed to bridge that gap, utilizing professional techniques to ensure a sky-high dome and a succulent interior every single time.
The beauty of this recipe lies in its structural engineering and the “thermal spring” method. By starting with a high-heat burst in the oven and utilizing a specific ratio of leavening agents, we encourage the batter to rise rapidly before the crust sets, resulting in that coveted “muffin top” that spills elegantly over the edges of the liner. Whether you are prepping school snacks for the week or hosting a sophisticated brunch, these muffins deliver a restaurant-quality experience with less than fifteen minutes of active prep work. Let’s explore the science of batter viscosity and the secrets to achieving the perfect caramelized muffin lid.
Why You’ll Love This Recipe
- Bakery-Standard Height: We utilize a dual-temperature baking technique that guarantees a tall, rounded dome rather than a flat or sunken top.
- Superior Flavor Depth: By using a blend of melted unsalted butter and two types of sugar, we achieve a rich, toffee-like flavor that oil-based muffins simply cannot match.
- Effortless One-Bowl Prep: You don’t need a stand mixer or any specialized equipment; a simple whisk and a spatula are all that’s required to prevent over-mixing.
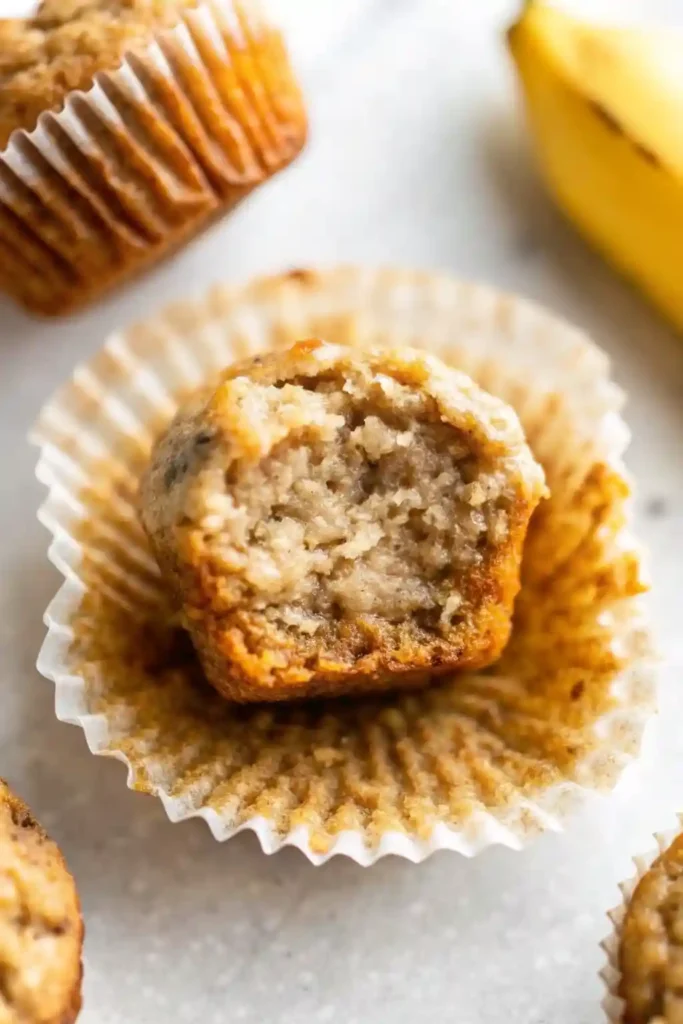
- The Ultimate Texture Hierarchy: The high-heat start creates a slightly “crusty” sugar lid while the interior remains as soft and tender as a cloud.
- Infinite Versatility: The base batter is a resilient canvas that can be loaded with chocolate chips, toasted nuts, or a crunchy cinnamon streusel without losing its lift.
Ingredient Notes & Pro Selections
The success of a gourmet muffin depends entirely on the state of your produce and the quality of your fats. Here is how to shop for a professional-grade result.
The Bananas
- The Ripeness Rule: For muffins, your bananas must be at the “stage of no return.” Look for skins that are almost entirely black or heavily spotted. These bananas have the highest sugar concentration and a liquid-like consistency that ensures a moist, flavorful crumb.
- The Measurement: Do not just count bananas; measure the mash. You need exactly 1.5 cups of mashed banana (usually 3 large or 4 medium bananas). Using too much will make the muffins heavy and leaden; too little will make them dry.
The Fat & Sugars
- Unsalted European Butter: While oil makes a muffin “wet,” melted butter makes it “succulent.” Using a high-fat butter (like Kerrygold) provides a rich, savory backbone that balances the sweetness of the fruit.
- The Sugar Duo: We use a combination of Granulated White Sugar and Light Brown Sugar. The granulated sugar helps the edges crisp and brown, while the brown sugar adds the molasses moisture needed for a tender center.
The Leavening
- Baking Soda: This is the primary lifter. It reacts immediately with the acidity of the bananas and the brown sugar to create the carbon dioxide bubbles needed for a tall rise.
- Check Your Date: If your baking soda is more than six months old, replace it! Muffins require a powerful “punch” of air to achieve their iconic shape.
The Science of the Muffin Top
To achieve professional results, one must understand the “Thermal Spring.” Most home recipes suggest baking muffins at 350°F (175°C) for the entire duration. However, professional bakeries often use a “High-to-Low” method:
- The Initial Burst: We start the oven at 425°F (218°C). This intense heat causes the moisture in the batter to turn to steam almost instantly, forcing the muffins to “spring” upward rapidly.
- The Set: This high heat also sets the outer edges of the muffin top quickly, creating a structure that holds the height as the interior finishes cooking.
- The Finish: After five minutes, we drop the temperature to 350°F to allow the center to bake through without burning the top.
Step-by-Step Instructions
Step 1: Prep and High-Heat Start
Preheat your oven to 425°F (218°C). Line a standard 12-cup muffin tin with high-quality paper liners.
- Pro Tip: For the best air circulation, only fill every other muffin cup. This allows the heat to hit the sides of the muffins more effectively, leading to an even higher rise (though this requires two pans or two batches).
Step 2: The Manual Mash
Peel your overripe bananas into a bowl. Use a fork to mash them until they are mostly liquid but still contain a few small, soft nuggets of fruit. Measure out exactly 1.5 cups.
Step 3: Mix the Wet Base
In a large mixing bowl, whisk together the melted butter, granulated sugar, and brown sugar until smooth. Add the large egg, vanilla extract, and the mashed bananas. Whisk vigorously for 1 minute until the mixture is pale and emulsified.
Step 4: Fold in the Dry Ingredients
Sift the all-purpose flour, baking soda, and salt directly into the wet bowl. Using a rubber spatula, use a “folding” motion (cutting through the center and lifting from the bottom) to combine. Crucial Rule: Stop folding the moment the last streak of white flour disappears. If the batter looks a little lumpy, that is perfect! Over-mixing at this stage will develop gluten, turning your soft muffins into tough, rubbery bread.
Step 5: Fill the Cups
Divide the batter evenly among the 12 muffin liners. Unlike cupcakes, which are filled 2/3 full, bakery-style muffins should be filled nearly to the very top. This ensures the batter has nowhere to go but up.
Step 6: The Two-Stage Bake
Place the tin in the center of the oven. Bake at 425°F for exactly 5 minutes. Without opening the oven door, reduce the temperature to 350°F (175°C) and bake for an additional 12–15 minutes.
- The Doneness Test: A toothpick inserted into the center should come out clean or with just one or two moist crumbs.
Step 7: Cool and Set
Let the muffins rest in the pan for 5 minutes to allow the structure to set. Transfer them to a wire rack to cool completely.
Secrets to the Ultimate Bakery Muffin
- Don’t Over-Mash: Leaving a few tiny lumps of banana provides “flavor pockets” that burst in your mouth, offering a more rustic and gourmet experience.
- Room Temperature Egg: Ensure your egg is at room temperature before adding it to the melted butter. If the egg is cold, it will cause the butter to seize and clump, resulting in an uneven crumb.
- The “Sugar Crust” Finish: For a truly professional look, sprinkle the tops of the raw batter with a pinch of Turbinado (Raw) Sugar before baking. It creates a beautiful, glittery crunch that contrasts with the soft interior.
- Avoid Paper Sticking: If you find your muffins stick to the paper liners, it is usually because they are too fresh! Let them cool for at least 30 minutes; the steam will naturally release the cake from the paper.
Variations and Substitutions
- Chocolate Chip Banana: Fold in 1 cup of semi-sweet mini chocolate chips during Step 4. Mini chips are preferred as they don’t sink to the bottom of the muffin as easily as large ones.
- The Nutty Crunch: Add 1/2 cup of toasted chopped walnuts or pecans to the batter for a classic “Bakery-Style” texture.
- Healthy-ish Swap: Replace half of the all-purpose flour with whole wheat pastry flour and swap the granulated sugar for coconut sugar.
- Peanut Butter Center: Drop a teaspoon of creamy peanut butter into the center of the batter after filling the liners for a “PB&B” surprise.
Storage and Freezing Guide
- Room Temperature: Store the muffins in an airtight container for up to 3 days. To keep the tops from getting “sticky,” place a paper towel at the bottom of the container to absorb excess moisture.
- Refrigerator: Muffins actually stay fresh longer in the fridge (up to 1 week), but the cold can make the butter-based crumb feel firm. Always microwave for 10 seconds before eating.
- Freezing: These are the ultimate meal-prep snack! Wrap individual muffins in plastic wrap and place them in a freezer bag for up to 3 months. Thaw on the counter for 1 hour or reheat directly from frozen in a 300°F oven for 10 minutes.
FAQ
Why did my muffins sink in the middle? This is usually caused by one of two things: either the baking soda was expired, or the oven door was opened too early in the baking process, causing a sudden drop in pressure before the structure was set.
Can I use frozen bananas? Yes! Thaw them completely in a bowl. They will release a lot of liquid (banana “juice”)—do not discard this liquid. It contains concentrated flavor. Mash it all together and use it in the recipe.
What if I don’t have a muffin tin? You can bake the batter in a 9×5-inch loaf pan at 350°F for 55–65 minutes to create a traditional banana bread, though you will miss the high-dome texture of the muffins.
How do I get the muffins to be uniform? Use a large spring-loaded cookie scoop or a 1/4 cup measuring cup. Consistent batter volume ensures every muffin in the tin finishes baking at the exact same time.

Easy Homemade Banana Muffins (The Ultimate Bakery-Style Recipe)
Ingredients
Equipment
Method
- Preheat your oven to 425°F (218°C). Line a standard 12-cup muffin tin with paper liners or grease them lightly. For better air circulation, only fill every other muffin cup.
- In a large mixing bowl, whisk together the melted butter, granulated sugar, and brown sugar until smooth and well-combined. Add the egg, vanilla extract, and mashed bananas, whisking until the mixture is smooth.
- In a separate bowl, sift together the flour, baking soda, and salt. Gradually fold the dry ingredients into the wet ingredients with a rubber spatula, mixing until just combined. Do not over-mix.
- Divide the batter evenly among the muffin liners, filling them almost to the top. Bake at 425°F for 5 minutes, then reduce the oven temperature to 350°F and bake for another 12-15 minutes, or until a toothpick inserted into the center comes out clean.
- Let the muffins rest in the tin for 5 minutes before transferring them to a wire rack to cool completely.


