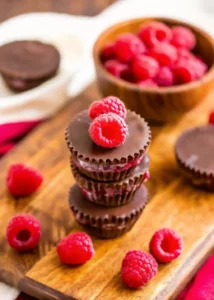
If you’ve ever reached for those fancy chocolate raspberry truffles at a candy shop, you know how irresistible that combination of rich dark chocolate and sweet-tart raspberry can be. The good news? You can make these decadent chocolate raspberry cups right at home with just four simple ingredients and no baking required.
These homemade chocolate raspberry cups taste better than store-bought versions and cost a fraction of the price. Whether you’re making them for Valentine’s Day, Mother’s Day, holiday gifts, or simply because you’re craving something special, this easy recipe delivers professional-looking results that will impress everyone.
The best part is how customizable they are. You can use dark, milk, or even white chocolate, swap raspberries for other berries, and adjust the sweetness to your preference. Once you master this simple technique, you’ll find yourself making chocolate cups for every occasion.

Why You’ll Love This Recipe
No Baking Required These chocolate raspberry candy cups come together completely on the stovetop and in the refrigerator. No oven needed, which means less cleanup and easier preparation—especially perfect during hot summer months.
Just 4 Simple Ingredients Fresh or frozen raspberries, chia seeds, chocolate, and a touch of sweetener are all you need to create these elegant treats. The ingredient list is short, but the flavor is anything but simple.
Healthier Than Store-Bought Control exactly what goes into your chocolate raspberry cups. No artificial colors, preservatives, or mystery ingredients—just real food that tastes incredible.
Perfect for Gift-Giving Package these homemade chocolate raspberry truffles in a pretty box or bag, and you’ve got a thoughtful, delicious gift that rivals anything from an expensive chocolate shop.
Customizable to Your Taste Prefer milk chocolate over dark? Want to use strawberries instead? These chocolate cups are endlessly adaptable to your preferences and dietary needs.
Ingredients for Chocolate Raspberry Cups
For the Raspberry Filling:
- 6 oz fresh or frozen raspberries (about 1½ cups) – No need to thaw frozen berries
- 1 tablespoon chia seeds – Acts as a natural thickener
- 2 teaspoons sweetener of choice – Honey, maple syrup, sugar, or stevia
For the Chocolate Shell:
- 6 oz chocolate chips or chopped chocolate bars (about 1 cup) – Dark, semi-sweet, milk, or white chocolate all work
- 1 teaspoon coconut oil or vegetable oil (optional) – Makes the chocolate smoother and easier to work with
Equipment Needed:
- Mini cupcake liners or silicone candy molds
- Mini muffin tin (optional, for support)
- Small saucepan
- Microwave-safe bowl or double boiler
- Fork or potato masher
- Teaspoon or small spoon
Quick Shortcut: Don’t want to make homemade raspberry jam? Simply use 3-4 tablespoons of store-bought raspberry jam or preserves instead of the raspberry filling ingredients.
How to Make Chocolate Raspberry Cups
Step 1: Prepare the Raspberry Filling
Start by thoroughly mashing your raspberries with a fork or potato masher until they’re well broken down into a chunky puree. If using frozen raspberries, there’s no need to thaw them first, but do blot away any excess ice crystals with a paper towel.
Transfer the mashed raspberries to a small saucepan and add the chia seeds and sweetener. Turn the heat to low and stir occasionally as the mixture heats up. After about 3-5 minutes, the raspberry filling will begin to bubble and thicken slightly.
Remove from heat and let it cool for a few minutes while the chia seeds work their magic, creating a jam-like consistency. The filling will continue to thicken as it cools.
Pro tip: If your filling seems too runny, add an extra ½ tablespoon of chia seeds and let it sit for 5-10 minutes.
Step 2: Melt the Chocolate
While your raspberry filling is cooling, it’s time to melt your chocolate. You have two excellent options:
Microwave Method: Place chocolate chips or finely chopped chocolate in a microwave-safe bowl. Heat for 20 seconds, stir, then continue heating in 10-second intervals, stirring after each one. This prevents burning—be patient and don’t rush it!
Double Boiler Method: Fill a small saucepan with about 1 inch of water and bring it to a simmer. Place a heat-safe bowl on top (making sure the bottom doesn’t touch the water) and add your chocolate. Stir continuously as the steam gently melts the chocolate.
If using coconut oil or vegetable oil, stir it into the melted chocolate for a smoother, glossier finish that’s easier to work with.
Step 3: Create the Chocolate Shells
Line a mini muffin tin with paper mini cupcake liners or use silicone candy molds. If you don’t have a muffin tin, the liners can stand on their own on a baking sheet—they just provide extra stability.
Spoon about 1 teaspoon of melted chocolate into each liner. Use the back of your spoon to spread the chocolate up the sides, creating a little cup or shell. You want the sides to be thick enough to hold the filling without breaking (about ⅛ inch thick).
Important: Work somewhat quickly here, as the chocolate will begin to set. If it starts hardening before you finish, simply reheat it briefly.
Step 4: Add the Raspberry Filling
Carefully spoon about 2 teaspoons of the cooled raspberry filling into the center of each chocolate cup. Don’t overfill—leave enough room for the chocolate top layer. The filling should come to about ¾ of the way up the sides.
Texture tip: If your raspberry filling is still quite liquid, place the cups in the freezer for 10-15 minutes before adding the top chocolate layer. This prevents the layers from mixing together.
Step 5: Seal with Chocolate
Spoon the remaining melted chocolate over the raspberry filling, spreading it gently to the edges to seal everything in. The chocolate should completely cover the filling.
Gently tap the muffin tin on the counter a few times to release any air bubbles and help the chocolate settle evenly.
Step 6: Set the Chocolate
You have three options for setting your chocolate raspberry cups:
Refrigerator: 15-20 minutes for firm cups Freezer: 10-15 minutes for quick setting Room Temperature: 2-3 hours if you’re not in a hurry
Once fully set, carefully peel away the paper liners to reveal your beautiful homemade chocolate raspberry cups!
Expert Tips for Perfect Results
Mash Berries First Mashing the raspberries before cooking them with chia seeds creates a smoother, more consistent filling that’s easier to work with.
Don’t Skip the Cooling Let the raspberry filling cool for at least 5 minutes before adding it to the chocolate shells. Hot filling will melt the chocolate and create a mess.
Keep Chocolate Smooth Never let water come in contact with melting chocolate—it will seize up and become grainy. Make sure all bowls and utensils are completely dry.
Use Fresh Liners Mini cupcake liners work perfectly for this recipe. If you don’t have candy molds, standard paper liners are your best friend for creating uniform, professional-looking cups.
Freeze for Easier Removal If you’re having trouble peeling away the paper liners, pop the chocolate raspberry cups in the freezer for 5 minutes. The chocolate will contract slightly, making removal much easier.
Make Them Your Own Don’t be afraid to experiment! These chocolate cups are incredibly forgiving and adaptable to your preferences.
Delicious Variations
Different Fruit Fillings
This basic technique works beautifully with other fruits:
Strawberry Chocolate Cups: Use 6 oz strawberries (stems removed) for a classic combination Blueberry Chocolate Cups: Swap in blueberries for a different berry experience Cherry Chocolate Cups: Use pitted cherries for an elegant, sophisticated flavor Mixed Berry Cups: Combine raspberries, strawberries, and blueberries for a berry medley
Chocolate Varieties
Milk Chocolate Raspberry Cups: Sweeter and creamier than dark chocolate versions White Chocolate Raspberry Cups: Creates a beautiful color contrast with the pink filling Dark Chocolate Lovers: Use 70-85% dark chocolate for an intense, less-sweet treat Two-Tone Cups: Make the shell with dark chocolate and the top layer with white chocolate
Extra Add-Ins
Nutty Raspberry Cups: Add finely chopped almonds or hazelnuts to the filling Coconut Raspberry Cups: Mix shredded coconut into the raspberry jam Boozy Grown-Up Version: Add ½ teaspoon of raspberry liqueur to the filling Minty Twist: Add a drop of peppermint extract to the chocolate
Sugar-Free Option
Use stevia or monk fruit sweetener in the filling, and sugar-free chocolate chips for a low-carb, keto-friendly version.
Storage and Make-Ahead Instructions
Storing Chocolate Raspberry Cups
Store your finished chocolate raspberry cups in an airtight container in the refrigerator for up to 2 weeks. Place parchment paper between layers to prevent sticking.
For best texture, remove from the refrigerator about 10 minutes before serving to let the chocolate soften slightly at room temperature.
Freezing Instructions
These chocolate cups freeze beautifully! Place them in a freezer-safe container or bag with parchment paper between layers. They’ll keep for up to 3 months in the freezer.
Frozen chocolate raspberry cups are actually delicious eaten straight from the freezer—they have a truffle-like texture that’s incredibly satisfying. You can also thaw them in the refrigerator overnight.
Make-Ahead Tips
These are perfect for making ahead for parties or gifts:
- Make the filling up to 3 days in advance and store in the refrigerator
- Prepare the entire recipe up to 2 weeks before needed
- Assemble in batches if making large quantities
Creative Serving Ideas
Gift Packaging
Valentine’s Day: Package in small heart-shaped boxes with tissue paper Mother’s Day: Arrange in a pretty gift box tied with ribbon Holiday Gifts: Place in clear cellophane bags tied with festive ribbon Party Favors: Wrap individually in gold or silver foil
Presentation
Dessert Platter: Arrange on a serving plate with fresh raspberries and mint leaves Coffee Pairing: Serve alongside espresso or coffee for an elegant after-dinner treat Wine Night: Pair with a glass of dessert wine or champagne Dessert Board: Include on a chocolate and cheese dessert board
Nutritional Benefits
While these are definitely a treat, they do offer some nutritional advantages over commercial candy:
Raspberries are loaded with antioxidants, fiber, and vitamin C Chia seeds provide omega-3 fatty acids and additional fiber Dark chocolate contains flavonoids and may support heart health No artificial ingredients means you know exactly what you’re eating
Each chocolate raspberry cup contains approximately:
- 80-100 calories (depending on chocolate type)
- 2g fiber
- Good source of antioxidants
Frequently Asked Questions
Can I use jam instead of making the raspberry filling? Absolutely! Use 3-4 tablespoons of store-bought raspberry jam or preserves. This cuts down prep time significantly and still tastes delicious.
What if I don’t have chia seeds? You can substitute with ground flaxseed in the same amount, or omit entirely and just use thickened jam. The chia seeds help create the perfect consistency, but they’re not absolutely essential.
Can I make these without candy molds? Yes! Mini cupcake liners work perfectly. You can also freeze dollops of the raspberry filling, then dip them in melted chocolate for a simpler approach.
How do I prevent the chocolate from blooming? Store chocolate raspberry cups in the refrigerator and avoid temperature fluctuations. Blooming (white spots) doesn’t affect taste, just appearance.
Can I double this recipe? Definitely! This recipe scales up easily. Just make the filling in batches if needed, as large amounts take longer to cool.
Are these cups suitable for people with allergies? They can be! Use dairy-free chocolate chips for a vegan version. They’re naturally gluten-free and can be made nut-free by avoiding nut-topped variations.
Chocolate Raspberry Cups
Ingredients
Equipment
Method
- Mash raspberries in a small saucepan with a fork. Add chia seeds and sweetener. Cook over low heat for 3–5 minutes, stirring occasionally, until the mixture thickens slightly. Remove from heat and let cool for 5–10 minutes until jam-like in consistency.
- Place chocolate in a microwave-safe bowl and heat in 20-second intervals, stirring between each, until melted and smooth. Alternatively, melt using a double boiler. Stir in coconut oil if desired for extra shine and smoothness.
- Line a mini muffin tin with paper liners or use silicone molds. Spoon 1 teaspoon of melted chocolate into each cup and spread it up the sides to form a shell. Chill for 5–10 minutes until set.
- Fill each chocolate shell with about 2 teaspoons of cooled raspberry filling, leaving room at the top for sealing. If the filling is too runny, chill the cups for 10 minutes before topping with chocolate.
- Spoon remaining melted chocolate over the raspberry filling to cover completely. Gently tap the pan to release air bubbles and smooth the tops.
- Refrigerate for 15–20 minutes or freeze for 10 minutes until firm. Once set, peel away liners or pop out of molds. Store in the fridge until ready to serve.

