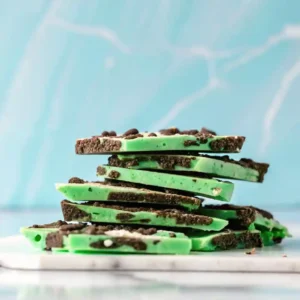
When the holiday season reaches its peak, the desire for high-reward, low-effort desserts becomes a priority for every home baker. This Mint Oreo Bark is the perfect solution: a stunning, vibrant, and delicious candy that requires zero oven time and only about ten minutes of active preparation. Combining the creamy sweetness of white chocolate with the iconic crunch of Mint Oreos, this bark is a celebration of textures and flavors that feels far more sophisticated than its simple ingredient list suggests.
The beauty of chocolate bark lies in its rustic charm. You don’t need expensive molds, candy thermometers, or expert tempering skills to achieve a professional result. By simply melting high-quality chocolate and swirling in crushed cookies and festive colors, you create a treat that is perfect for gifting in mason jars, adding to holiday dessert platters, or stashing in the freezer for a late-night snack. Whether you are celebrating St. Patrick’s Day with bright green swirls or Christmas with a “winter mint” theme, this bark is a crowd-pleasing staple that proves sometimes the best things in life are the simplest.

Why You’ll Love This Recipe
- No-Bake Simplicity: You don’t even need to preheat the oven. This is a microwave-friendly (or double-boiler) recipe that is perfect for when your oven is occupied by a holiday roast.
- The Perfect Edible Gift: This bark is sturdy, travels well, and looks beautiful when packaged in clear cellophane bags with a festive ribbon.
- Iconic Flavor Duo: Mint and chocolate are a match made in heaven. The cooling sensation of the peppermint extract paired with the rich white chocolate creates a balanced, refreshing bite.
- Kid-Friendly Kitchen Project: Because there are no hot burners (if using the microwave) or complicated techniques, this is an excellent recipe for getting children involved in holiday prep.
- Small Ingredient List: You only need five basic ingredients to make a massive batch of candy, making this a budget-friendly option for large gatherings.
Ingredient Notes & Pro Selections
The quality of your chocolate will make or break this recipe. Since there are so few components, each one needs to stand out.
The Chocolate Base
- White Chocolate Chips or Melting Wafers (24 oz): While standard chocolate chips work, melting wafers (like Ghirardelli) are preferred for bark. They contain a higher ratio of cocoa butter, which allows them to melt more smoothly and set with a professional snap.
- White Almond Bark: This is a great, budget-friendly alternative. It isn’t “real” chocolate (it contains vegetable fats instead of cocoa butter), but it is extremely stable and easy to work with for beginners.
The “Star” Inclusion
- Mint Oreos (1 Pack): Ensure you get the specific “Mint” variety with the green filling. The cool mint cream adds an extra layer of flavor that regular Oreos can’t provide.
- Chopping Technique: Don’t pulverize the cookies. You want a mix of fine crumbs to dye the chocolate and large, chunky pieces to provide a satisfying crunch.
Color & Flavor Boosters
- Green Candy Melts (1/4 Cup): This is used for the “swirl.” It provides that beautiful emerald green color that makes the bark pop visually.
- Peppermint Extract (1/2 tsp): Even though the cookies are minty, a tiny bit of peppermint extract in the white chocolate base ensures the mint flavor is present in every single bite.
- Coconut Oil (1 tsp): Adding a small amount of coconut oil to the chocolate helps it melt into a silky consistency and prevents it from cracking when you break it into pieces later.
Step-by-Step Instructions
Step 1: Prep Your Station
Line a large rimmed baking sheet (half-sheet pan) with parchment paper or a silicone baking mat.
- Pro Tip: Do not use aluminum foil; the chocolate will stick to it, and the salt from the cookies can react with the metal.
Step 2: Crush the Cookies
Place about 2/3 of the Mint Oreos in a large Ziploc bag. Use a rolling pin or the back of a heavy spoon to crush them into medium-sized chunks. Roughly chop the remaining 1/3 of the cookies with a knife to keep some larger, prettier pieces for the top.
Step 3: Melt the White Chocolate
In a large microwave-safe bowl, combine the white chocolate and the coconut oil. Microwave in 30-second bursts, stirring vigorously between each interval. White chocolate is notorious for “seizing” (turning into a dry, clumpy mess) if it gets too hot, so go slow. Once the chocolate is smooth and glossy, stir in the peppermint extract.
Step 4: Mix and Spread
Fold the 2/3 of crushed cookies into the melted white chocolate. Stir gently so you don’t turn the whole mixture grey; you want to see the white and black contrast. Pour the mixture onto the prepared baking sheet. Use an offset spatula to spread it into an even layer about 1/4-inch thick.
Step 5: The Green Swirl
In a small bowl, melt the green candy melts. Drop small spoonfuls of the green chocolate over the top of the bark. Use a toothpick or a butter knife to gently swirl the green into the white. Immediately top with the remaining large cookie chunks, pressing them down slightly so they adhere to the chocolate.
Step 6: Set and Break
Let the bark sit at room temperature for 1–2 hours, or place it in the refrigerator for 20–30 minutes until completely firm. Once set, lift the parchment paper off the pan. Use your hands to break the bark into irregular, rustic triangles or use a large knife to cut it into more uniform squares.
Secrets to a Professional Bark Finish
- Avoid Water at All Costs: Even a single drop of water in your melting bowl will cause the chocolate to seize instantly. Ensure your bowls and spatulas are bone-dry.
- The “Snap” Test: If you want that satisfying “snap” when you bite into the candy, don’t let the chocolate get too hot. If the bowl feels too hot to touch, you’ve gone too far.
- Uniform Thickness: Try to spread the bark as evenly as possible. If the edges are too thin, they will melt in your fingers. If the center is too thick, it will be difficult to bite into.
- Tapping the Pan: Once you’ve spread the chocolate, lift the baking sheet and gently tap it against the counter a few times. This releases air bubbles and helps the chocolate level out perfectly.
Variations and Substitutions
- The “Dark Mint” Version: Swap the white chocolate base for dark chocolate (60% cacao). This creates a flavor profile similar to a Thin Mint cookie.
- Andes Mint Addition: Chop up a handful of Andes Mint candies and sprinkle them over the top along with the Oreos for an extra burst of creamy mint.
- Double Peppermint: Sprinkle crushed candy canes over the top for a festive Christmas crunch.
- Vegan Option: Use dairy-free white chocolate chips (like King David or Enjoy Life) and ensure your “Oreo-style” cookies are vegan-certified.
- The “Leprechaun” Bark: For St. Patrick’s Day, add gold star sprinkles to the green swirls for a “pot of gold” theme.
Storage and Gifting Guide
- Refrigerator: Store in an airtight container for up to 2 weeks. While bark is shelf-stable, the cookies will stay crunchier for longer if kept in a cool environment.
- Freezer: This bark freezes beautifully! Store in a freezer bag for up to 3 months. It’s actually delicious to eat straight from the freezer.
- Gifting Tips:
- Layering: Use parchment paper between layers of bark in a gift tin to prevent them from sticking together.
- Mason Jars: Stack smaller pieces in a pint-sized mason jar and tie a sprig of fresh mint or a green ribbon around the lid.
- Temperature Control: If you are gifting this during the summer, include a small note to “Keep Cool” so the chocolate doesn’t bloom or melt.
FAQ
Why did my white chocolate turn into a thick paste? This is called “seizing,” and it usually happens because a drop of water got into the bowl or the chocolate was overheated. You can sometimes save it by stirring in a teaspoon of vegetable oil, but it may lose its “snap.”
Can I make this with regular Oreos? Yes! If you can’t find Mint Oreos, use regular ones and increase the peppermint extract to 1 teaspoon to compensate for the missing mint cream.
How do I get the “swirl” to look like the pictures? The key is to work quickly while both the white and green chocolates are still very fluid. Don’t over-swirl, or the colors will just blend together into a muddy green. 3 or 4 “S” motions with a knife is usually enough.
Can I use a different color than green? Absolutely! Use red for Valentine’s Day, blue for a “Winter Wonderland” theme, or leave the swirls out entirely for a classic look.
Why is my bark soft at room temperature? White chocolate has a lower melting point than dark chocolate. If your house is warm, it’s best to keep the bark in the refrigerator until right before serving.
Easy Mint Oreo Bark
Ingredients
Equipment
Method
- Line a large baking sheet with parchment paper or a silicone baking mat.
- Crush about two-thirds of the Mint Oreos into medium chunks. Roughly chop the remaining cookies into larger pieces for topping.
- In a microwave-safe bowl, melt the white chocolate and coconut oil in 30-second intervals, stirring between each, until smooth. Stir in peppermint extract.
- Fold the crushed Oreos into the melted white chocolate. Pour onto the prepared baking sheet and spread evenly.
- Melt the green candy melts. Spoon over the bark and gently swirl with a knife or toothpick. Top with remaining Oreo chunks.
- Allow bark to set at room temperature for 1–2 hours or refrigerate for 20–30 minutes until firm. Break into pieces and serve.


