If you grew up in a household where the holidays weren’t complete without a tin of homemade treats, chances are you’ve tasted Fantasy Fudge.
For decades, this recipe was the gold standard of home candy making. Printed on the back of the marshmallow creme jar, it was the “secret weapon” for busy moms and grandmas everywhere. Why? Because unlike traditional old-fashioned fudge—which requires precise temperature control and hours of beating—Fantasy Fudge is practically fail-proof.
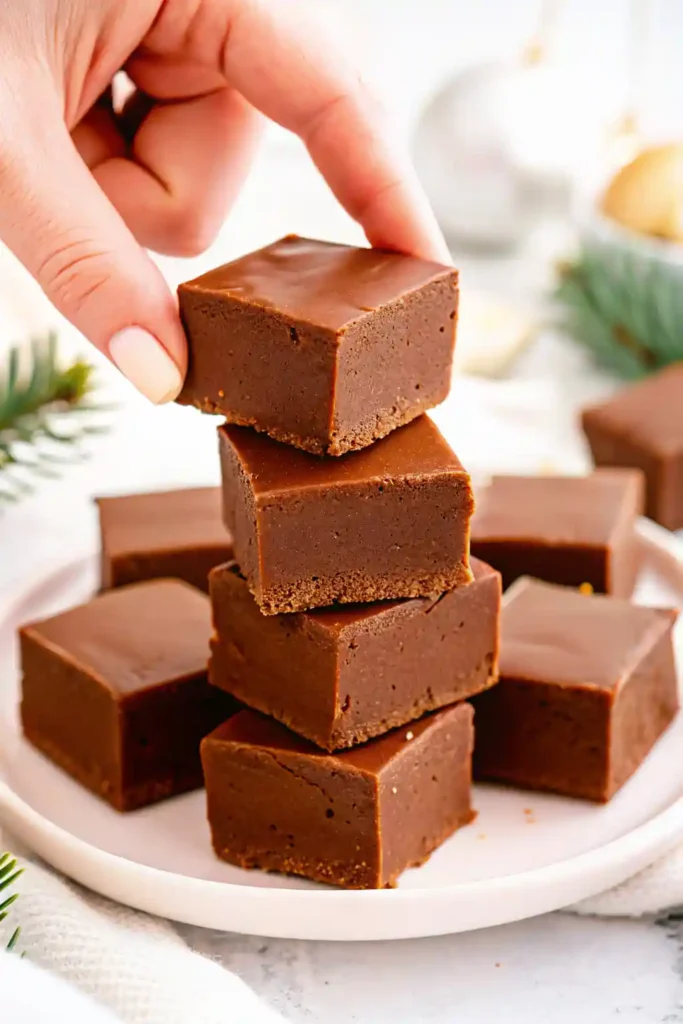
It’s rich, impossibly smooth, and has that signature “melt-in-your-mouth” texture that only marshmallow creme can provide.
However, a few years ago, the recipe on the back of the jar changed. Many bakers were disappointed to find the new version didn’t quite stack up to the nostalgia of the classic.
If you’ve been hunting for the Original Fantasy Fudge recipe—the one you remember from your childhood—you have found it. This guide will walk you through exactly how to make it, why it works, and how to ensure it turns out perfect every single time.
What is Fantasy Fudge?
Fantasy Fudge is a “shortcut” fudge that uses marshmallow creme (often referred to by the brand name Jet-Puffed or Marshmallow Fluff) as a stabilizer.
Traditional fudge relies on a complex chemical process of controlling sugar crystals as they cool. If you stir it too soon, it turns grainy. If you don’t cook it long enough, it stays liquid. It’s a temperamental art form.
Fantasy Fudge removes that stress. The marshmallow creme acts as an “interfering agent,” which essentially prevents the sugar from crystallizing into large, grainy chunks. The result is a fudge that is consistently smooth and sets up firm but creamy, even if you aren’t a professional chocolatier.
Why This Recipe Works
- It’s Forgiving: The combination of evaporated milk and marshmallow creme creates a stable emulsion that resists seizing.
- It’s Fast: From start to finish, the cooking process takes about 10-15 minutes.
- It’s Customizable: While the classic chocolate walnut is iconic, this base recipe works for peanut butter, mint, and white chocolate variations.
Ingredients You Need
The beauty of this recipe lies in its simplicity. However, because candy making is chemistry, substitutions are risky. Here is what you need and why:
- Sugar: Regular white granulated sugar is essential. Do not substitute brown sugar or powdered sugar here, as it will alter the moisture content and boiling point.
- Butter: Salted or unsalted works, though I prefer salted butter to cut through the intense sweetness. If you use unsalted, add a pinch of salt to the pot.
- Note: The original 1970s recipe called for margarine. You can still use it, but real butter provides a richer flavor and better mouthfeel.
- Evaporated Milk: This is crucial! Do not confuse this with Sweetened Condensed Milk. They are completely different products. Evaporated milk is thinner and unsweetened. If you use condensed milk, your fudge will not set and will be cloyingly sweet.
- Semi-Sweet Chocolate Chips: The original recipe calls for a 12-ounce bag (about 2 cups). Semi-sweet is best because the marshmallow creme and sugar add plenty of sweetness. Milk chocolate chips can make the fudge too sweet.
- Marshmallow Creme: You need one 7-ounce jar. Marshmallow creme (like Jet-Puffed) and Marshmallow Fluff are slightly different, but both work in this recipe.
- Vanilla Extract: Add this after the mixture comes off the heat to preserve the flavor.
- Walnuts (Optional): Chopped walnuts cut the richness and add a lovely texture. You can easily omit them or swap for pecans.
Equipment Checklist
- Heavy-Bottomed Saucepan: This is non-negotiable. A thin pan will cause the sugar to scorch (burn) at the bottom before it reaches the correct temperature. A heavy Dutch oven or stainless steel pot is ideal.
- Candy Thermometer: While you can use the time method, a digital instant-read thermometer or a clip-on candy thermometer guarantees success.
- 9×13 Baking Pan: For thinner squares (traditional). Use a 9×9 pan if you prefer thick, bakery-style blocks.
- Aluminum Foil or Parchment Paper: To line the pan for easy removal.
How to Make Original Fantasy Fudge: Step-by-Step
1. Prep Your Station
Candy making moves fast. Before you even turn on the stove, line your baking pan with foil and grease it lightly with butter or cooking spray. Open your jar of marshmallow creme, measure your chocolate chips, and have your vanilla ready. You won’t have time to measure once the boiling stops!
2. The Boil
In your heavy saucepan, combine the sugar, butter, and evaporated milk. Turn the heat to medium. Stir strictly and constantly as the butter melts and the sugar dissolves.
Bring the mixture to a full rolling boil. This means big bubbles that don’t stop even when you stir.
3. The Temperature (The Critical Step)
Once it is boiling, you have two options:
- The Thermometer Method (Recommended): Cook until the mixture reaches 234°F (112°C). This is the “soft ball” stage.
- The Timer Method: If you don’t have a thermometer, boil for exactly 5 minutes. Keep the heat on medium and stir constantly to prevent burning.
Chef’s Tip: Humidity affects candy. On a rainy day, water evaporates slower. This is why using a thermometer is safer than relying on a timer.
4. The Transformation
As soon as it hits 234°F or the 5 minutes are up, remove the pot from the heat immediately.
Working quickly, stir in the chocolate chips. Keep stirring until they are mostly melted. Then, add the marshmallow creme and vanilla.
Stir vigorously. The mixture will turn from a dark, glossy liquid into a lighter, creamy, thick fudge batter. If you are using nuts, fold them in now.
5. The Set
Pour the hot mixture into your prepared pan. Smooth the top with a spatula.
Now, the hardest part: Waiting. Let the fudge cool at room temperature for at least 2-3 hours. Avoid putting it in the fridge to speed it up, as this can sometimes cause it to lose its shine or become sticky due to condensation.
Troubleshooting Your Fudge
Even with a “fail-proof” recipe, things can go wrong. Here is how to fix common issues:
Problem: My fudge is grainy.
- Cause: Undissolved sugar crystals.
- Fix: Next time, ensure you wash down the sides of the saucepan with a wet pastry brush during the boiling stage to prevent sugar crystals from falling back into the mix. Also, make sure the mixture actually reached a full boil before starting your timer.
Problem: My fudge is too soft and won’t set.
- Cause: It didn’t reach 234°F.
- Fix: This usually happens when the boil wasn’t vigorous enough or you took it off the heat too soon. Unfortunately, you can’t re-boil fudge easily. However, you can roll the soft fudge into balls and coat them in crushed nuts or cocoa powder for “fudge truffles.”
Problem: My fudge is hard or crumbly.
- Cause: It was overcooked (temperature went past 240°F).
- Fix: Ensure your thermometer is calibrated. When boiling, watch it like a hawk!
Variations to Try
Once you master the Original, try these twists:
- Peanut Butter Fantasy Fudge: Swap the chocolate chips for peanut butter chips (or use 1 cup peanut butter chips and 1 cup semi-sweet).
- Mint Chocolate: Add 1/2 teaspoon of peppermint extract alongside the vanilla. You can also crush candy canes on top for a festive look.
- Oreo Fudge: Use white chocolate chips instead of semi-sweet, and fold in 1 cup of crushed Oreo cookies at the end.
Storage and Freezing Instructions
Fantasy Fudge is one of the best desserts for shipping and gifting because it is so stable.
- Room Temperature: Store in an airtight container at room temperature for up to 2 weeks. Separate layers with wax paper to prevent sticking.
- Fridge: You can store it in the fridge for up to 3 weeks, but it may dry out slightly.
- Freezing: This fudge freezes beautifully! Wrap the block (uncut is best, but cut works too) in plastic wrap, then a layer of foil, and place it in a freezer-safe bag. It will last for 3-6 months. Thaw on the counter for a few hours before serving.
Frequently Asked Questions
Can I double this recipe? Yes, but you must use a very large pot. The mixture bubbles up significantly when boiling. You will also need to be very careful with the stirring to ensure the bottom doesn’t burn.
Can I use marshmallow fluff instead of creme? Yes. While purists debate the difference, they are functionally interchangeable in this recipe.
Why did my butter separate? This happens if the mixture gets too hot too fast, or if there is a drastic temperature change. Stirring in the marshmallow creme usually helps bring the emulsion back together.
Conclusion
There is a reason the Original Fantasy Fudge recipe has survived for over 50 years. It captures the essence of the holidays—sweet, indulgent, and made with love. Whether you are recreating a childhood memory or starting a new tradition, this recipe is guaranteed to bring smiles to everyone who tries a piece.
So grab your jar of marshmallow creme and get boiling. Your new favorite holiday tradition is just 15 minutes away!

The Best Original Fantasy Fudge Recipe (Fail-Proof & Creamy)
Ingredients
Equipment
Method
- Line a 9×13-inch baking pan with foil or parchment and lightly grease it for easy fudge removal.
- In a heavy saucepan, add sugar, butter, and evaporated milk. Heat over medium, stirring constantly until butter melts and sugar dissolves.
- Bring to a full rolling boil. Continue stirring constantly.
- Boil for exactly 5 minutes or until the mixture reaches 234°F on a candy thermometer.
- Remove from heat immediately. Stir in the chocolate chips until fully melted and smooth.
- Stir in the marshmallow creme and vanilla. Beat vigorously until the mixture becomes thick, glossy, and creamy.
- Fold in chopped walnuts, if using.
- Pour the fudge into the prepared pan. Smooth the top and allow to cool completely at room temperature for 2–3 hours before cutting.


