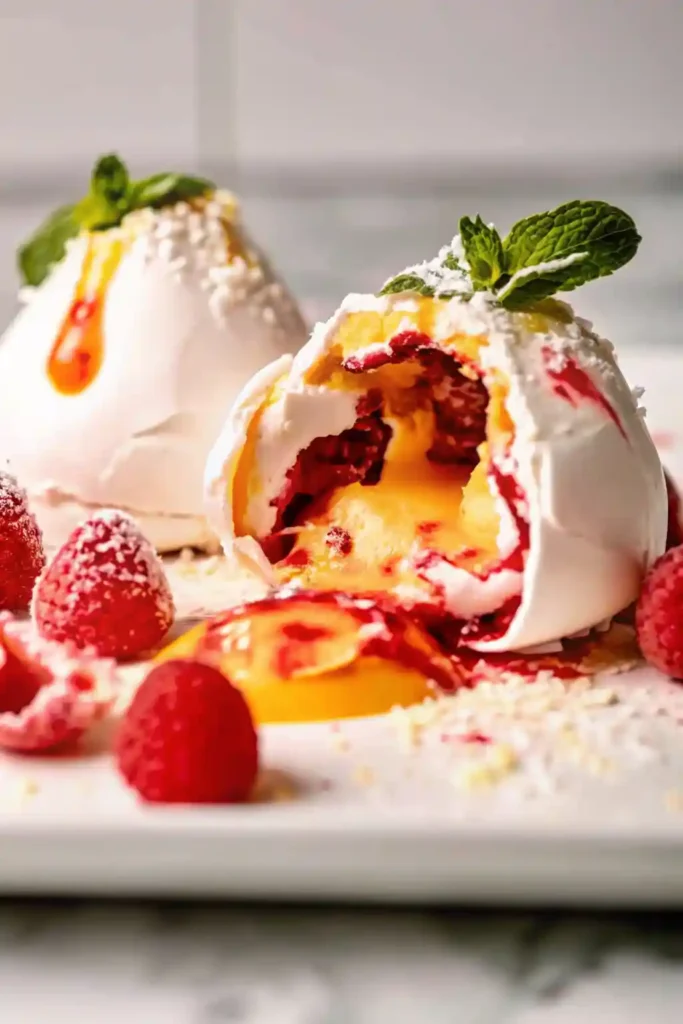
If you are looking for a dessert that delivers a “wow” factor far beyond its simple ingredients, these Pavlova Bombs are the answer. Inspired by the classic Australian Pavlova, these are bite-sized meringue domes that look perfectly innocent on the outside but hide a vibrant, “explosive” center of lemon curd, raspberry coulis, and fresh whipped cream.
The magic of the Pavlova Bomb lies in the “smash.” When you crack into the crispy, sugary shell, the fillings spill out in a beautiful mess of textures—crunchy, marshmallowy, tart, and creamy. They are naturally gluten-free, incredibly light, and serve as the perfect centerpiece for a holiday party or a sophisticated dinner gathering. While traditional large pavlovas can be finicky and prone to collapsing, these mini “bombs” are much more stable and easy to handle. Let’s master the art of the perfect meringue shell and the secret to filling them without breaking the structure.
Why You’ll Love This Recipe
- The Surprise Element: There is nothing more satisfying than seeing guests’ faces when they realize there is a hidden, colorful center inside the white dome.
- Perfect Texture Contrast: You get the shatteringly crisp exterior, a soft marshmallow-like interior, silky curd, and airy cream all in one bite.
- Make-Ahead Friendly: You can bake the meringue shells and prepare the fillings a day in advance, leaving only the assembly for right before serving.
- Naturally Gluten-Free: A safe and elegant option for guests with dietary restrictions without sacrificing any flavor.
- Infinite Variations: While lemon and raspberry is the classic “high-contrast” pairing, you can fill these with anything from passionfruit pulp to salted caramel.
Ingredient Notes & Selection
Because meringue is essentially a science experiment involving air and sugar, the quality and temperature of your ingredients are paramount.
The Meringue Shell
- Egg Whites (80ml / approx. 3 large eggs): Use room temperature egg whites. Cold eggs separate more easily, but room temperature whites whip to a much higher volume. Crucial: Ensure there is not a single speck of yellow yolk in your whites, or they will not whip.
- Caster Sugar (2/3 cup): Also known as superfine sugar. It dissolves much faster than regular granulated sugar, which prevents a “gritty” texture and helps prevent the meringue from weeping in the oven.
- Cornstarch (1 ¼ tsp) & White Vinegar (1/2 tsp): These are the structural stabilizers. They give the pavlova its signature marshmallow center and help the shell hold its shape without cracking prematurely.
The “Explosive” Fillings
- Lemon Curd: Provides a sharp, custardy tang. You can use high-quality store-bought curd or make it fresh using the leftover yolks from the meringue.
- Raspberry Coulis: The bright red color provides the best visual “explosion” against the white cream. A simple sauce of strained pureed raspberries and sugar works perfectly.
- Heavy Whipping Cream: Use cold, full-fat cream. Avoid “light” versions as they won’t hold enough air to plug the base of the bomb.
Step-by-Step Instructions
Step 1: Prep the Meringue Base
Preheat your oven to 300°F (150°C). In a stand mixer fitted with a whisk attachment, beat the egg whites on high speed for 1 minute until soft peaks form. Gradually add the caster sugar, one tablespoon at a time, while the mixer is running. Continue beating for about 5 minutes until the mixture is thick, glossy, and you can no longer feel sugar grains when rubbing a bit between your fingers. Fold in the vinegar and cornstarch for 30 seconds.
Step 2: Shape and Bake
Line a tray with parchment paper. Transfer the meringue to a piping bag (or use a large spoon) and create 5-6 tall mounds. Smooth them into domes that are taller than they are wide. Important: Immediately turn the oven down to 225°F (110°C) and bake for 1 hour 30 minutes.
Step 3: The Slow Cool (The Secret Step)
Once the timer goes off, do not open the oven door. Turn the oven off and leave the pavlovas inside to cool for at least 3 hours, or preferably overnight. This gradual cooling prevents the shells from cracking and ensures they are perfectly dry to the touch.
Step 4: Create the “Bomb” Hole
Once the shells are completely cold and dry, carefully turn them over. Using a small sharp knife, cut a 1/2-inch hole into the flat base of each pavlova. Use a chopstick to gently jiggle inside and create a cavity for the fillings, being careful not to crack the outer shell.
Step 5: Fill and Plug
Using piping bags (or a small spoon), pipe about 1.5 teaspoons of raspberry coulis into the hole, followed by 2 teaspoons of lemon curd. “Plug” the hole with a generous dollop of stiffly whipped cream. This acts as the sealant that keeps the liquids inside.
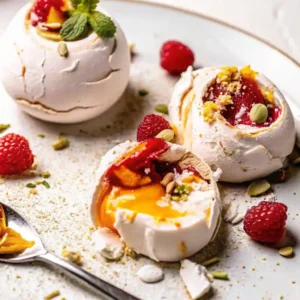
Step 6: Serve and Smash
Invert the pavlova bomb onto a serving plate (hole-side down). Garnish the top with a tiny bit more cream, fresh raspberries, chopped pistachios, and a dusting of powdered sugar. Serve immediately and instruct your guests to “smash” them open with a spoon!
Secrets to the Perfect “No-Weep” Meringue
- Clean Your Bowl: Wipe your mixing bowl and whisk with a bit of lemon juice or vinegar before starting. This removes any trace of grease that would prevent the eggs from fluffing up.
- Humidity is the Enemy: Meringues absorb moisture from the air. If it is a very rainy or humid day, your shells may turn out sticky. Try to bake these on a dry day.
- Don’t Rush the Sugar: Adding the sugar too fast will deflate the air bubbles. Think “slow and steady” to build a strong protein structure.
- The Base Hole: Never try to put the hole in the top of the dome. The top is the most fragile part. The base is flat and reinforced, making it the only safe place to puncture.
Variations and Substitutions
- Tropical Bomb: Fill with passionfruit pulp and mango puree. Top with toasted coconut flakes.
- Forest Berry: Use a mix of blackberry and blueberry coulis for a deep purple “explosion.”
- Chocolate Lovers: Fill with chocolate ganache and salted caramel. Dust the outside with cocoa powder instead of powdered sugar.
- Eton Mess (The Rescue): If your shell cracks during filling, don’t panic! Simply crush it into a glass, layer it with the cream and fillings, and serve it as a “Deconstructed Pavlova” or Eton Mess. It will taste exactly the same!
Storage and Reheating
- Unfilled Shells: These can be stored in an airtight container at room temperature for up to 3 days. Ensure the container is perfectly sealed to prevent them from becoming chewy.
- Assembled Bombs: These must be eaten immediately. Once the wet fillings touch the meringue, the shell will begin to soften. Within an hour, the crispness will be gone.
- Freezing: You can freeze unfilled, dry meringue shells in a sturdy airtight container for up to 1 month. Thaw at room temperature for 15 minutes before filling.
FAQ
Why is my meringue brown instead of white? Your oven might be running hot. Meringue is meant to “dry” rather than “bake.” If they are turning brown, lower your oven temperature by 15 degrees next time.
Can I use regular granulated sugar? Yes, but you must beat it for much longer to ensure it dissolves. If you see tiny golden beads of syrup on your meringue after baking, it means the sugar didn’t dissolve properly.
My pavlova is sticky/tacky. What happened? This usually happens due to humidity or not leaving the shells in the oven long enough to cool. You can try putting them back in a 200°F oven for 20 minutes to dry them out again.
Do I have to use a piping bag? No, but it makes filling the small hole much cleaner. If you don’t have one, use a Ziploc bag with the corner snipped off.
Crispy Pavlova Bombs
Ingredients
Equipment
Method
- Preheat oven to 300°F (150°C). Beat egg whites on high speed until soft peaks form. Gradually add caster sugar one tablespoon at a time until thick and glossy. Fold in vinegar and cornstarch.
- Pipe or spoon meringue into 5–6 tall domes on a parchment-lined baking tray. Reduce oven temperature to 225°F (110°C) and bake for 1 hour 30 minutes.
- Turn oven off and allow pavlovas to cool completely inside the oven for at least 3 hours or overnight without opening the door.
- Once cool, turn pavlovas upside down and carefully cut a small hole in the base. Gently hollow out the center with a chopstick.
- Pipe raspberry coulis into the cavity followed by lemon curd. Seal the opening with whipped cream.
- Invert onto serving plates, garnish with extra cream, berries, pistachios, and powdered sugar. Serve immediately and smash to reveal the center.

