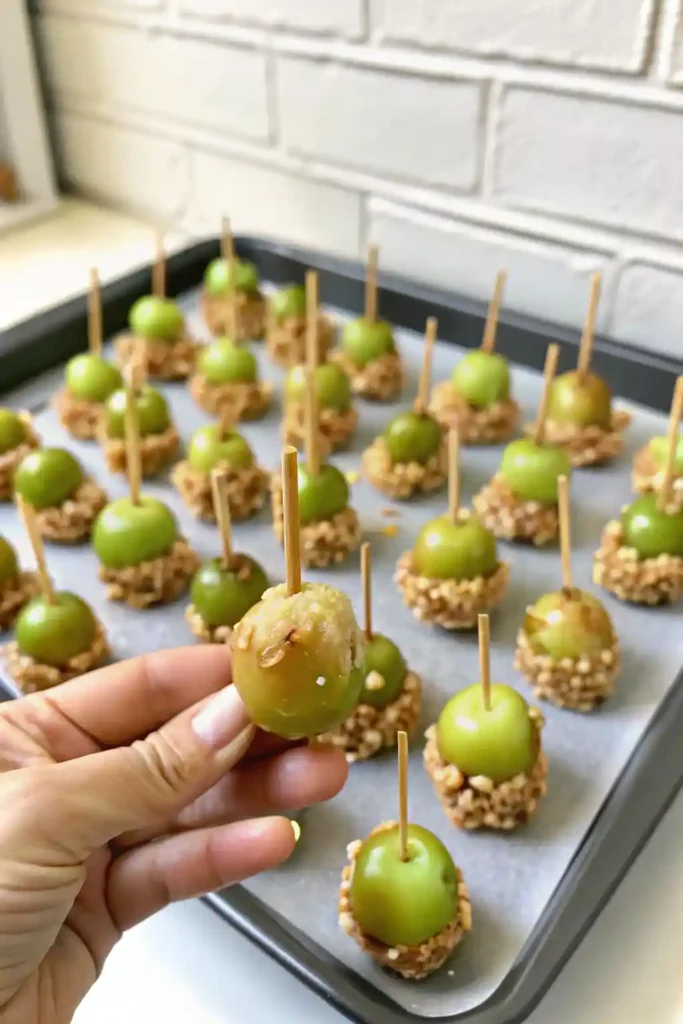
These Easy Caramel Apple Grapes are a fun, bite-sized twist on the classic fall treat, delivering all the delicious flavor of a caramel apple with a refreshing, juicy crunch. This simple, no-bake recipe features crisp, sweet grapes dipped in rich, gooey caramel and then rolled in your favorite crunchy toppings. They are an incredibly easy, completely addictive, and beautiful treat for any autumn occasion.
Perfect for a Halloween party, a fall festival, or just a fun afternoon snack, this recipe is a guaranteed hit with both kids and adults. It’s a creative and simple way to enjoy a beloved flavor combination without the commitment of a full-sized caramel apple.
Why You’ll Love This Recipe
- No-Bake & Incredibly Easy: A foolproof recipe that comes together in minutes with no cooking required.
- Fun & Bite-Sized: The perfect easy-to-eat treat for parties and little hands.
- Completely Customizable: The topping possibilities are endless, so everyone can make their favorite.
- A Fun Twist on a Classic: All the flavor of a caramel apple in a fun, new format.
Ingredients
- 1 lb Green or Red Grapes, washed and stemmed
- 1 (11 oz) bag Caramel Bits (like Kraft’s)
- 2 tablespoons Water
- Optional Toppings:
- Finely chopped peanuts or pecans
- Mini chocolate chips
- Fall-themed sprinkles
- Crushed Oreo cookies or graham crackers
- Toffee bits
Step-by-Step Instructions
- Prep the Grapes (The Most Important Step): Wash the grapes thoroughly and remove them from the stems. Lay them on a paper towel and pat them completely dry. Let them air dry for a bit to ensure there is no moisture left.
- Prepare Toppings: Place each of your desired toppings in separate, shallow bowls. Line a large baking sheet with parchment paper.
- Melt the Caramel: In a microwave-safe bowl, combine the caramel bits and water. Microwave in 30-second intervals, stirring in between, until the caramel is completely melted and smooth.
- Dip the Grapes: Working quickly, dip one grape at a time into the melted caramel, coating it completely. Use a fork to lift the grape out, allowing any excess caramel to drip off.
- Add Toppings: Immediately roll the caramel-coated grape in your topping of choice until it’s well-coated.
- Chill and Set: Place the finished grape on the prepared parchment-lined baking sheet. Repeat with the remaining grapes. Place the baking sheet in the refrigerator for at least 30 minutes to allow the caramel to set completely.
- Serve: Serve the caramel apple grapes chilled.
Tips & Variations
- Pro Tip: The grapes must be completely dry. If they are even slightly damp, the caramel will slide right off.
- Use Sticks: For a true “mini caramel apple” experience and less messy fingers, you can insert a toothpick or a small lollipop stick into each grape before dipping.
- Chocolate Drizzle: After the caramel has set, you can drizzle the grapes with melted white, milk, or dark chocolate for an extra layer of decadence.
- Different Dips: You could also dip the grapes in melted chocolate first, let it set, and then drizzle with caramel.
Frequently Asked Questions (FAQ)
- How do I store caramel apple grapes?
- Store them in an airtight container in the refrigerator. They are best enjoyed within 1-2 days, as the grapes will start to release moisture and soften the caramel.
- Why isn’t my caramel sticking to the grapes?
- The number one reason is that the grapes were not completely dry. Any moisture will prevent the caramel from adhering properly.
- Can I make these ahead of time?
- Yes, you can make them the morning of a party or a few hours ahead of time. They are best served the same day they are made for the best texture.
Serving Suggestions
- Arrange these caramel apple grapes on a festive platter for a fall party or a Halloween gathering. They are a perfect, easy-to-grab dessert that doesn’t require any plates or utensils.

Caramel Apple Grapes
These bite-sized Caramel Apple Grapes are a fun, no-bake treat that tastes just like a caramel apple in every bite! Juicy green grapes are dipped in smooth caramel and rolled in crunchy chopped peanuts — a quick and easy snack for parties, holidays, or anytime you crave something sweet and salty.
Ingredients
Equipment
Method
- Line a baking sheet with parchment paper or a silicone mat. Wash and thoroughly dry the grapes with paper towels to ensure the caramel sticks properly.
- Finely chop the peanuts and place them in a shallow bowl. Insert a toothpick into each grape and set aside.
- In a microwave-safe bowl, combine caramel bits and heavy cream. Microwave in 30-second intervals, stirring in between, until smooth and fully melted.
- Dip each grape into the caramel, let excess drip off, then roll in chopped peanuts. Place each coated grape back onto the prepared baking sheet.
- Refrigerate the caramel apple grapes until firm and ready to serve. Enjoy chilled!
Notes
Be sure your grapes are completely dry before dipping — moisture prevents the caramel from sticking.
Store in the refrigerator for up to 2 days. Serve chilled for the best texture and flavor!
Store in the refrigerator for up to 2 days. Serve chilled for the best texture and flavor!

