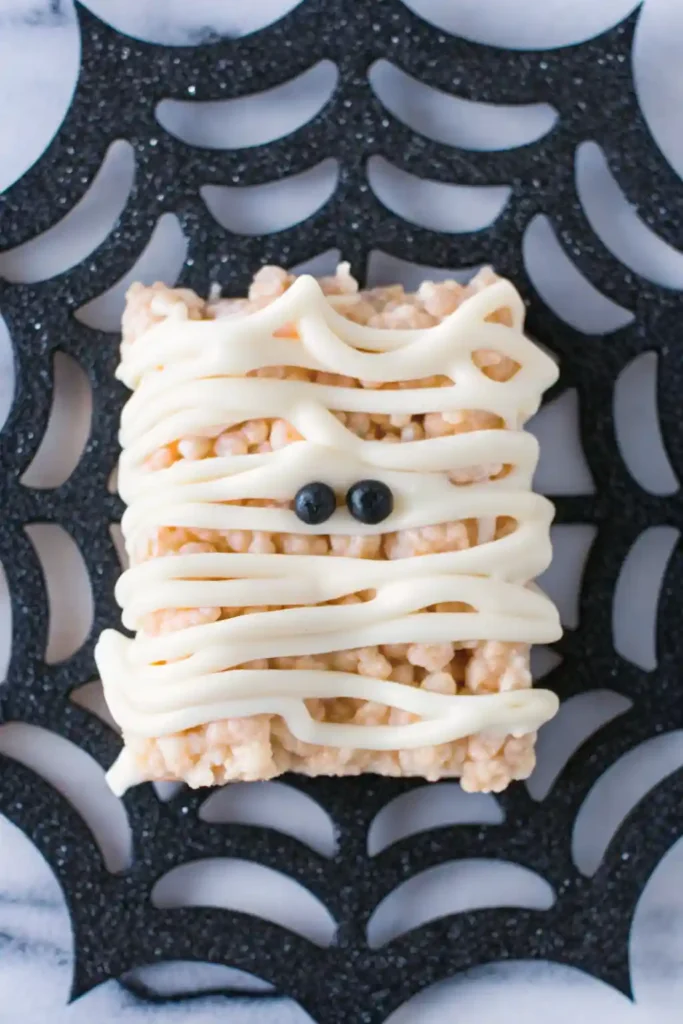
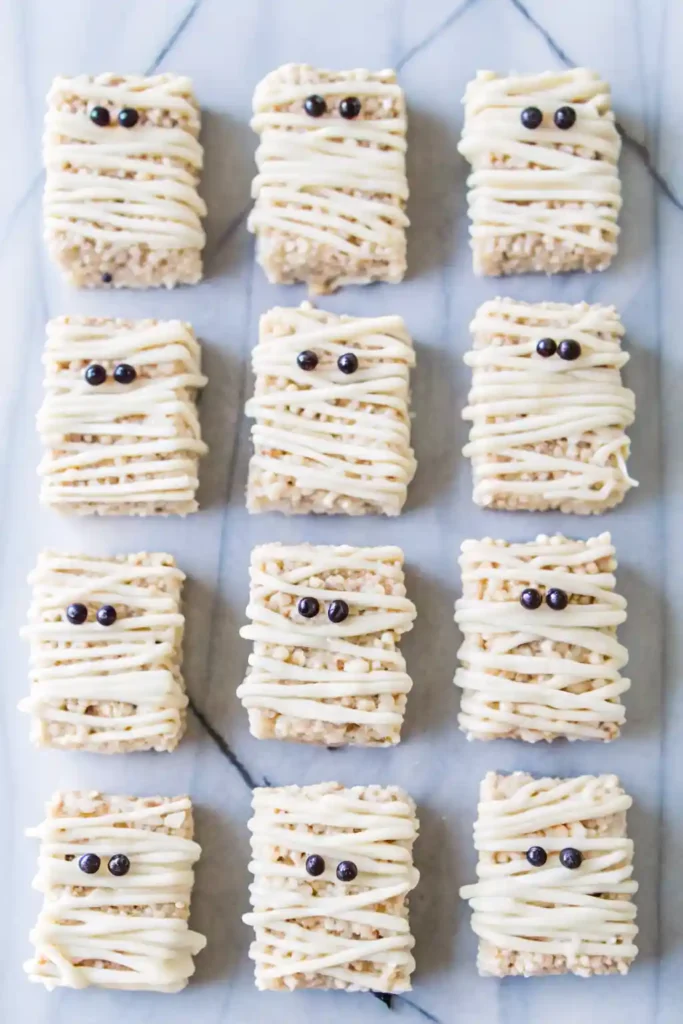
These Easy Mummy Rice Krispie Treats are a spooktacularly simple and delicious no-bake dessert, perfect for any Halloween celebration. This recipe takes the classic, gooey, and chewy marshmallow treat and gives it an adorable spooky makeover. Each bar is drizzled with white chocolate “bandages” and finished with a pair of candy eyeballs, transforming them into cute, friendly mummies.
This is the ultimate last-minute Halloween party treat, as it requires no baking and comes together with just a handful of simple ingredients. It’s a fun, festive, and completely foolproof recipe that’s perfect for getting kids involved in the kitchen. Get ready for these to be the first thing to vanish from the dessert table!
Why You’ll Love This Recipe
- No-Bake & Incredibly Easy: A classic, foolproof recipe that comes together in minutes without turning on the oven.
- Festive & Cute: The mummy design is an adorable, non-scary treat perfect for all ages.
- Kid-Friendly: A fun project for kids to help decorate and a treat they will absolutely love to eat.
- Perfect Party Food: Makes a big batch, is easy to serve, and is always a crowd-pleaser.
Ingredients
- 6 cups Rice Krispies Cereal
- 1 (10 oz) bag Mini Marshmallows
- 4 tablespoons Unsalted Butter
- 1 teaspoon Vanilla Extract
- Pinch of Salt
- 1 cup White Chocolate Melting Wafers or White Chocolate Chips
- Candy Eyeballs
Step-by-Step Instructions
- Prep: Line a 9×13 inch baking pan with parchment paper, leaving an overhang on the sides to act as handles. Lightly grease the parchment paper.
- Melt Marshmallows: In a large pot or Dutch oven, melt the butter over low heat. Add the mini marshmallows and stir continuously until they are completely melted and smooth.
- Add Flavor: Remove the pot from the heat. Stir in the vanilla extract and the pinch of salt.
- Combine: Immediately add the Rice Krispies cereal to the pot. Gently fold everything together with a greased spatula until the cereal is evenly coated in the marshmallow mixture.
- Press and Cool: Transfer the mixture to the prepared baking pan. Use the greased spatula or another piece of parchment paper to gently press the mixture into an even layer. Do not press too firmly. Let it cool completely for at least 1 hour.
- Cut the Treats: Use the parchment paper handles to lift the cooled treats out of the pan. Cut them into 12-16 equal rectangles.
- Decorate the Mummies: Melt the white chocolate wafers in the microwave in 30-second intervals until smooth. Transfer the melted chocolate to a piping bag or a zip-top bag with a small corner snipped off. Drizzle the chocolate back and forth over each Rice Krispie treat to create the look of mummy bandages.
- Add Eyes and Set: Before the chocolate sets, gently press two candy eyeballs onto each mummy. Let the treats sit at room temperature until the chocolate is completely firm, about 20-30 minutes.
Tips & Variations
- Pro Tip: Use fresh marshmallows for the best gooey, melt-in-your-mouth texture. Older marshmallows can be dry and won’t melt as smoothly.
- Gentle Press: When pressing the mixture into the pan, be gentle! Pressing too hard is the number one cause of hard, dense Rice Krispie treats.
- Chocolate Base: For an extra layer of decadence, you can dip the bottom of each treat in melted dark or milk chocolate before adding the mummy drizzle.
- Gluten-Free: To make this recipe gluten-free, simply use a certified gluten-free crisped rice cereal.
Frequently Asked Questions (FAQ)
- How do I store these?
- Store the mummy treats in an airtight container at room temperature for up to 3 days. Keep layers separated with parchment paper to prevent sticking.
- What if I don’t have candy eyeballs?
- You can easily make your own eyes by using two mini chocolate chips, pressed point-side down into the white chocolate drizzle before it sets.
- Can I make these ahead of time?
- Yes, these are a great make-ahead treat. You can prepare them a day or two in advance of your party.
Serving Suggestions
- Arrange these Mummy Rice Krispie Treats on a festive platter for a Halloween party, bake sale, or school event. They are a perfect grab-and-go dessert that requires no plates or forks.

Mummy Rice Krispies Treats
Mummy Rice Krispies Treats are a spooky and fun Halloween dessert! Classic marshmallow cereal bars drizzled with white chocolate bandages and chocolate chip eyes. Perfect for school parties, kids, or quick Halloween snacks.
Ingredients
Equipment
Method
- Grease and line a 9×13 inch pan with parchment paper, leaving 1–2 inch overhang on the long sides.
- Using a double boiler, melt marshmallows and butter together over medium heat. Stir in vanilla extract if using.
- Quickly mix in Rice Krispies cereal until coated. Press mixture firmly into prepared pan using a greased cup to flatten. Let sit 20–60 minutes to firm up.
- Remove from pan using parchment sling. With a warm knife, cut into 12–18 rectangular pieces.
- Melt white chocolate using a double boiler or microwave in short bursts until smooth. Transfer to piping bag or plastic bag with a corner snipped.
- Drizzle white chocolate over bars to resemble mummy bandages. Add mini chocolate chips as eyes while chocolate is still wet.
- Let set for 60 minutes or overnight before serving.
Notes
✅ Use Kamut puffed cereal for a healthier alternative.
✅ Don’t overheat white chocolate or it may seize.
✅ A piping bag or small freezer bag with the corner snipped off makes drizzling easy.
✅ Store at room temperature in an airtight container for 2–3 days.
✅ Don’t overheat white chocolate or it may seize.
✅ A piping bag or small freezer bag with the corner snipped off makes drizzling easy.
✅ Store at room temperature in an airtight container for 2–3 days.


