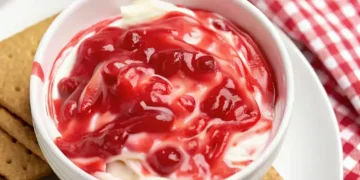
These Easy Rice Krispies Treat Marshmallow Brains are a ghoulishly delightful and simple no-bake dessert, perfect for your Halloween party spread. This recipe takes the classic gooey and chewy marshmallow treat and shapes it into spooky little brains, finished with a drizzle of “bloody” red gel icing for a creepy effect. They are incredibly easy to make, fun to decorate, and a guaranteed hit with kids and adults alike.
With just a few ingredients and no oven required, this is the ultimate last-minute Halloween treat. It’s a fun, festive, and completely foolproof recipe that’s perfect for getting little monsters involved in the kitchen. Get ready for some delicious brain food!

Why You’ll Love This Recipe
- No-Bake & Incredibly Easy: A classic, foolproof recipe with a spooky twist, ready in minutes.
- Festive & Fun: The brain shape and gory drizzle make them perfect for Halloween.
- Kid-Friendly: A fun project for kids to help shape and decorate, and a treat they’ll love to eat.
- Perfect Party Food: Makes a batch, is easy to serve, and always gets a reaction.
Ingredients
- 6 cups Rice Krispies Cereal
- 1 (10 oz) bag Mini Marshmallows
- 4 tablespoons Unsalted Butter
- 1/2 teaspoon Vanilla Extract
- Pinch of Salt
- Red Decorating Gel Icing or Seedless Raspberry Jam, slightly warmed
Step-by-Step Instructions
- Prep: Line a large baking sheet with parchment paper. Lightly grease your hands with butter or cooking spray – you’ll need this for shaping!
- Melt Marshmallows: In a large pot or Dutch oven, melt the butter over low heat. Add the mini marshmallows and stir continuously until they are completely melted and smooth.
- Add Flavor: Remove the pot from the heat. Stir in the vanilla extract and the pinch of salt.
- Combine: Immediately add the Rice Krispies cereal to the pot. Gently fold everything together with a greased spatula until the cereal is evenly coated in the marshmallow mixture.
- Shape the Brains: Let the mixture cool for just a minute or two until it’s safe to handle but still warm and pliable. Scoop out about 1/3 cup of the mixture. With greased hands, gently shape it into an oval. Use the handle end of a greased spoon or your finger to make a slight indentation down the center lengthwise, creating two distinct halves like a brain. Place the shaped brain on the prepared parchment paper. Repeat with the remaining mixture.
- Decorate: Once all the brains are shaped and slightly cooled, take the red decorating gel or slightly warmed seedless raspberry jam and drizzle it into the center indentation and randomly over the “brain” to create a bloody effect.
- Set and Serve: Let the treats cool completely at room temperature until firm, about 30-60 minutes, before serving.
Tips & Variations
- Pro Tip: Work quickly while the Rice Krispie mixture is still warm, as it becomes difficult to shape once it cools down. Keep your hands well-greased!
- Gentle Shaping: Don’t compress the mixture too tightly when shaping, or the brains will be hard instead of chewy.
- Pink Brains: Add a drop or two of red food coloring to the melted marshmallow mixture before adding the cereal for pink-tinted brains.
- Add Texture: Mix in 1/2 cup of mini chocolate chips after removing the pot from the heat for a chocolate chip brain variation.
Frequently Asked Questions (FAQ)
- How do I store these?
- Store the marshmallow brains in an airtight container at room temperature for up to 3 days. Keep layers separated with parchment paper to prevent sticking. Avoid refrigerating, as it can make them hard.
- My mixture is too sticky to handle! What do I do?
- Make sure your hands are well-greased. If it’s still unmanageable, let the mixture cool for another minute or two before trying again.
- Can I make these ahead of time?
- Yes, these are a great make-ahead treat. You can prepare them a day in advance of your party.
Serving Suggestions
- Arrange these spooky Rice Krispies Treat Brains on a festive platter for a Halloween party. They are a perfect grab-and-go dessert that requires no plates or forks and adds a fun, creepy touch to your spread.

Rice Krispies Brains
Turn ordinary Rice Krispies Treats into creepy, squishy brains for your next Halloween party! These fun no-bake treats are quick to make, delightfully eerie, and perfect for both kids and adults. Add edible red ‘blood’ streaks for an extra spooky touch!
Ingredients
Equipment
Method
- Line a large baking sheet with parchment paper or a silicone baking mat. Set aside.
- In a large saucepan, melt the butter over low heat. Add marshmallows and stir until completely melted and smooth.
- Once melted, add red food coloring to achieve a light pink hue. Keep in mind the color will lighten once mixed with the cereal.
- Remove the saucepan from heat and stir in the Rice Krispies until fully coated with the marshmallow mixture.
- Using an ice cream scoop or 1/4 cup measure sprayed with non-stick spray, scoop portions onto the prepared baking sheet. Shape each mound into a slightly oblong circle to resemble a brain.
- Use the handle of a butter knife to create a deep groove down the center of each brain. Gently push the two sides closer together to enhance the shape.
- Mix a few drops of red food coloring with a tiny bit of water in a bowl. Use a clean paintbrush to streak or splatter ‘blood’ across the brains. Let set completely before serving.
- Allow the brains to cool and firm up before serving. Store in an airtight container at room temperature for up to one week.
Notes
Pro Tip: Use gel food coloring for a vibrant pink hue that holds its color. If desired, drizzle with strawberry syrup for an even gorier look!
Storage: Keep in an airtight container at room temperature for up to 1 week.
Customization: Make one giant Rice Krispies brain for a fun Halloween centerpiece!
Storage: Keep in an airtight container at room temperature for up to 1 week.
Customization: Make one giant Rice Krispies brain for a fun Halloween centerpiece!

