There are certain recipes that just feel like home, you know? For me, stuffed peppers are one of those dishes that instantly transport me back to my childhood dinner table. My mom made these every other week when I was growing up, and now I find myself doing the exact same thing for my own family. It’s funny how that works.
I’ve been making stuffed bell peppers for years now, and I’ve tweaked my mom’s original recipe just enough to make it my own while keeping all those nostalgic flavors intact. These stuffed peppers with ground beef and rice are the perfect combination of hearty, comforting, and surprisingly easy to put together. Plus, they make your kitchen smell absolutely amazing while they’re baking — Jason always knows when I’m making these because he can smell them from the driveway!
The best part? These are one of those meals where you can prep ahead, customize for different tastes (Emma likes hers without the green peppers, Lucas will eat anything with cheese on top), and feel good about serving something that’s actually nutritious. Let’s talk about how to make the best stuffed peppers you’ve ever had.

Why You’ll Love This Stuffed Peppers Recipe
I make these at least twice a month, and here’s why they’re such a hit in our house:
- They’re incredibly forgiving: Seriously, stuffed peppers are one of those recipes where you can’t really mess up. Too much rice? That’s fine. Extra cheese? Even better. They’re flexible and always delicious.
- Perfect for meal prep: I’ve discovered that these are actually better the next day after all the flavors have had time to hang out together. I’ll make a big batch on Sunday and we’ll eat them throughout the week.
- Everyone can customize their own: This is huge when you have picky eaters. I put out different toppings — sour cream, extra cheese, hot sauce — and everyone makes their pepper exactly how they want it. Game changer for family dinners.
- They freeze beautifully: I always make extra to stash in the freezer for those nights when I just cannot deal with cooking. Future me is always grateful.
- Surprisingly kid-friendly: Even though they’re vegetables stuffed with more vegetables (kind of), the cheese and familiar flavors make these a winner with kids. Lucas calls them “pepper boats” and thinks they’re the coolest thing ever.
Ingredients You’ll Need for Stuffed Bell Peppers
The ingredient list is pretty straightforward, and you probably have most of these hanging around your kitchen already:
For the peppers:
- 4-6 large bell peppers (any color works — I mix red, yellow, and orange for a pretty presentation)
- 1 tablespoon olive oil
For the filling:
- 1 pound ground beef (I use 85/15 for flavor, but leaner works too)
- 1 medium onion, diced
- 3-4 cloves garlic, minced
- 1 can (14.5 oz) fire-roasted diced tomatoes (trust me, the fire-roasted makes a difference)
- 1 cup cooked rice (white, brown, or even cauliflower rice work great)
- 1½ cups shredded cheese, divided (cheddar, mozzarella, or pepper jack)
- 1 tablespoon paprika
- 1 teaspoon dried oregano
- 1 teaspoon dried basil
- Salt and pepper to taste
- Optional: 1 jalapeño pepper, finely diced (for a little kick)
For serving:
- Fresh parsley, chopped
- Red pepper flakes (optional)
- Sour cream (our family favorite topping)
A few notes on ingredients:
The fire-roasted tomatoes are worth seeking out at the store. They add this amazing smoky depth that regular diced tomatoes just can’t match. I learned this after years of making these with regular tomatoes and wondering why they tasted just… fine.
For the bell peppers, I’ve found that the red, yellow, and orange ones are slightly sweeter and less bitter than green peppers. Emma refuses to eat green peppers (she says they taste “too vegetable-y”), so I usually skip them. But if you grew up on green stuffed peppers like I did, go for it! They’re traditional and delicious in their own right.
Here’s a money-saving tip: I save the tops of the peppers (minus the stems) and dice them up to cook with the onions. Nothing goes to waste, and it adds even more pepper flavor to the filling!
How to Make Stuffed Peppers (Step-by-Step)
I’m breaking this down into super manageable steps because the first time I made these, I got a bit overwhelmed trying to do everything at once.
Preparing Your Bell Peppers
Step 1: Preheat your oven to 425°F. I know it seems hot, but this temperature gives you perfectly tender peppers with a slight char on the edges — so good!
Step 2: While the oven heats, bring a large pot of water to boil. You want enough water to completely submerge your peppers.
Step 3: Wash your bell peppers and cut off the tops (about ½ inch down). Save those tops! Pull out all the seeds and membranes from inside — I use my hands, but a spoon works too.
Step 4: If your peppers won’t stand upright, slice a tiny bit off the bottom to create a flat base. Just be careful not to cut through to the inside or your filling will leak out (I learned this the hard way).
Step 5: Blanch the peppers in boiling water for 5 minutes. This softens them slightly so they cook evenly in the oven. Set them in a lightly oiled 9×13 baking dish while you make the filling.
Pro tip: Some recipes skip the blanching step, and honestly, you can too if you’re short on time. Just add 10-15 minutes to the baking time and cover the dish with foil for the first 20 minutes.
Making the Beef and Rice Filling
Step 1: Chop up those pepper tops (toss the stems) and dice your onion. Heat a tablespoon of olive oil in a large skillet over medium heat.
Step 2: Add the onion and chopped pepper tops to the skillet. Cook for about 5 minutes until they’re soft and starting to get a little golden. This is where your kitchen starts smelling incredible.
Step 3: Add the minced garlic and cook for just one minute — until it’s fragrant but not burned. Burned garlic is bitter (I’ve done it more times than I’d like to admit), so watch it carefully.
Step 4: Push the vegetables to the side of the pan and add your ground beef. Break it up with a wooden spoon and cook until it’s browned all the way through, about 6-8 minutes. I like to drain off most of the excess fat at this point — just tilt the pan and spoon it out.
Step 5: Stir in the fire-roasted tomatoes (with their juice), cooked rice, paprika, oregano, basil, and a good pinch of salt and pepper. Let everything simmer together for 3-4 minutes so the flavors can get friendly.
Step 6: Remove from heat and stir in about ¾ cup of the shredded cheese. The residual heat will melt it into the filling. Taste and adjust the seasonings — this is your chance to make it perfect!
Stuffing and Baking
Step 1: Spoon the beef mixture into each pepper, packing it in gently. Don’t be shy — fill them all the way to the top! I usually have a little extra filling, which I either stuff into one more pepper or just bake in a ramekin alongside the peppers (cook’s treat!).
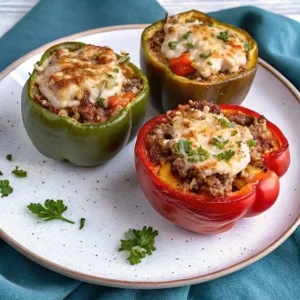
Step 2: Top each stuffed pepper with the remaining shredded cheese. Be generous here — nobody ever complained about too much cheese.
Step 3: Bake uncovered for 15-20 minutes, until the cheese is melted and bubbly and the peppers are tender when you pierce them with a fork.
Step 4: Let them cool for about 5 minutes before serving. I know it’s hard to wait, but trust me — the first time I didn’t wait, I burned the roof of my mouth so badly I couldn’t taste anything for two days.
Tips for Perfect Stuffed Peppers Every Time
After making these countless times (and making pretty much every possible mistake), here’s what I’ve learned:
Cook your rice ahead of time: This is huge. I either make rice the night before or use leftover rice from another meal. If you try to make it while you’re prepping everything else, you’ll feel rushed and stressed.
Choose peppers that sit flat: Test them in your baking dish before you start cooking. Wobbly peppers are annoying to fill and even more annoying when they tip over in the oven (speaking from experience).
Don’t overstuff: I know, I just told you to be generous, but there’s a limit. If you pack them too tightly, the filling can push out the bottom or the pepper won’t cook evenly.
Add a little water to the baking dish: I pour about ¼ cup of water in the bottom of the pan. This creates steam and helps the peppers cook evenly without drying out.
Customize the heat level: Jason and I like things spicy, so I add a diced jalapeño to the filling. The kids get theirs from a pepper where I’ve left out that section of filling. It works perfectly.
Make it even easier: Sometimes I skip blanching the peppers entirely and just bake them longer (covered with foil) at 375°F for about 45 minutes, then uncover and bake 10 more minutes. It’s more hands-off and the peppers get super soft.
Variations and Substitutions
One of the things I love most about stuffed peppers is how adaptable they are:
Different proteins: Ground turkey, chicken, or pork all work beautifully. I’ve even made these with crumbled Italian sausage and they were incredible. For a vegetarian version, try black beans and quinoa — I promise it’s delicious.
Grain alternatives: Swap the rice for quinoa, farro, or even riced cauliflower. Just make sure it’s cooked before you add it to the filling.
Different cheeses: Mozzarella gives you that amazing cheese pull, cheddar adds sharpness, pepper jack brings heat, or do a Mexican blend for more complexity.
Make them Mexican-style: Use taco seasoning instead of Italian herbs, add black beans and corn to the filling, and top with pepper jack cheese and cilantro.
Greek-inspired: Mix in some feta cheese, spinach, and dill. Top with more feta and a dollop of tzatziki when serving.
Serving Suggestions
These stuffed peppers are pretty complete on their own, but here are some sides that work really well:
A simple green salad with a tangy vinaigrette helps cut through the richness. I usually throw together some mixed greens, cherry tomatoes, cucumber, and a lemon vinaigrette.
Garlic bread is always a hit in our house. Lucas uses it to scoop up any filling that falls out of his pepper.
Roasted vegetables on the side make it feel like a complete meal. I’ll often roast some zucchini and carrots alongside the peppers.
For toppings, we always have sour cream, hot sauce, and extra cheese on the table. Sometimes I’ll dice up an avocado too.
Storage and Reheating
In the refrigerator: Store leftover stuffed peppers in an airtight container for up to 4-5 days. They actually taste better the next day, which makes them perfect for meal prep.
Freezing: These freeze beautifully! I wrap each pepper individually in plastic wrap, then put them all in a freezer bag. They’ll keep for 2-3 months. To reheat, thaw in the fridge overnight and bake at 350°F for about 20 minutes, or microwave until heated through.
Reheating: The microwave works fine (about 2-3 minutes on high), but I prefer reheating them in the oven at 350°F for 15-20 minutes. The peppers stay firmer and the cheese gets melty again.
Frequently Asked Questions
Can I make these ahead of time? Absolutely! You can stuff the peppers completely, cover them tightly with plastic wrap, and refrigerate for up to 24 hours before baking. Just add 5-10 minutes to the baking time since they’ll be cold from the fridge.
Do I have to blanch the peppers first? Nope! It’s a step I usually do because it ensures evenly cooked peppers, but you can skip it and just bake them longer. Cover the dish with foil and bake at 375°F for 45 minutes, then uncover and bake 10 more minutes.
What if I don’t have fire-roasted tomatoes? Regular diced tomatoes work fine, or you can use tomato sauce. You’ll just miss out on that smoky flavor. You could add a tiny bit of smoked paprika to make up for it.
Can I use uncooked rice? I don’t recommend it. Uncooked rice won’t cook properly in the time it takes to bake the peppers, and you’ll end up with crunchy rice. Always use pre-cooked rice.
My peppers are watery — help! This usually happens if there’s too much liquid in your filling. Make sure to drain your tomatoes well (or use less liquid), and don’t add extra water to the filling itself. A little water in the pan is fine, but not in the filling.
How many peppers per person? I usually plan for 1-2 peppers per adult and 1 per child, depending on the size of the peppers and what else you’re serving. This recipe makes 4-6 peppers, which serves our family of four perfectly with one pepper left over.
The Best Stuffed Peppers Recipe
Ingredients
Method
- Preheat oven to 425°F. Bring a large pot of water to a boil. While the oven heats, cut the tops off the bell peppers and remove seeds and membranes. If necessary, trim the bottoms of the peppers to make them stand upright. Blanch peppers in boiling water for 5 minutes, then set aside in an oiled baking dish.
- Heat olive oil in a large skillet over medium heat. Add diced onion and chopped pepper tops, cooking for 5 minutes until soft. Add minced garlic and cook for 1 minute until fragrant. Push vegetables to the side and add ground beef. Brown the beef, breaking it apart with a spoon for 6-8 minutes. Drain excess fat if necessary.
- Stir in fire-roasted tomatoes, cooked rice, paprika, oregano, basil, salt, and pepper. Simmer for 3-4 minutes, allowing flavors to meld together. Stir in ¾ cup of shredded cheese, allowing it to melt into the mixture.
- Spoon the beef mixture into the hollowed bell peppers, packing them gently. Top each pepper with the remaining cheese. Bake uncovered for 15-20 minutes, until cheese is melted and bubbly and peppers are tender when pierced with a fork.
- Let the stuffed peppers cool for 5 minutes before serving. Garnish with fresh parsley, red pepper flakes, and a dollop of sour cream if desired. Serve warm and enjoy!


